In the vast, beautiful and treacherous world of Death Stranding 2: On the Beach, your journey is defined by the weight you carry. Not just the cargo that connects a fractured society, but the very gear that keeps you moving forward. Your backpack isn’t merely a container; it’s your silent companion, your mobile base of operations, and the single most critical piece of equipment tethered to your survival. It dictates your balance, your stamina, your defense, and ultimately, your effectiveness as a Porter. Mastering its potential by outfitting it with the right
Backpack Attachments is not just an advantage, it’s an absolute necessity.
This guide is built to be your definitive resource for that mastery. We’re going to break down every single Component and Charm you can attach to your pack, from the humble extra battery to game changing stabilizers. We’ll cover exactly how to unlock them, what they do, and most importantly, how to combine them into strategic loadouts that will prepare you for any challenge the UCA throws your way. Forget fumbling through menus while a BT breathes down your neck; it’s time to build the ultimate delivery machine.
Table of Contents
Getting Started: How to Customize Your Backpack
Before you can start decking out your pack, you need to know where to go. Thankfully, the game makes it easy to access the customization menu, encouraging you to tinker with your setup often.
You can modify your backpack in two primary locations:
- Your Private Room: This is the most common and comprehensive spot. In any Private Room, whether it’s in a major Distribution Center or a simple Safe House, just walk over to the wall where your gear is hanging. Look for your backpack mounted on the wall, and interact with it (the ‘Square’ button on PlayStation) to open the full customization screen.
- The Fabrication Menu: At any delivery terminal where you can fabricate equipment, you can also access the backpack customization options directly from the menu. This is perfect for making quick adjustments before heading out on a new delivery, especially after you’ve just unlocked a new piece of gear.
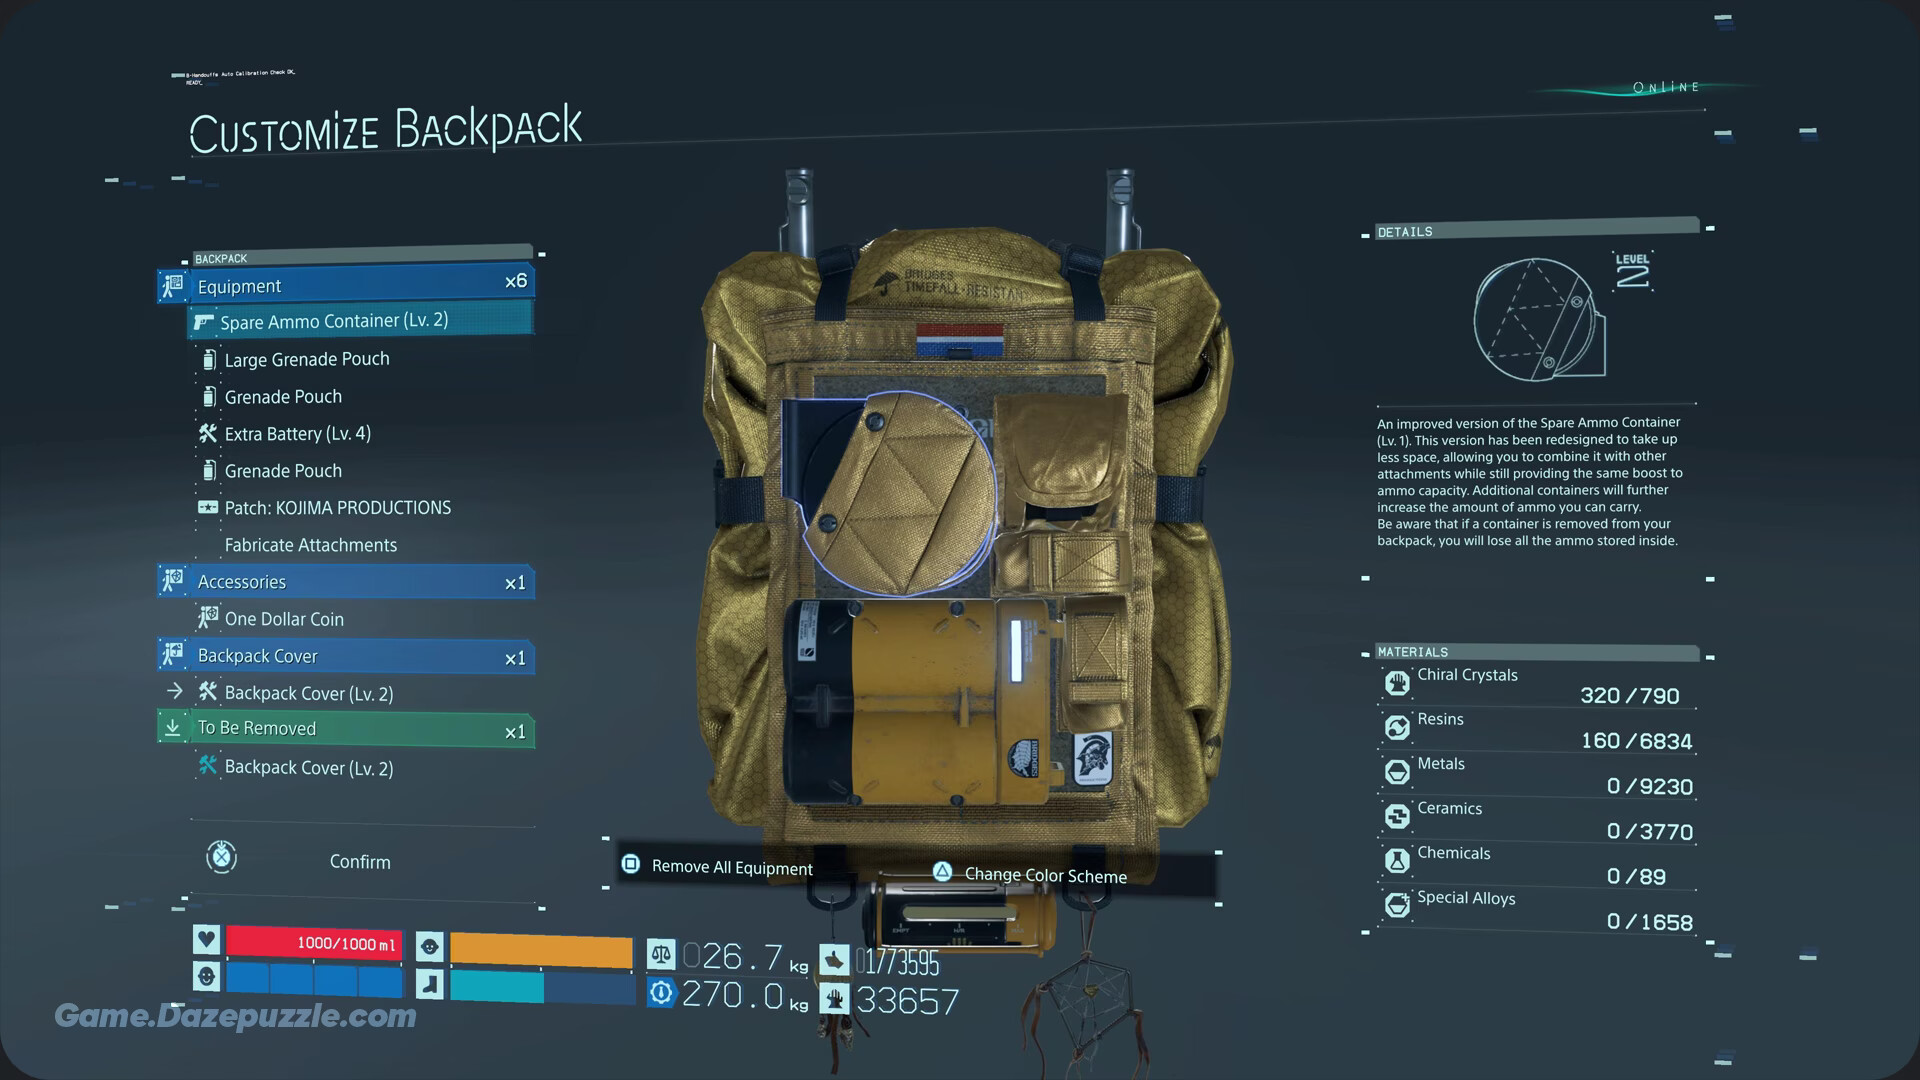
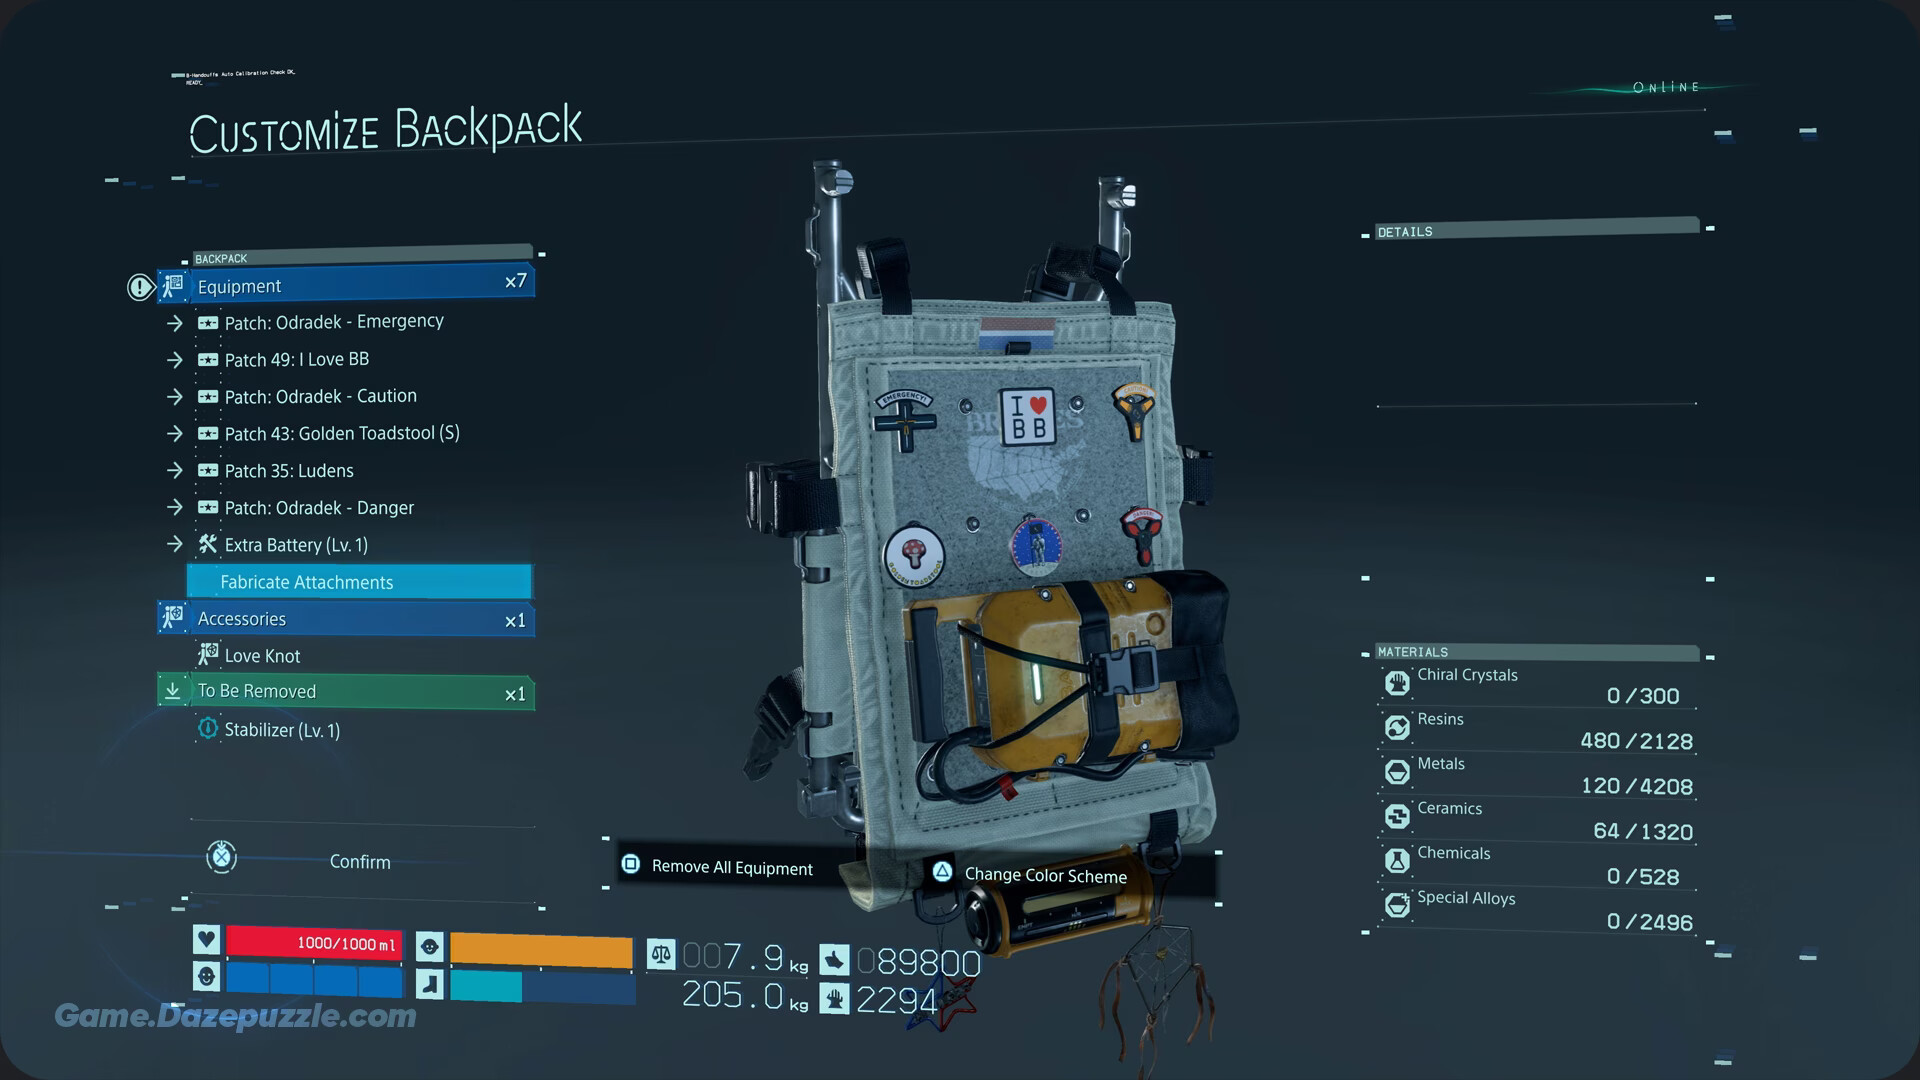
While you’re there, you’ll notice options for Colors and Patches. New colors are unlocked by increasing your connection level with The Artist, giving you some aesthetic flair. Patches are small cosmetic badges, with most being rewarded for achieving a 5-star connection with different Preppers across the world. They’re a great way to show off your accomplishments, but our main focus is on the functional upgrades: Components and Charms.
The Heart of Your Pack: Components vs. Charms
Your functional backpack attachments are divided into two crucial categories: Components and Charms (also called Accessories). Understanding their distinct roles is key to building an effective loadout.
- Components are the workhorses. These are tangible, buildable modules that offer direct, practical upgrades to Sam’s abilities. Think extra battery life, more ammo storage, or armor plating. They take up space on your backpack’s grid, and many can be stacked or upgraded to higher levels for increased effectiveness.
- Charms are unique, one of a kind items that hang from your backpack, providing subtle, passive bonuses. You can’t craft them; they are gifted to you by specific characters as a reward for building your connection with them. A key limitation is that you can only equip one Charm at a time, making your choice a significant strategic decision.
In short: Components are for raw performance enhancement, while Charms offer specialized, situational perks.
All Backpack Components and How to Get Them
Components are the foundation of any serious Porter’s loadout. They are essential for adapting to the diverse environments and hostile encounters in Death Stranding 2. Prioritizing the right Components for a mission can be the difference between a smooth S-Rank delivery and a catastrophic failure.
Below is a comprehensive table of every Component, its effect, and exactly how to unlock the fabrication plan.
| Component | Effect | How to Obtain | Notes/Upgrades |
|---|---|---|---|
| Component | Effect | How to Obtain | Notes/Upgrades |
| Backpack Cover Lv1 | Protects cargo from Timefall and prevents it from shifting during falls/impacts. | Reach Level 2 with The Fisherman (via side order 116 from Eastern Distribution Center F5). | Essential for preserving cargo. |
| Backpack Cover Lv2 | More durable than Lv1. | Reach Level 4 with The Fisherman (via side order 116 from Eastern Distribution Center F5). | Improved durability for longer protection. |
| Back Protector | Reduces damage from bullets from behind. Breaks after taking enough damage. | Complete main order 9 (Connect Government’s Base to Chiral Network). | Armor for rear defense. |
| Chiral Anti Gravity Device | Reduces the overall weight of the backpack, increasing Sam’s max carry capacity. | Reach Level 2 with The Government’s Base (via main order 9). | Equipping multiple units increases the weight reduction. |
| Electric Shock Absorber | Reduces damage from electrical attacks. Absorbs energy from incoming attacks to charge Sam’s battery. | Reach Level 2 with the Western Environmental Observatory (via main order 10 from the Government’s Base). | A unique counter against electrical foes. |
| Extra Battery Lv1 | An additional battery to power Sam’s field suit. | Connect Heartman’s Lab to the Chiral Network (via main order 23 from The Dowser). | Multiple units stack for more total battery capacity. |
| Extra Battery Lv2 | Superior capacity to Lv1 while being the same size. | Reach Level 2 with Heartman’s Lab (via main order 23 from The Dowser). | A significant power boost for the same space. |
| Extra Battery Lv3 | Superior capacity to Lv2 while being the same size. | Reach Level 3 with Heartman’s Lab (via main order 23 from The Dowser). | An even bigger power boost. |
| Extra Battery Lv4 | Same capacity as Lv3 but takes up less space. | Reach Level 4 with Heartman’s Lab (via main order 23 from The Dowser). | The most space efficient high capacity battery. |
| Grenade Pouch | Stores one throwable weapon, protecting it from Timefall. | Complete main order 9 (Connect Government’s Base to Chiral Network). | Avoids carrying grenades as cargo. |
| Large Grenade Pouch | Stores three throwable weapons, protecting them from Timefall. | Reach Level 4 with The Ghost Hunter (via side order 109 from The Chronobiologist). | Increased grenade storage capacity. |
| Small Extra Battery | A miniaturized version of the extra battery to power Sam’s field suit. Low capacity. | Reach Level 3 with Rainbow Valley (via main order 14 from West Fort Knot). | Can be equipped when space is tight; multiple units provide extra power. |
| Solar Generator | Uses solar energy to charge Sam’s battery. | Reach Level 2 with Rainbow Valley (via main order 14 from West Fort Knot). | More effective during the day; less so at night/in rain. Equipping multiple units increases charge speed. |
| Extra Ammo Pouch | Stores extra ammunition for weapons. Small size. | Complete main order 9 (Connect Government’s Base to Chiral Network). | Increases Sam’s ammo capacity. |
| Large Extra Ammo Pouch Lv1 | Significantly increases ammo capacity. | Reach Level 3 with The Government’s Base (via main order 9). | Further boosts Sam’s ammo capacity. |
| Large Extra Ammo Pouch Lv2 | Same capacity as Lv1 but takes up less space. | Reach Level 4 with The Government’s Base (via main order 9). | The most space efficient high capacity ammo storage. |
| Stabilizer Lv1 | A battery powered balance recovery unit; activates automatically. Increases overall battery capacity. | Reach Level 2 with the Eastern Environmental Observatory (via main order 38 from The Adventurer). | Helps prevent falls and provides a battery boost. |
| Stabilizer Lv2 | Functionally identical to Lv1, but takes up less space. | Reach Level 3 with the Eastern Environmental Observatory (via main order 38 from The Adventurer). | More space efficient balance and battery boost. |
| Stabilizer Lv3 | Functionally identical to Lv2, with added thrusters to soften the impact of jumps from great heights. | Reach Level 4 with the Eastern Environmental Observatory (via main order 38 from The Adventurer). | Improved fall protection. |
| Utility Pouch | Stores four blood bags, protecting them from Timefall. | Reach Level 3 with the Northern Environmental Observatory (via main order 16 from West Fort Knot). | Avoids carrying blood bags individually. |
| Auto Revive Device | Automatically revives Sam if he loses consciousness. Requires a cooldown after each use. | Reach Level 4 with The Motherhood (via main order 26 from The Data Scientist). | Crucial for survival in dangerous encounters. |
Strategic Use of Components
Simply having these components isn’t enough; you need to tailor your loadout. For combat-heavy missions against MULEs or Terrorists, prioritize the
Back Protector and Extra Ammo Pouches. For long, arduous treks across the wilderness, focus on
Extra Batteries, Solar Generators, and a Stabilizer. If you’re carrying fragile or time-sensitive cargo, the
Backpack Cover is non negotiable.
Pay close attention to space management. Higher-level versions of components, like the Extra Battery Lv4 or Stabilizer Lv2, often provide better or identical effects in a smaller package, making them incredibly valuable upgrades.
If you are new to this game, you need to read our Death Stranding 2 Beginner’s Guide
All Backpack Charms and Their Effects
Charms provide unique, passive buffs that can subtly but significantly alter your gameplay experience. Since you can only equip one at a time, your choice should reflect the immediate challenge you’re facing.
Here is a list of all known Charms and how to earn them.
| Charm | Effect | How to Obtain | Notes |
|---|---|---|---|
| Charm | Effect | How to Obtain | Notes |
| Bell | Wards off evil, making it easier to escape from Gazers and Catchers. Also said to prevent the momentary power-down of batteries when entering a BT zone. | Reach Level 4 with the Northern Environmental Observatory (via main order 16 from West Fort Knot). | Excellent for BT-infested areas. |
| Boxing Kangaroos | Fills you with a fighting spirit, allowing you to deal more damage with your melee attacks. | Reach Level 4 with Distribution Center South F2 (via Northern Environmental Observatory in main order 19). | Enhances close quarters combat. |
| Chiral Tea | Increases stamina when attached to the backpack. | Reach Level 2 with The Chronobiologist (via main order 14 from West Fort Knot). | Useful for long journeys and challenging terrain. |
| Cryptobiote | Makes Cryptobiotes less wary of Sam, reducing the likelihood of them fleeing as he approaches. | Connect The Chronobiologist to the Chiral Network (via main order 31 from East Fort Knot). | Facilitates easier Cryptobiote collection. |
| Electrobiote | Your battery lasts slightly longer with this charm attached to your backpack. | Reach Level 4 with Rainbow Valley (via main order 14 from West Fort Knot). | A small, passive boost to battery life. |
| Love Knot | Porters who are generous with their Likes are said to appear. | Reach Level 3 with The Chronobiologist (via main order 14 from West Fort Knot). | Enhances interaction with the Social Strand system. |
| The Porter | Allows you to see the location of other NPC Porters when looking at your map. | Gifted by The Bokka in Mexico after reaching Connection Level 4 with him (via finding lost cargo near Ciudad Nudo del Norte (C1)). | Improves awareness of shared cargo/potential help. |
| The Koka | Animals are less likely to flee if you have this charm attached to your backpack. | Reach Level 4 with The Animal Shelter (via main order 15 from Rainbow Valley). | Helpful for interacting with wildlife. |

Choosing the Right Charm
Think about your objective. Heading into a BT-heavy crater? The
Bell is your best friend. Planning to clear out a MULE camp the old-fashioned way? Equip the
Boxing Kangaroos for extra punch. Embarking on a marathon delivery across a mountain range? The
Chiral Tea will give you the stamina you need. This choice is all about adapting to the situation at hand.
The Key to Unlocks: How to Level Up Preppers Fast
As you’ve seen, the vast majority of backpack attachments are unlocked by increasing your Connection Level with the various Preppers and facilities across the UCA. Building these relationships is the core progression loop of the game. Here are the most effective strategies to earn Likes and raise those connection levels quickly:
- Prioritize Standard Orders: This is your bread and butter for earning Likes. When possible, deliver them by hand rather than using the DHV Magellan fast travel system, as manual deliveries yield much higher ratings and more Likes.
- Target Your Deliveries: Use the “Delivery/Report Destination” filter at the Ring Terminal to see all available orders heading to the specific Prepper you want to level up. This allows for focused, efficient grinding.
- Hunt for Lost Cargo: Recovering lost cargo is a fantastic way to earn a good chunk of Likes. A key tip is that cargo for a specific Prepper is usually found within 500-1000 meters of their location. Constantly use your Odradek scanner to ping for nearby packages.
- Clear Enemy Camps and BT Zones: These areas are often treasure troves of lost cargo for multiple Preppers. Clearing out the threat first allows you to safely and efficiently gather up all the valuable packages left behind.
- Utilize the Social Strand System: Don’t have time to deliver a piece of lost cargo? Entrust it at a Private Locker for other players to deliver. You’ll still passively receive Likes over time. Also, always check the “Shared Cargo” tab at terminals for packages left by other players that are destined for the Prepper you’re working on.
Advanced Porter Techniques: Mastering Your Loadout
Once you have the attachments, you can elevate your game by mastering the physics and tactical decisions of backpack management.
- The Art of Weight Distribution: A poorly balanced pack will cause Sam to constantly stumble, draining stamina and risking damage to your precious cargo. The golden rule is to place the heaviest items low and centered on Sam’s back to maintain a stable center of gravity. Always keep an eye on the weight indicator; if it’s in the yellow or red, you’re asking for trouble.
- Strategic Layout: While the “auto arrange” function is convenient, manually organizing your cargo is superior for tactical play. Keep your mission critical delivery cargo in the main slots. Use pouches like the Grenade and Utility Pouch for quick access to consumables in a fight, saving you from frantically navigating menus while under attack.
- Protecting Your Cargo: Timefall is the constant enemy of your cargo containers. A Backpack Cover is your best proactive defense. Always carry at least one can of Container Repair Spray for reactive repairs on the go to prevent damage to the contents inside.
- Knowing When to Drop the Pack: Sometimes, the most tactical move is to temporarily ditch your backpack. Without it, Sam is significantly faster, quieter, and presents a smaller target, making it ideal for stealth or intense combat. You can drop your cargo in a safe spot, clear out a hostile area, and then return to pick it up, ensuring it remains in pristine condition for an S-Rank delivery.
Synergies: Combining Your Gear for Maximum Effect
Your backpack attachments don’t exist in a vacuum. They create powerful synergies with Sam’s other equipment. Powering an active exoskeleton like the Battle or Boost Skeleton drains your battery fast. By loading your pack with
Extra Batteries or a Solar Generator, you dramatically extend their operational time, making tough fights or long sprints far more manageable. This same principle applies to Power Gloves, which also consume battery power. Think of your entire loadout as a single, integrated system to truly maximize your efficiency.
Becoming the Ultimate Porter
Mastering your backpack is to master the art of the delivery in Death Stranding 2. It’s a dynamic system that rewards preparation, strategic thinking, and a willingness to adapt. By understanding the role of each Component and Charm, focusing on your Prepper connections, and applying advanced management techniques, you transform your backpack from a simple container into the ultimate tool for reconnecting the world. So get out there, experiment with your loadouts, and enjoy the journey. Keep on keeping on.
Thanks for keeping up with Game.Dazepuzzle.com