Arthur Morgan’s life is a constant struggle for cash. Every job, every robbery, every piece of loot feels like a drop in an empty bucket. But what if I told you there’s a secret out there? A hidden path to wealth so immense it could solve every single one of the Van der Linde gang’s problems and make Arthur Morgan a king?
Welcome, partner, to the ultimate treasure hunt. We’re not talking about pocket watches or small bounties today. We’re talking about gold bars. Solid, gleaming bars of pure gold, each worth a king’s ransom of $500 at any Fence. And the world of Red Dead Redemption 2 is hiding a lot of them.
This guide is your personal treasure map to every last one. Forget scraping by; we’re going on an adventure that will make you a legend. By following this guide, you are on a path to uncover a staggering fortune worth over $8,000. With that kind of money, you can buy every weapon, every upgrade, every fancy outfit, and single handedly fund the entire camp without breaking a sweat.
So grab your horse and saddle up. It’s time to find some gold!
You might also like this: How to Make Money Fast In RDR2 Story Mode
What’s In Our All Gold Bar Locations in RDR2
Part 1: The Lone Bars – Quick and Easy Gold
Before we dive into complex maps and puzzles, let’s start with the easy pickings. These are gold bars hidden in specific locations that you can ride to right now for a quick and massive injection of cash.
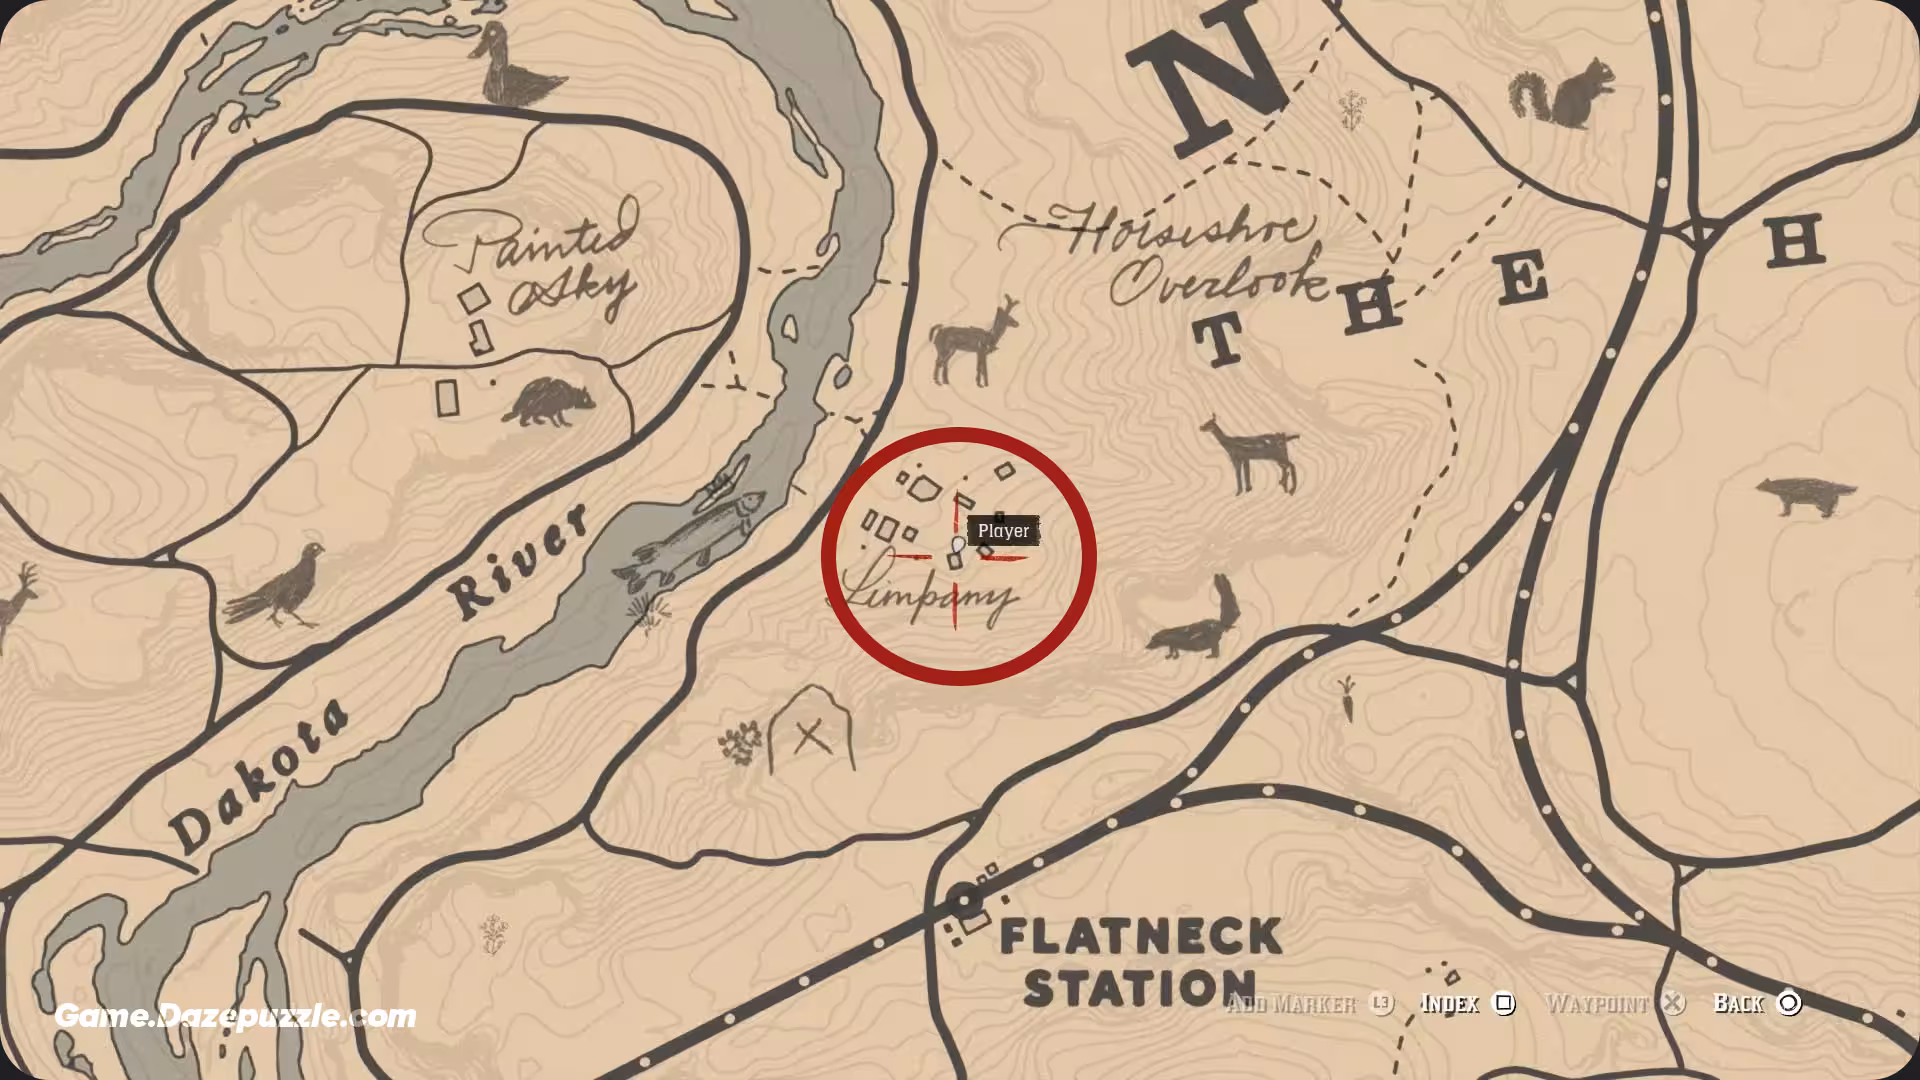
The Limpany Gold Bar
This is the most famous and easily accessible gold bar in the game, practically a gift from the developers.
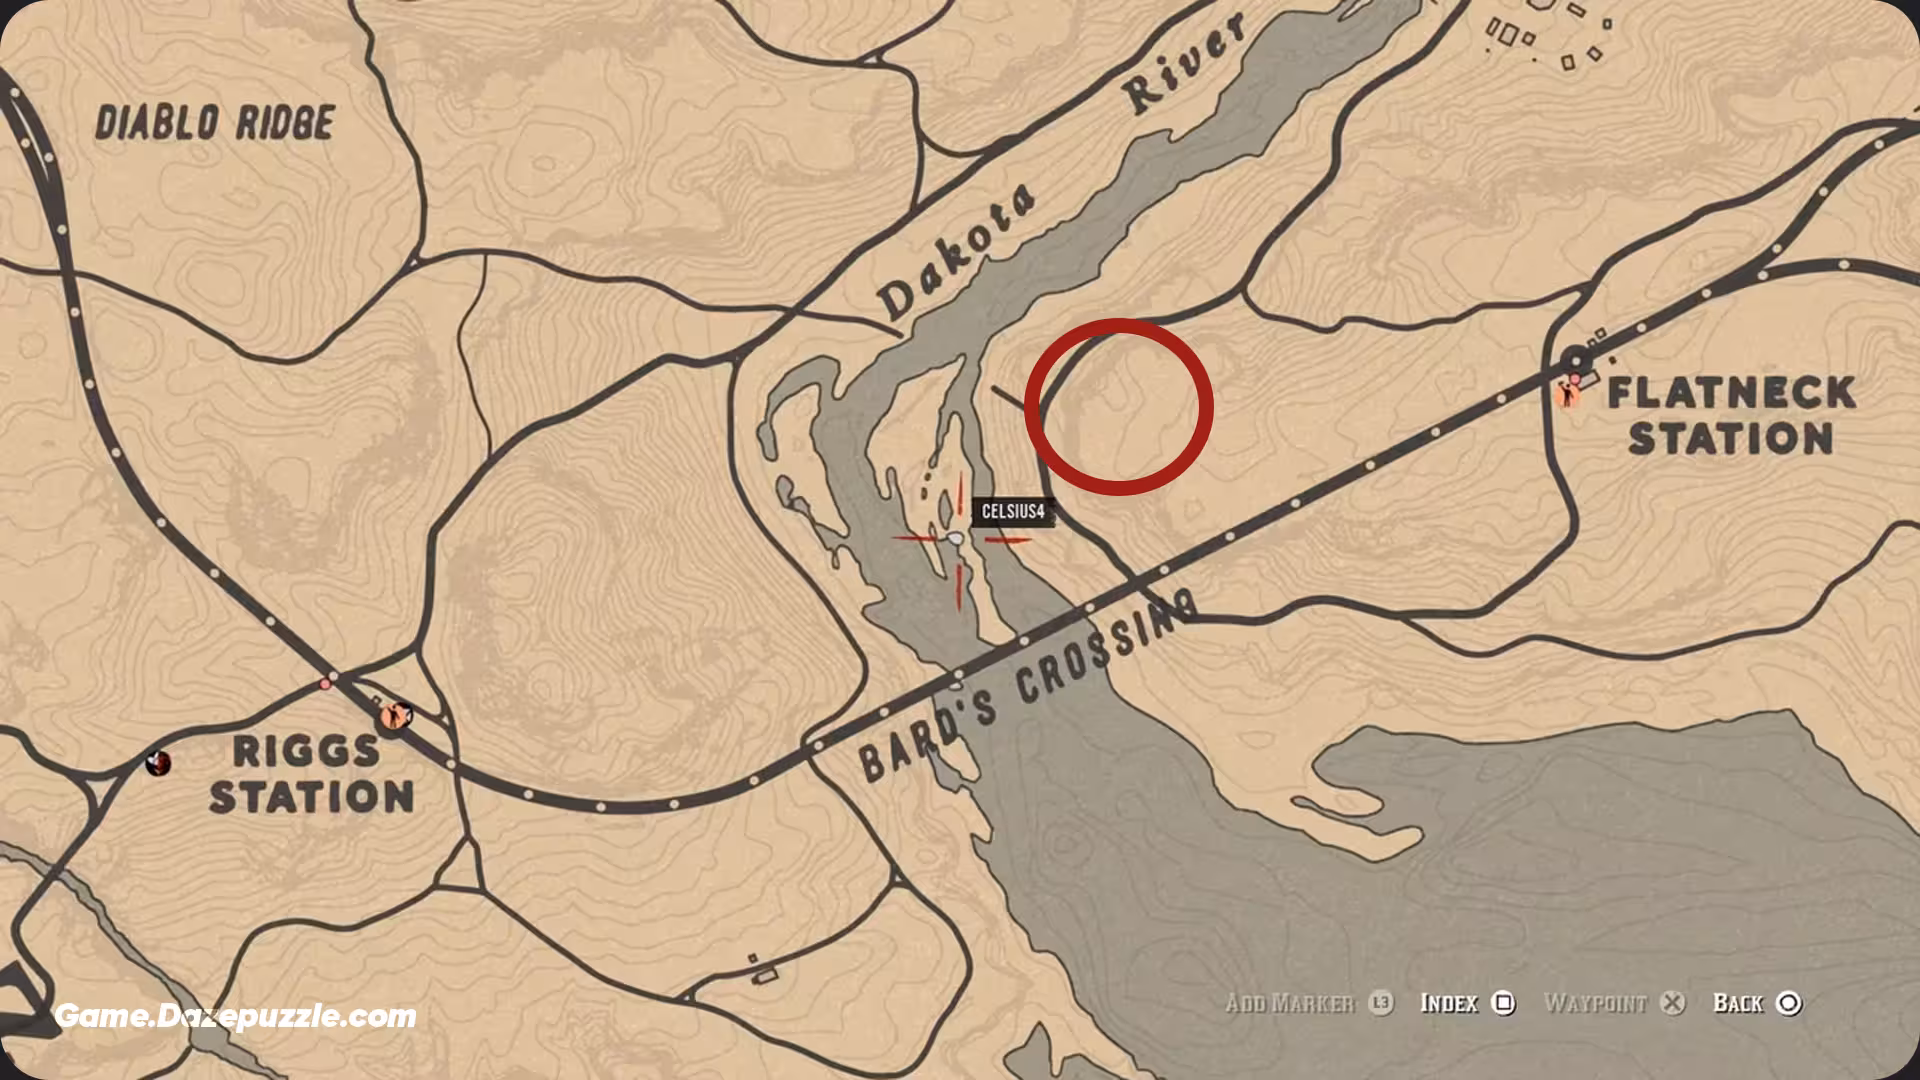
- Location: Find the burned down, abandoned town of Limpany. It’s just a short ride southwest of Valentine, directly across the Dakota River from Flatneck Station.
- Walkthrough: Amidst the charred ruins, locate the old Sheriff’s office. It’s one of the few buildings still somewhat standing. Walk inside, go behind the main desk, and look down. You’ll find a lockbox hidden there. Open it up to claim your very first gold bar. Easy as that.
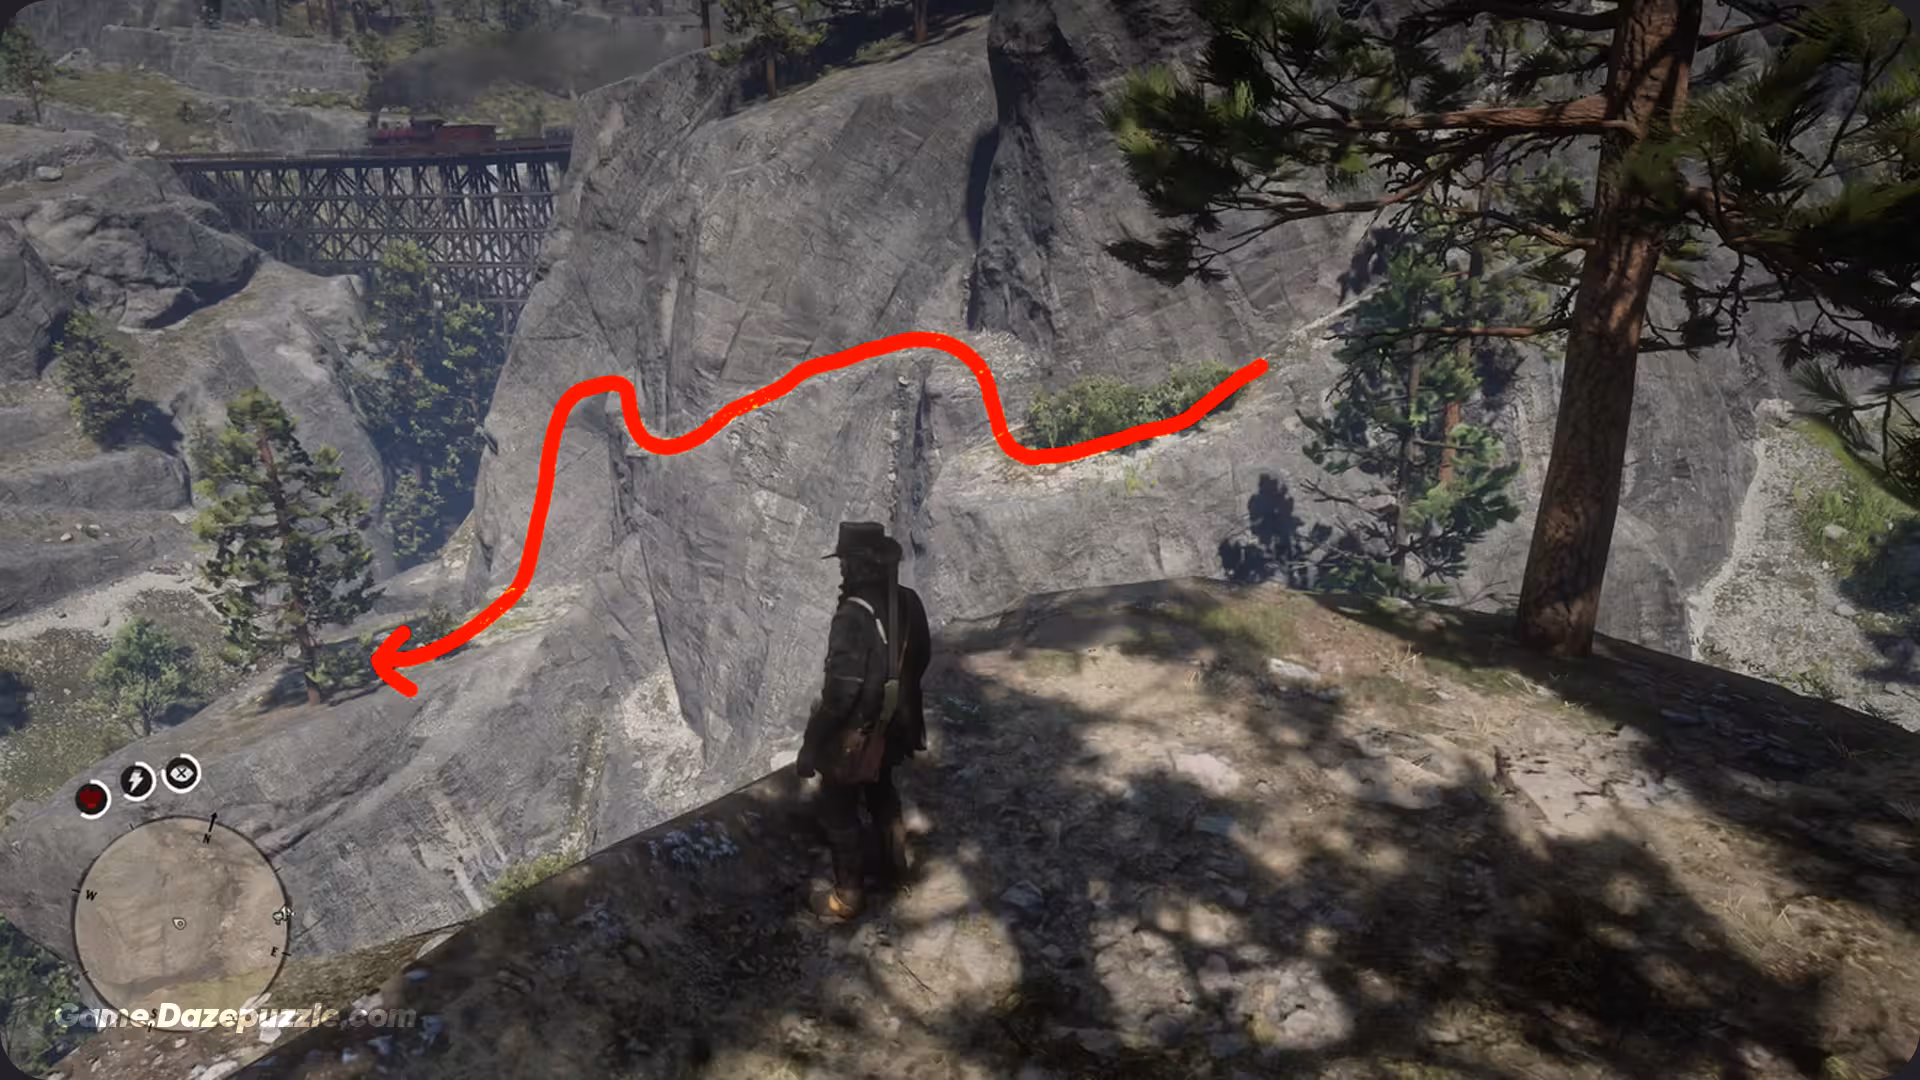
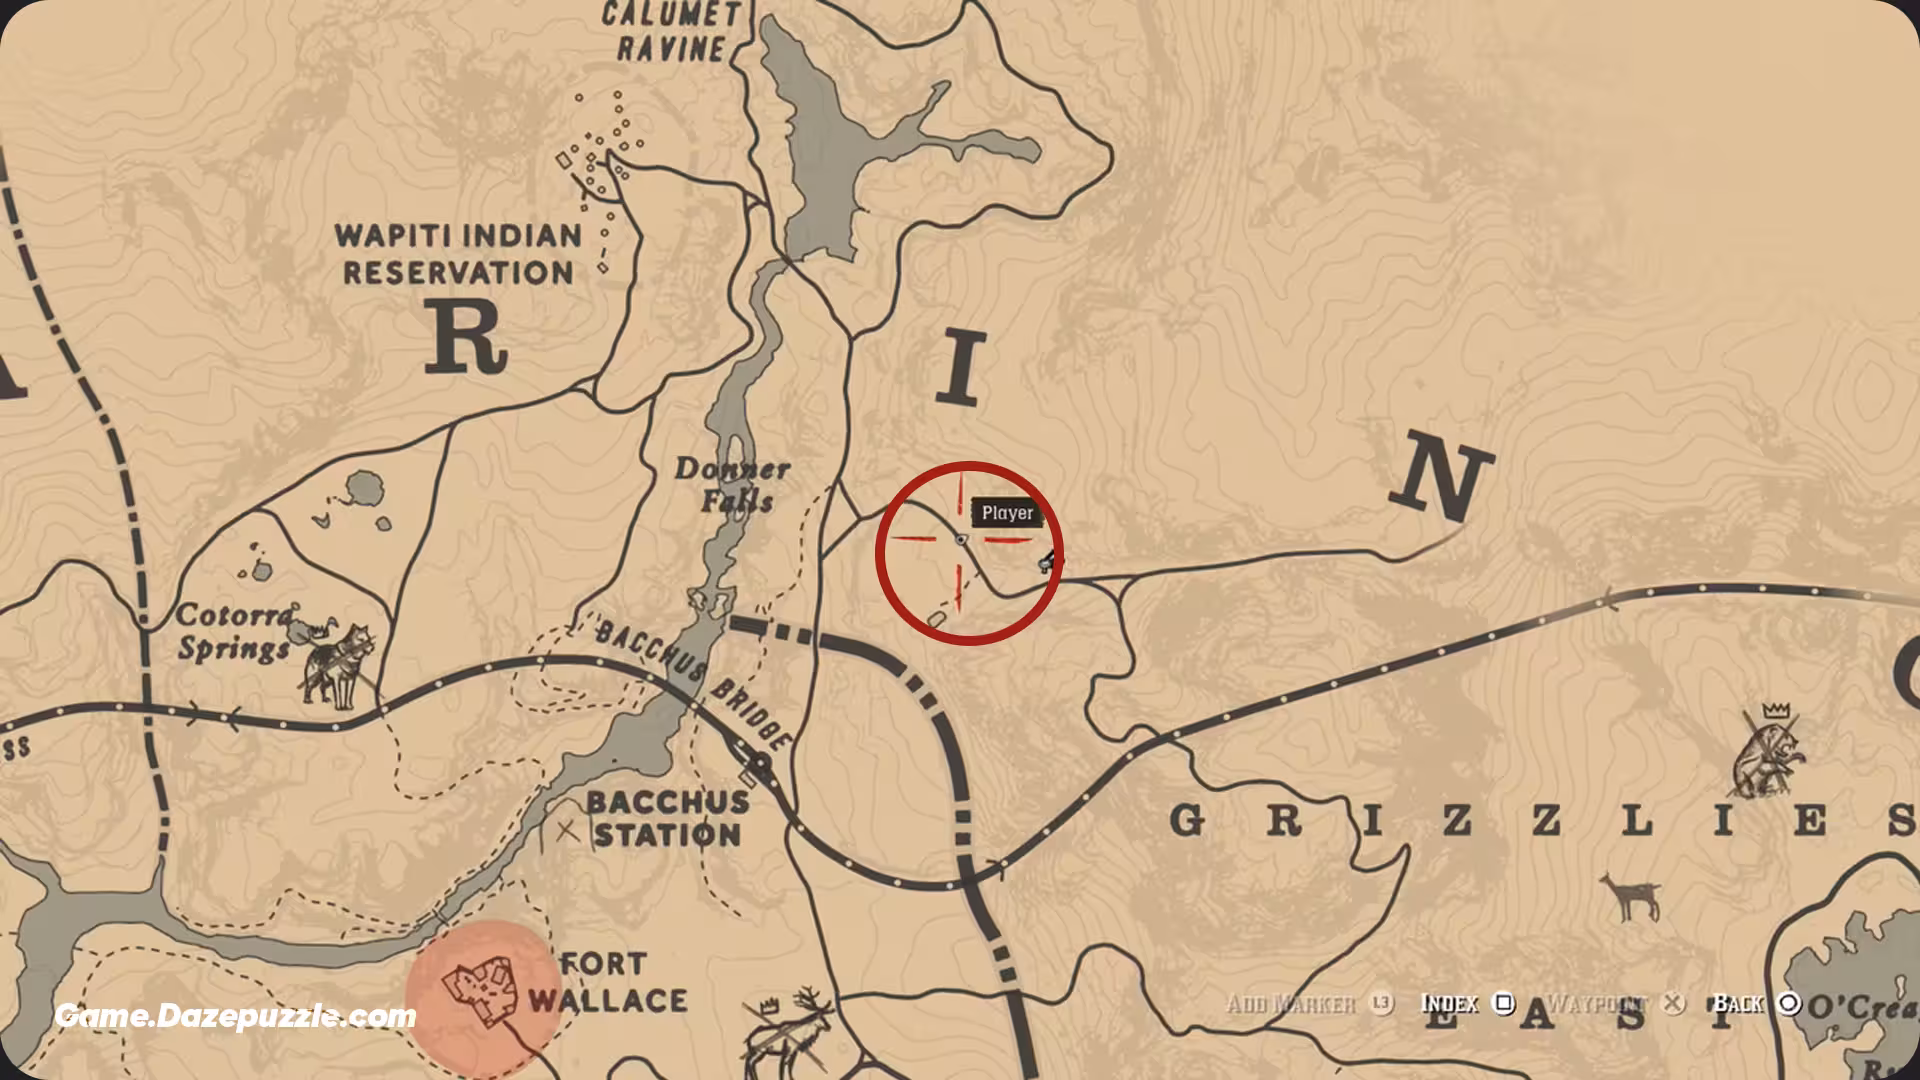
The Derailed Train Treasure (2 Gold Bars)
This is a slightly more challenging but very rewarding find, netting you two gold bars at once.
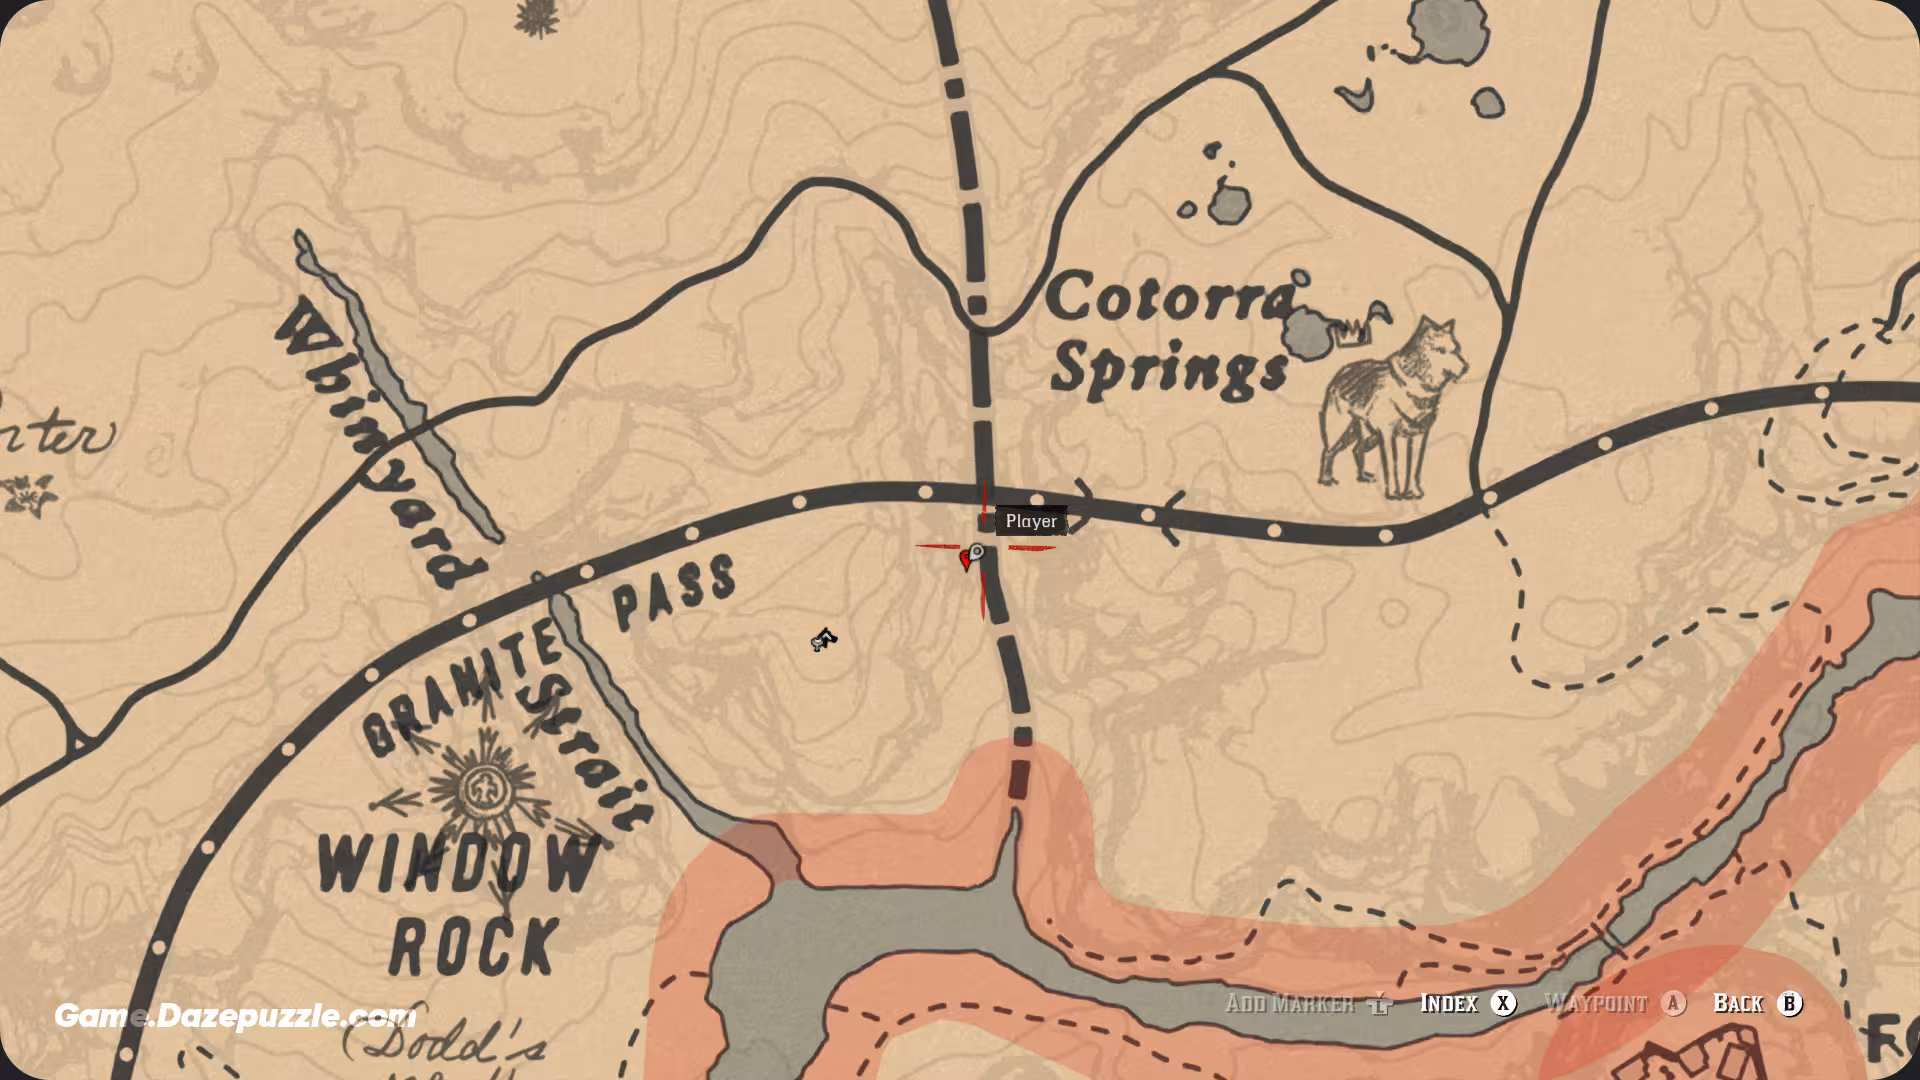
- Location: Head north into the mountains of Ambarino. You’re looking for the ravine under the bridge at Cotorra Springs. The bridge itself is part of the railway line that runs east of the “I” in “Ambarino” on your map.
- Walkthrough: Down in the ravine, you’ll see a train wreck. One of the train cars is standing upright, perched precariously on the cliffside. You need to get inside it. On the side of the ravine opposite the train car, you’ll see a rock face. There’s a hidden path along a ledge you can use to climb up and around. It’s a bit of a tricky climb, so be careful not to fall. Once you make your way around the ledge, you can jump down into the vertical train car. Inside, you’ll find two shiny gold bars waiting for you.
A Quick Word of Warning (Major Story Spoilers Ahead!)
Hold up, partner. The next gold bar on our list is located in the direct aftermath of a major, fiery story mission in Chapter 3. To avoid having a critical plot point spoiled for you, we strongly recommend you stop reading here and come back later.
Only proceed if you have already completed the story mission titled “Blood Feuds, Ancient and Modern.”
The Braithwaite Manor Gold Bar
This bar only becomes available after you have completed the story mission “Blood Feuds, Ancient and Modern” in Chapter 3.
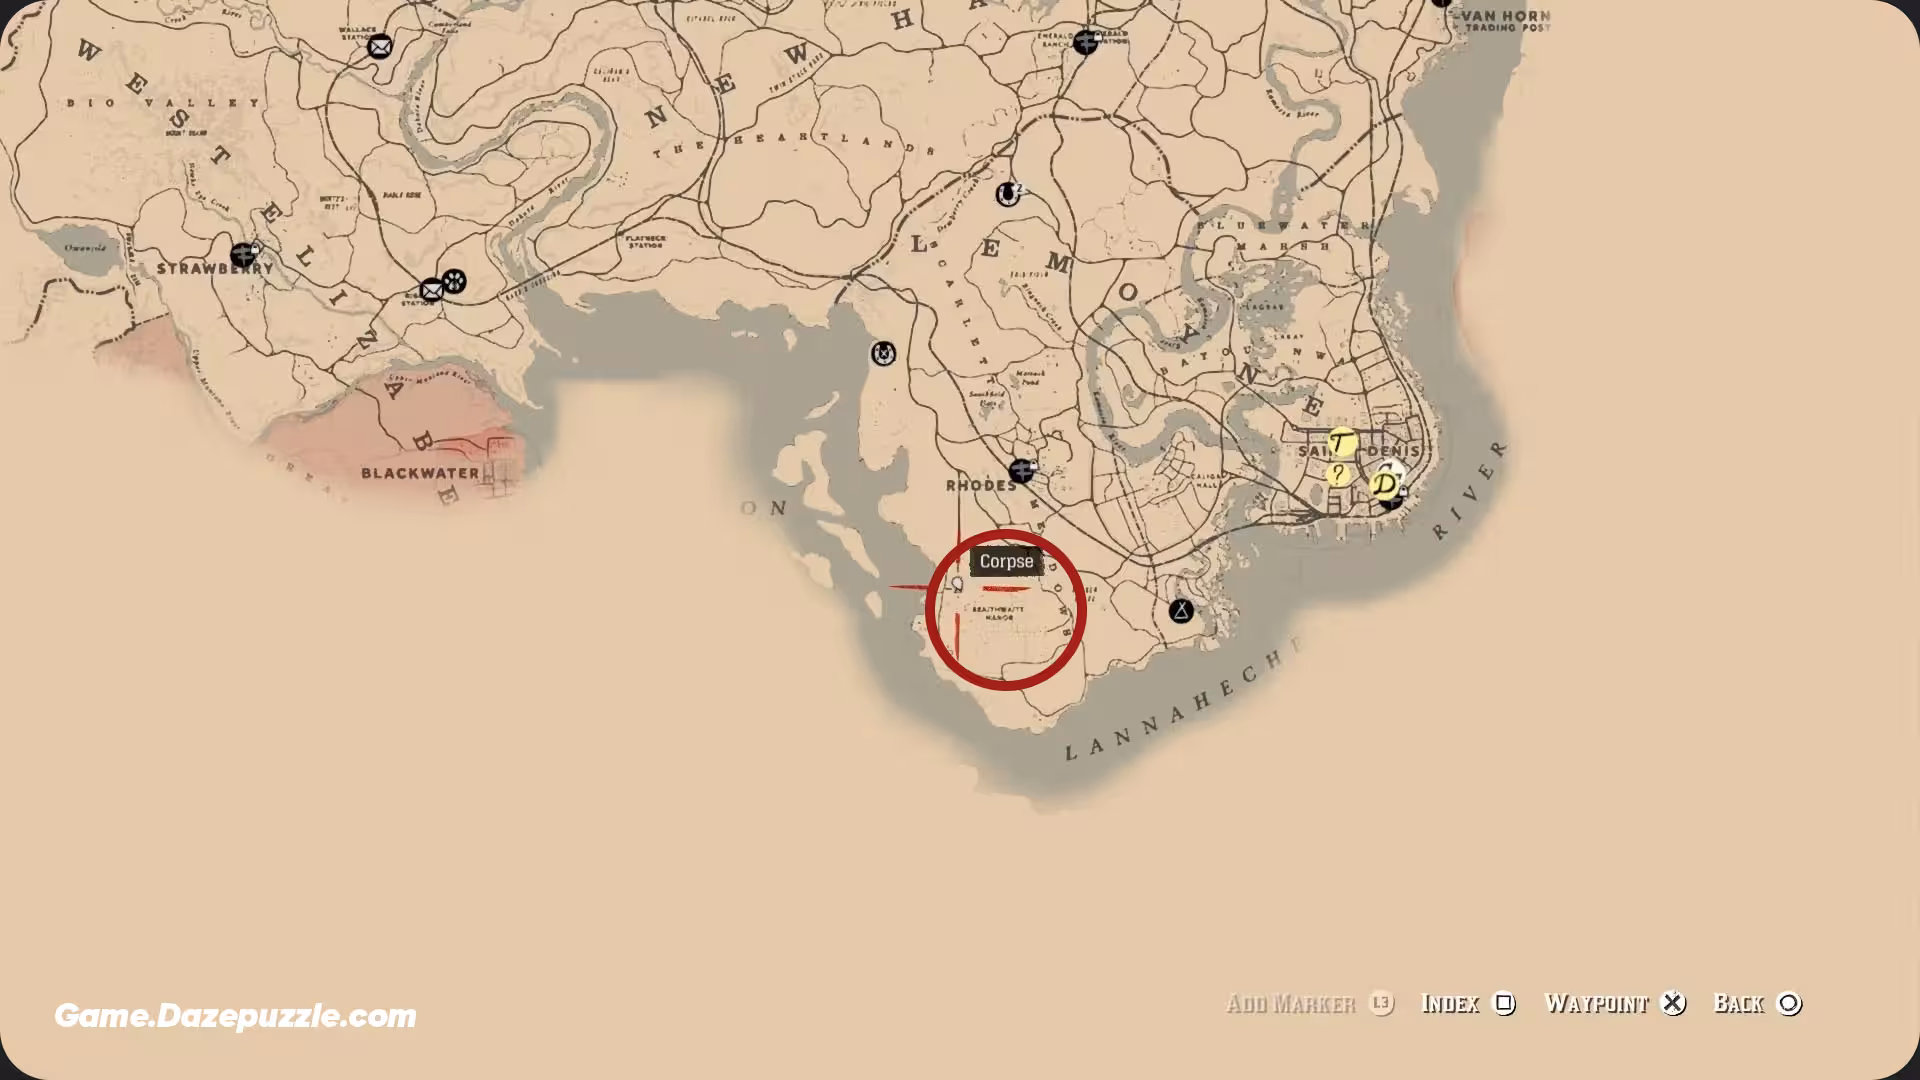
- Location: Braithwaite Manor, the large, opulent mansion south of Rhodes.
- Walkthrough: After the dramatic events of the mission, the manor will be a smoldering ruin. Return to it anytime after the mission is over. Go inside the main building and walk through the ashes until you find the room where Catherine Braithwaite’s body was. Just behind that spot, in a small alcove, you’ll find a lockbox. Inside is a single gold bar, the last remnant of the family’s once great fortune.
Part 2: The Strange Statues Puzzle (3 Gold Bars)
This treasure isn’t found with a map, but by solving a riddle. It’s one of the most unique and rewarding puzzles in the game.
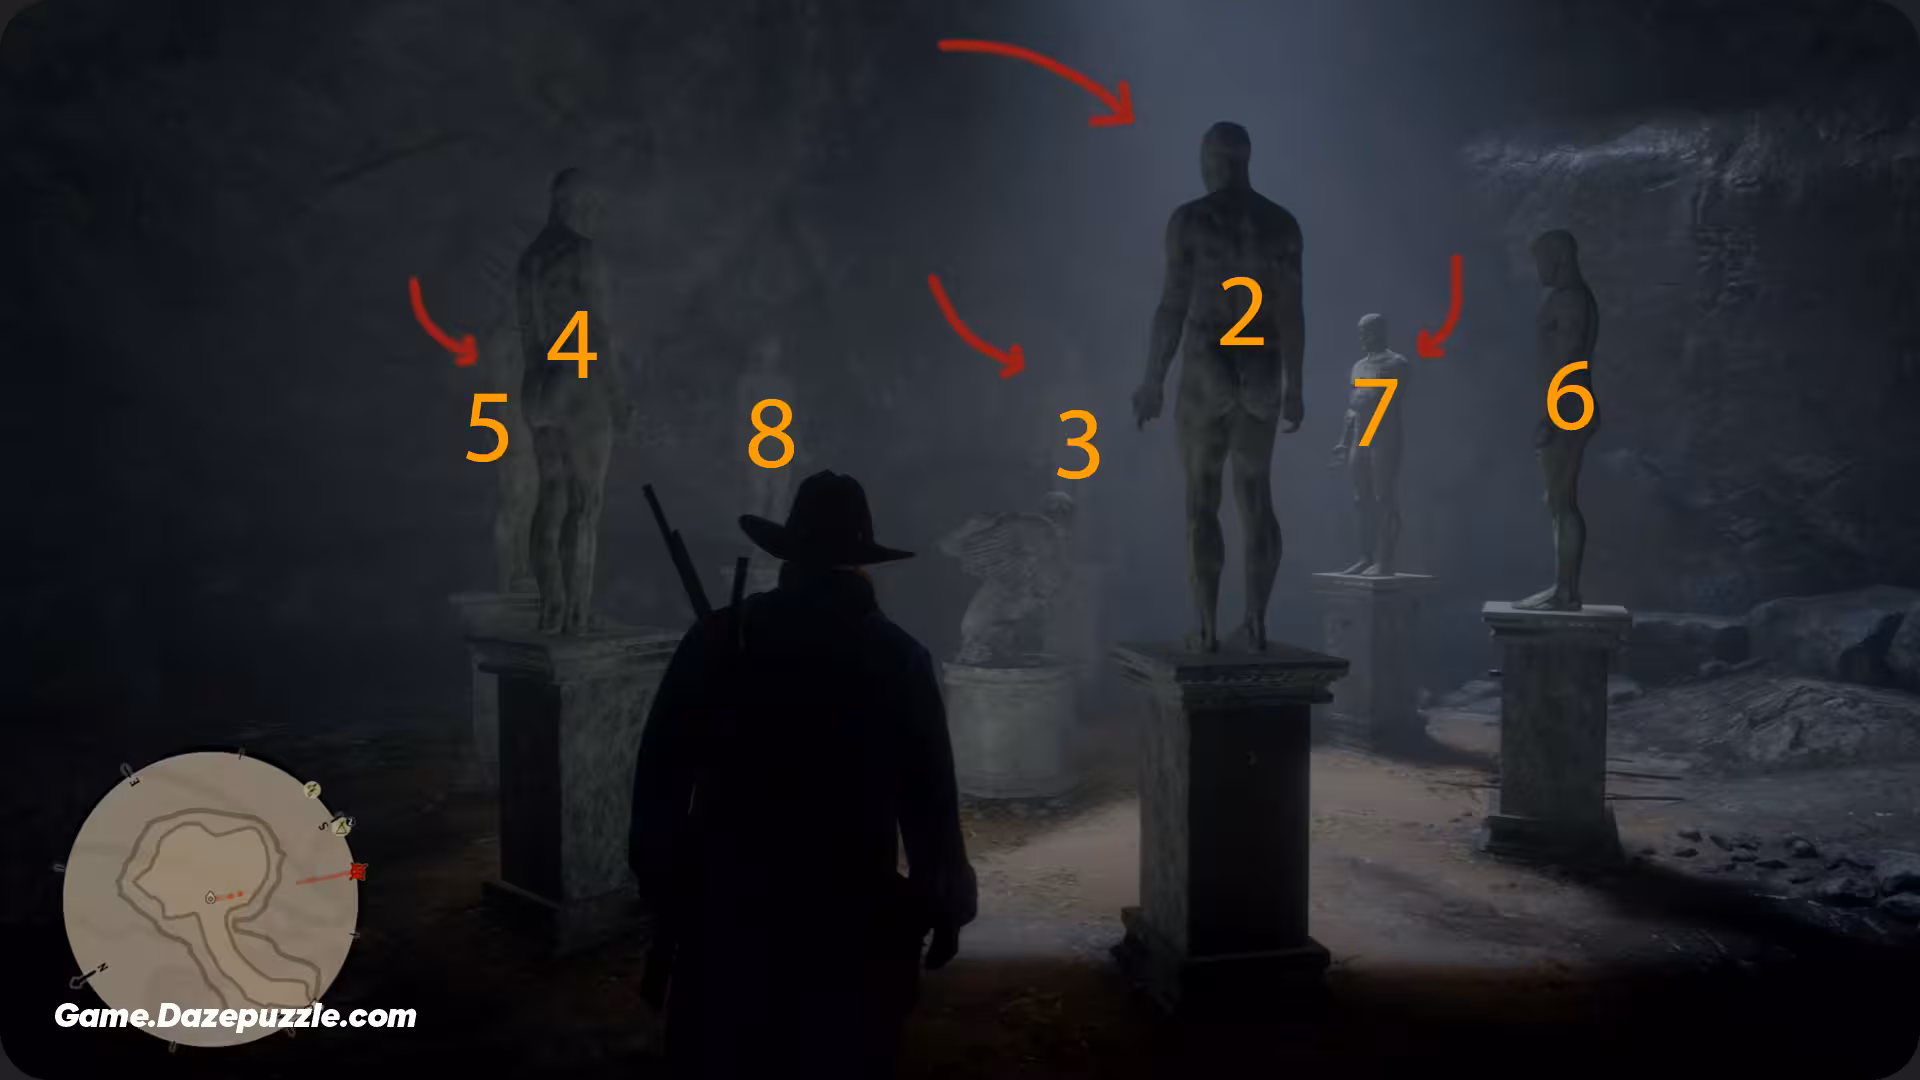
- Location: You are looking for a cave hidden in a rock face just northeast of Fort Wallace, slightly south of the “I” in “Ambarino.” From the road, you’ll see some strange paintings on the rock wall. The entrance to the cave is a narrow slit right in the middle of these rocks.
- The Puzzle: Inside, you will find a chamber with seven large, imposing statues of men arranged in a circle. In the center is a statue of an eagle. The puzzle is to press the buttons on the correct statues to unlock the compartment in the eagle statue. So, which ones are correct? The clue is the number of fingers on each statue’s hands.
- The Solution: The solution is based on prime numbers. Don’t worry, you don’t need to be a mathematician. Here is the answer: You need to press the buttons on the statues that have 2, 3, 5, and 7 fingers. (One of the statues is missing an arm, which would have given it 8 fingers, so ignore that one). Once you press the correct four buttons in any order, you’ll hear a grinding sound. Go to the central eagle statue, and you can now collect three gold bars from its hidden compartment.
Part 3: The Great Treasure Hunts
These are the grand adventures, multi step quests that require you to follow a series of maps to a final, glorious treasure.
The Jack Hall Gang Treasure (2 Gold Bars)
This is often the first treasure hunt players will complete.
How to Start: Find a stranger named Maximo on the cliffs overlooking the river northwest of Flatneck Station. Buy his treasure map for $10.
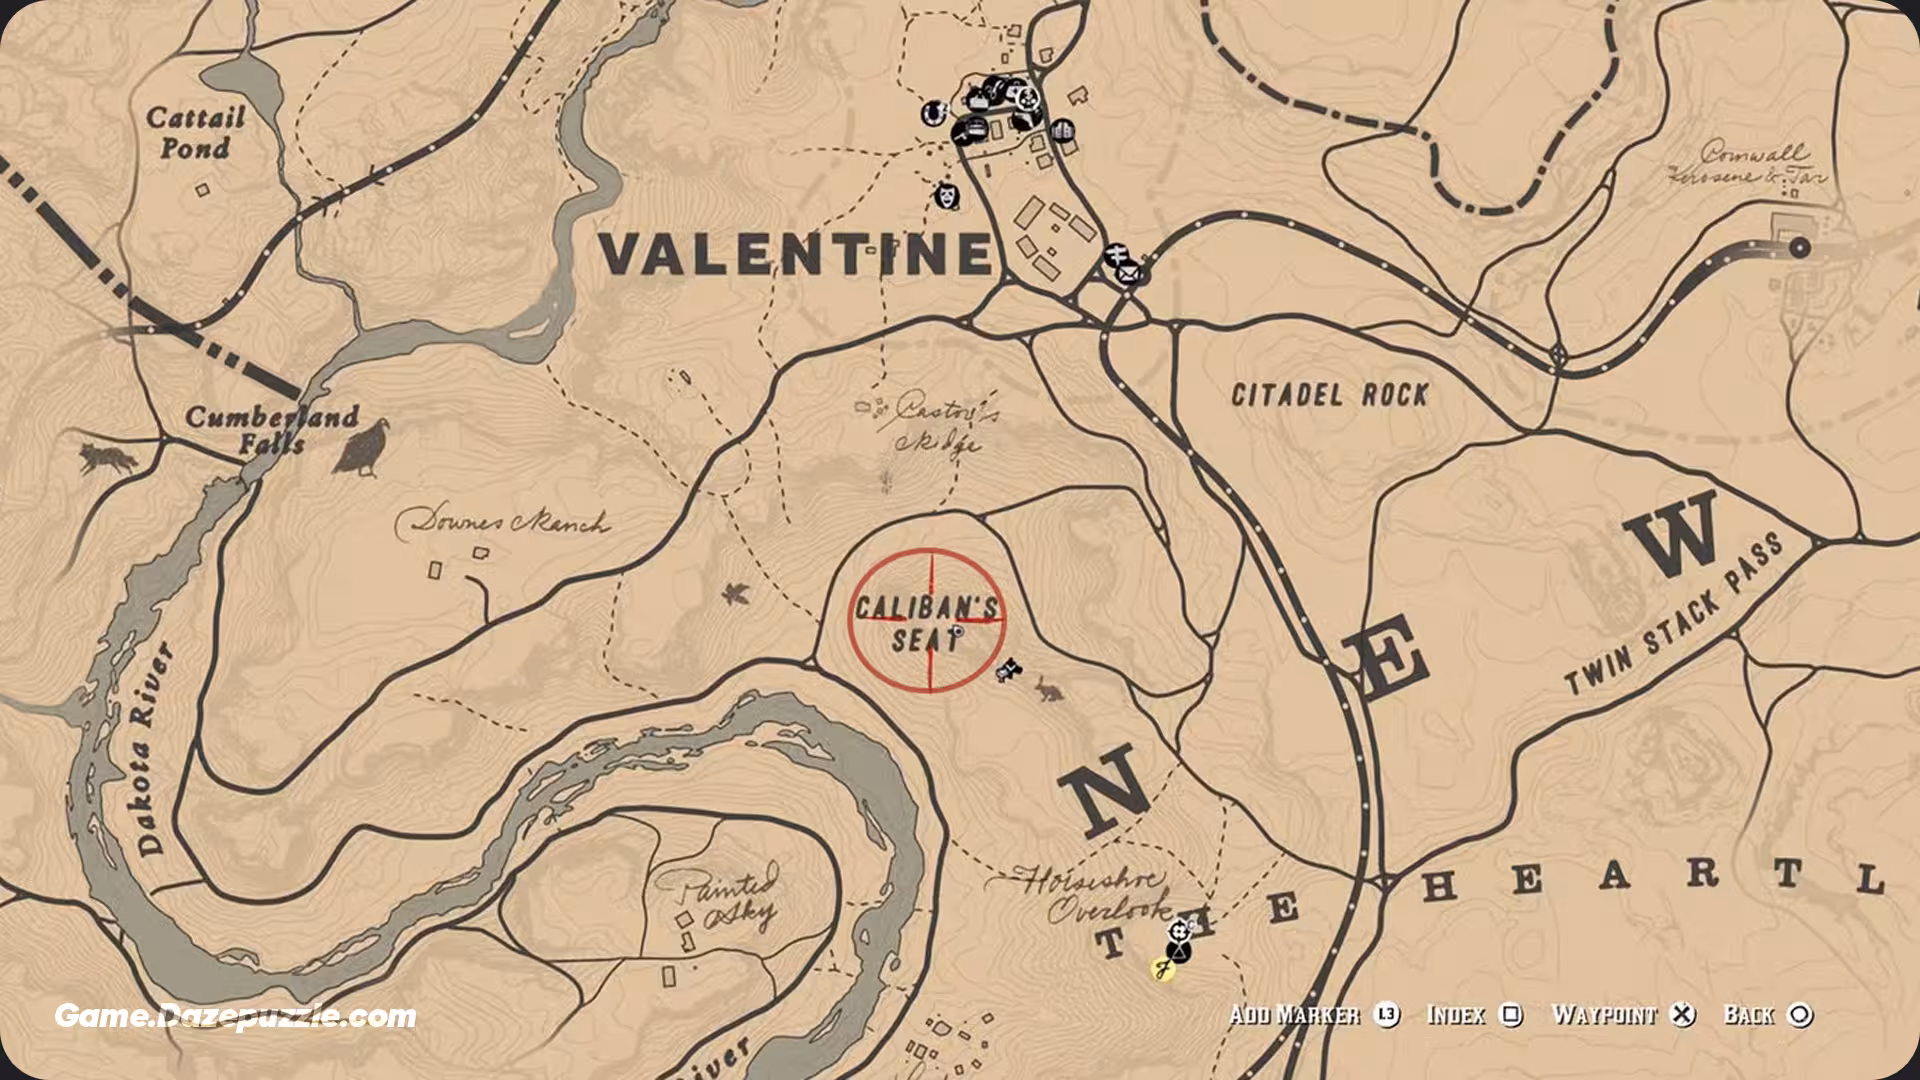
Clue 1: The first map points to Caliban’s Seat, a large rock formation just south of Valentine. Climb up the rock from the eastern side. You’ll need to follow a series of ledges down the face of the cliff. In a small crevice, you’ll find the second map.
Clue 2: The second map points to Cotorra Springs, the same area as the derailed train. This time, you’re looking for a unique stack of rocks. Search the base of the rock stack to find the third and final map.
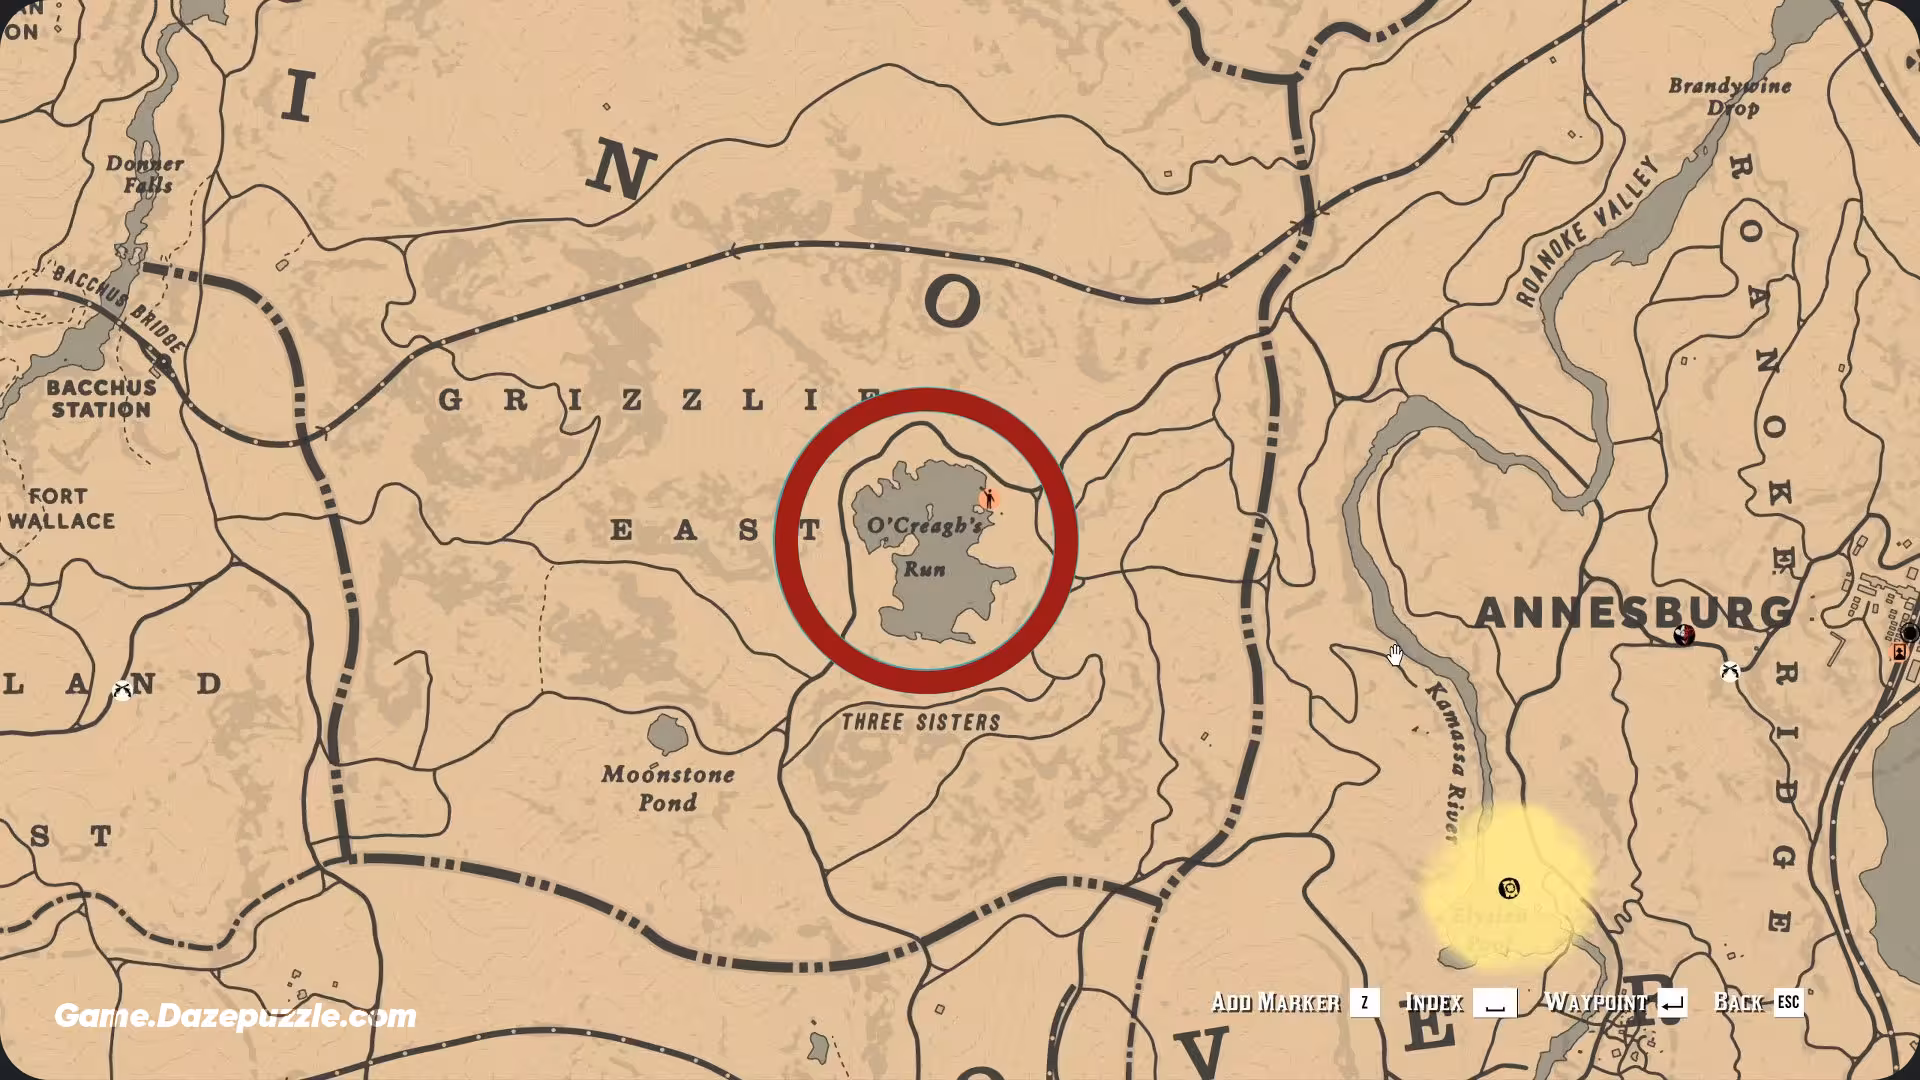
Final Treasure Location: The last map leads you to a small island in the middle of O’Creagh’s Run, a lake in the mountains of Grizzlies East. On the small, rocky island, look under a loose rock to finally claim your prize: two gold bars.
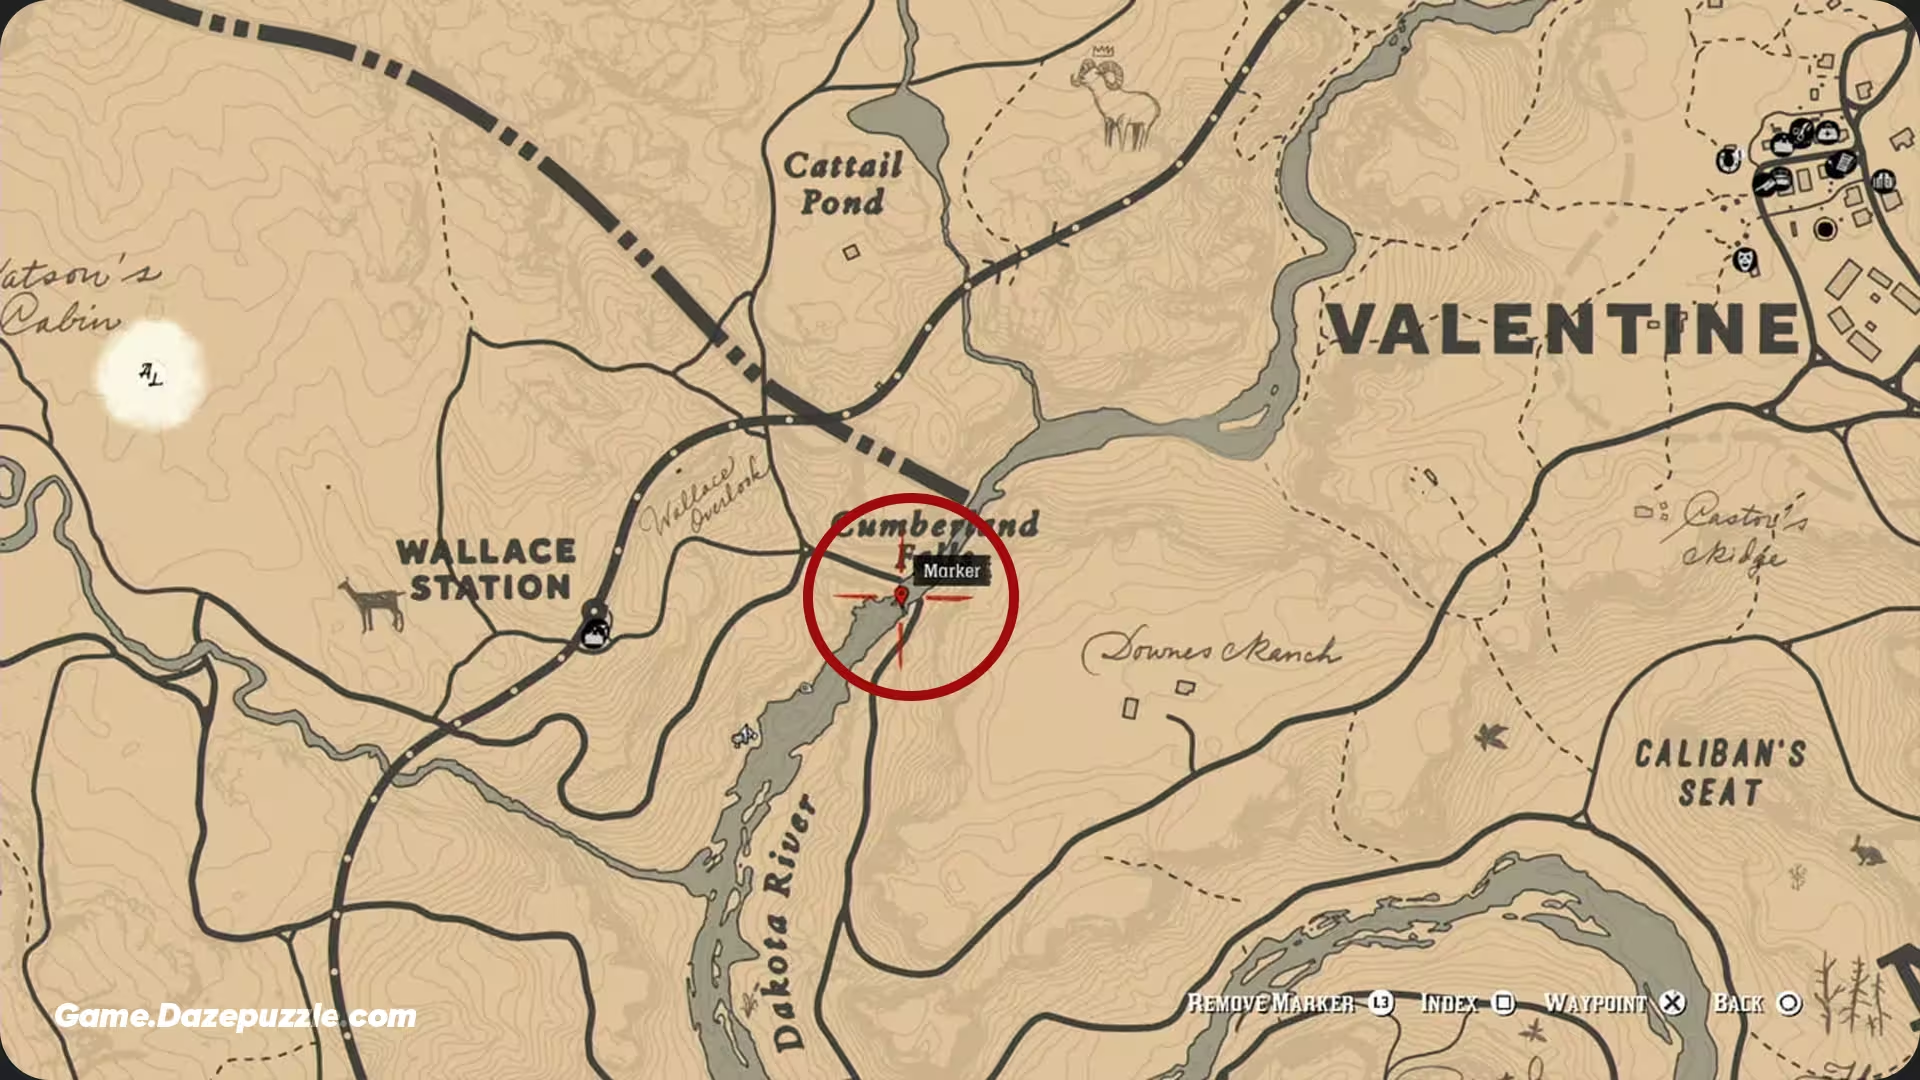
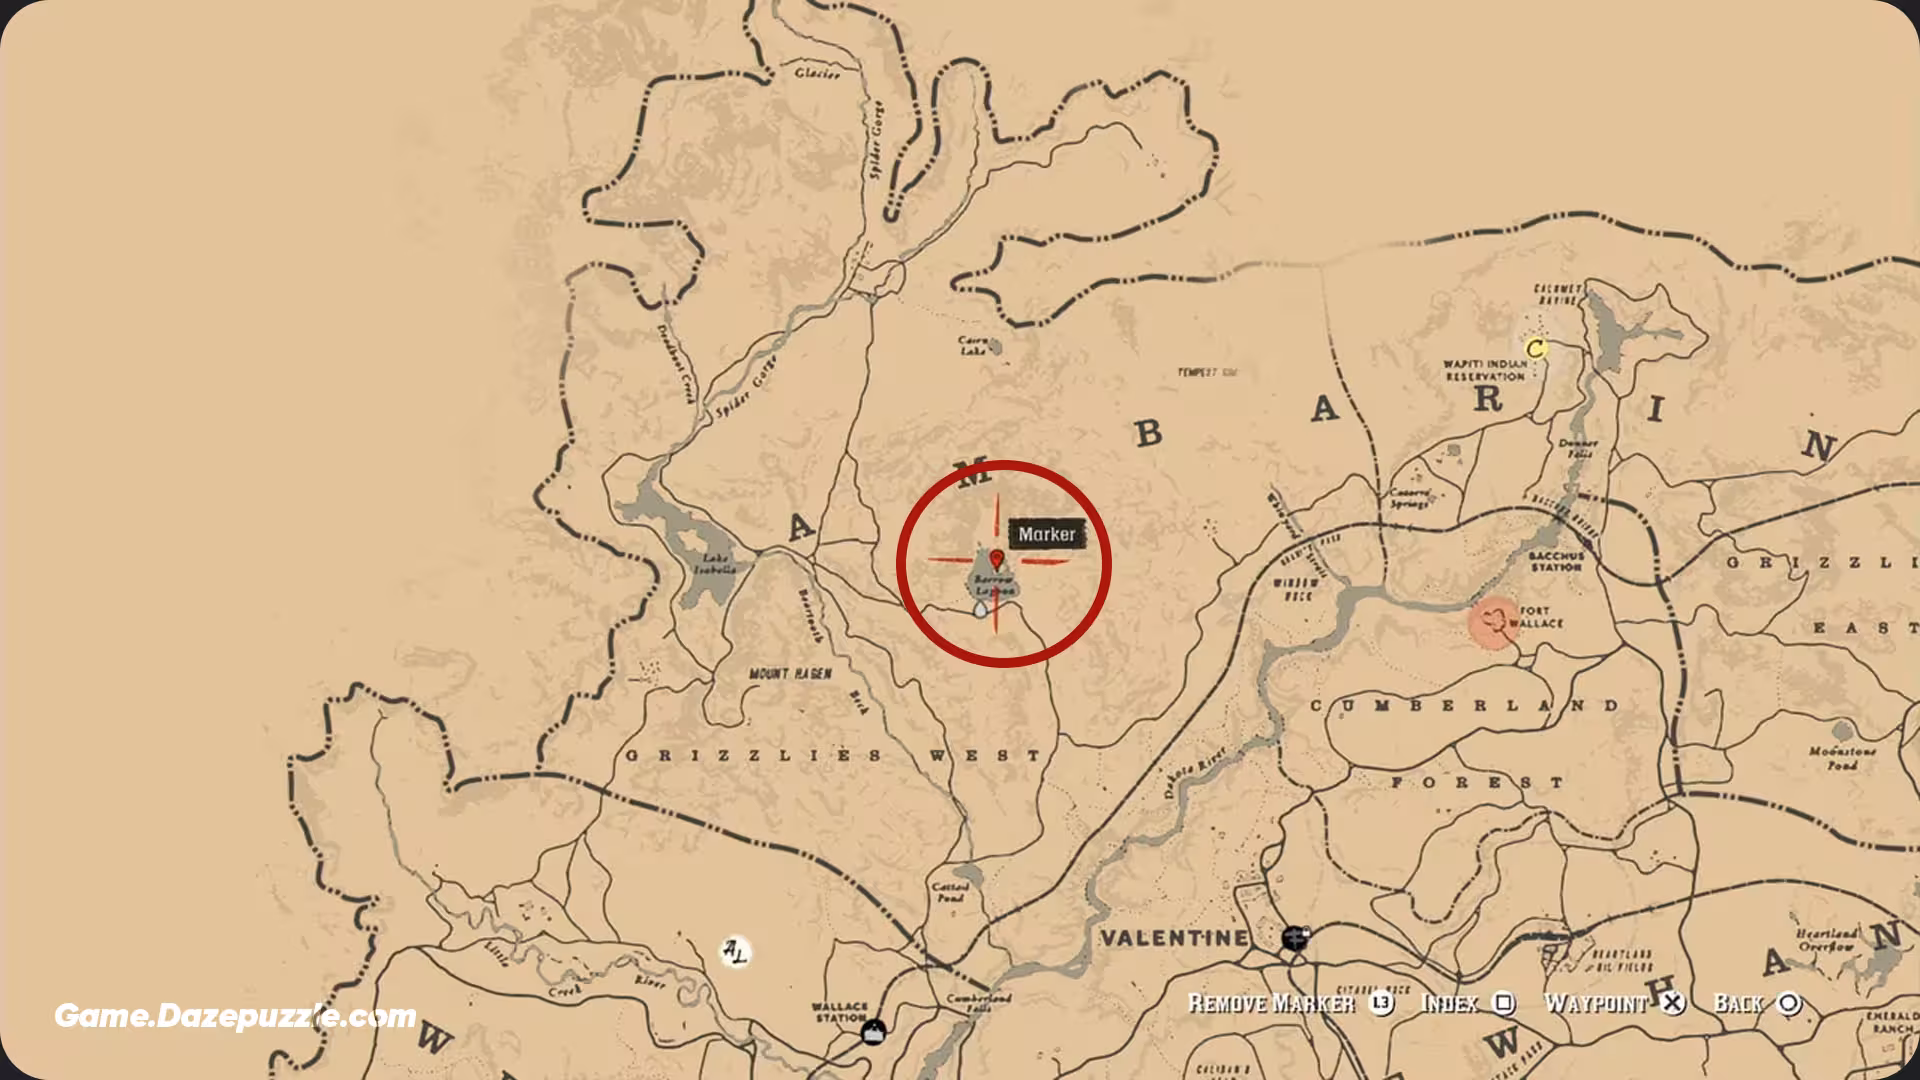
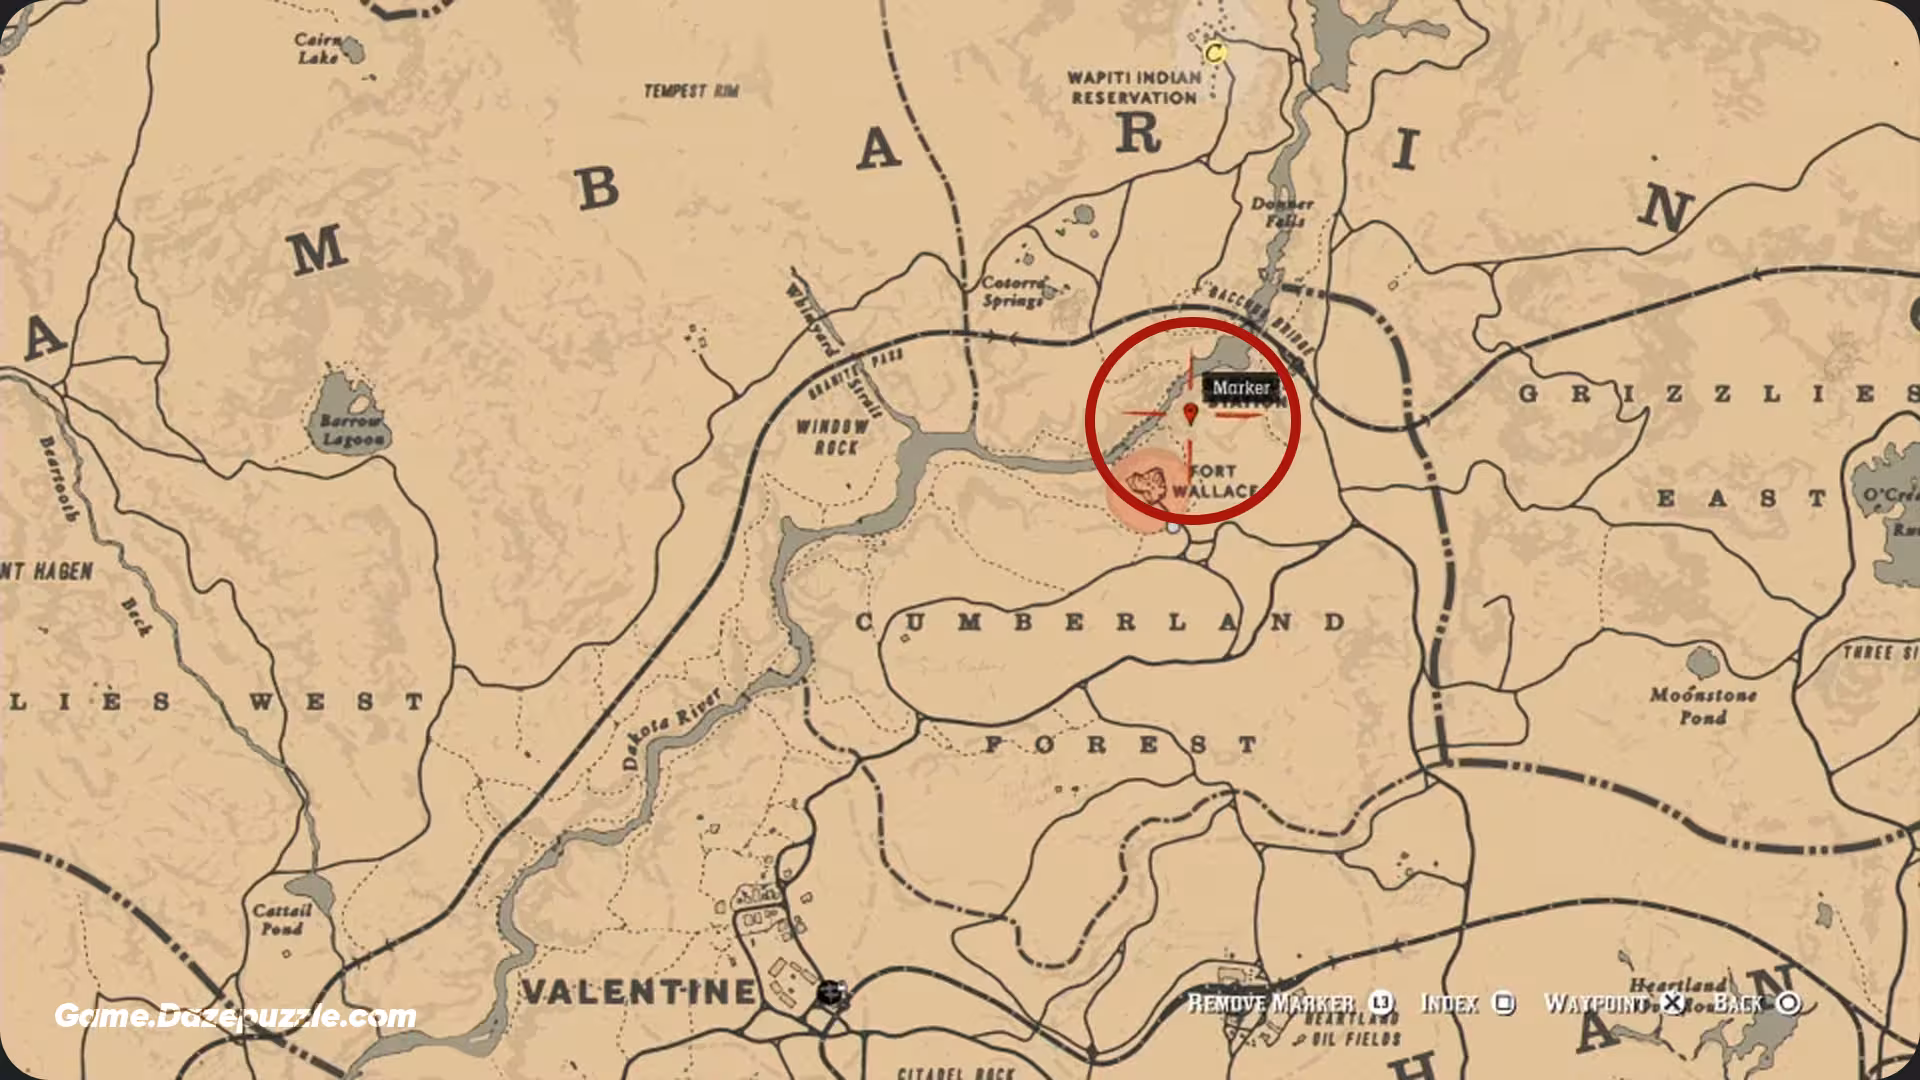
The High Stakes Treasure (3 Gold Bars)
This hunt involves a bit of a chase to get started.
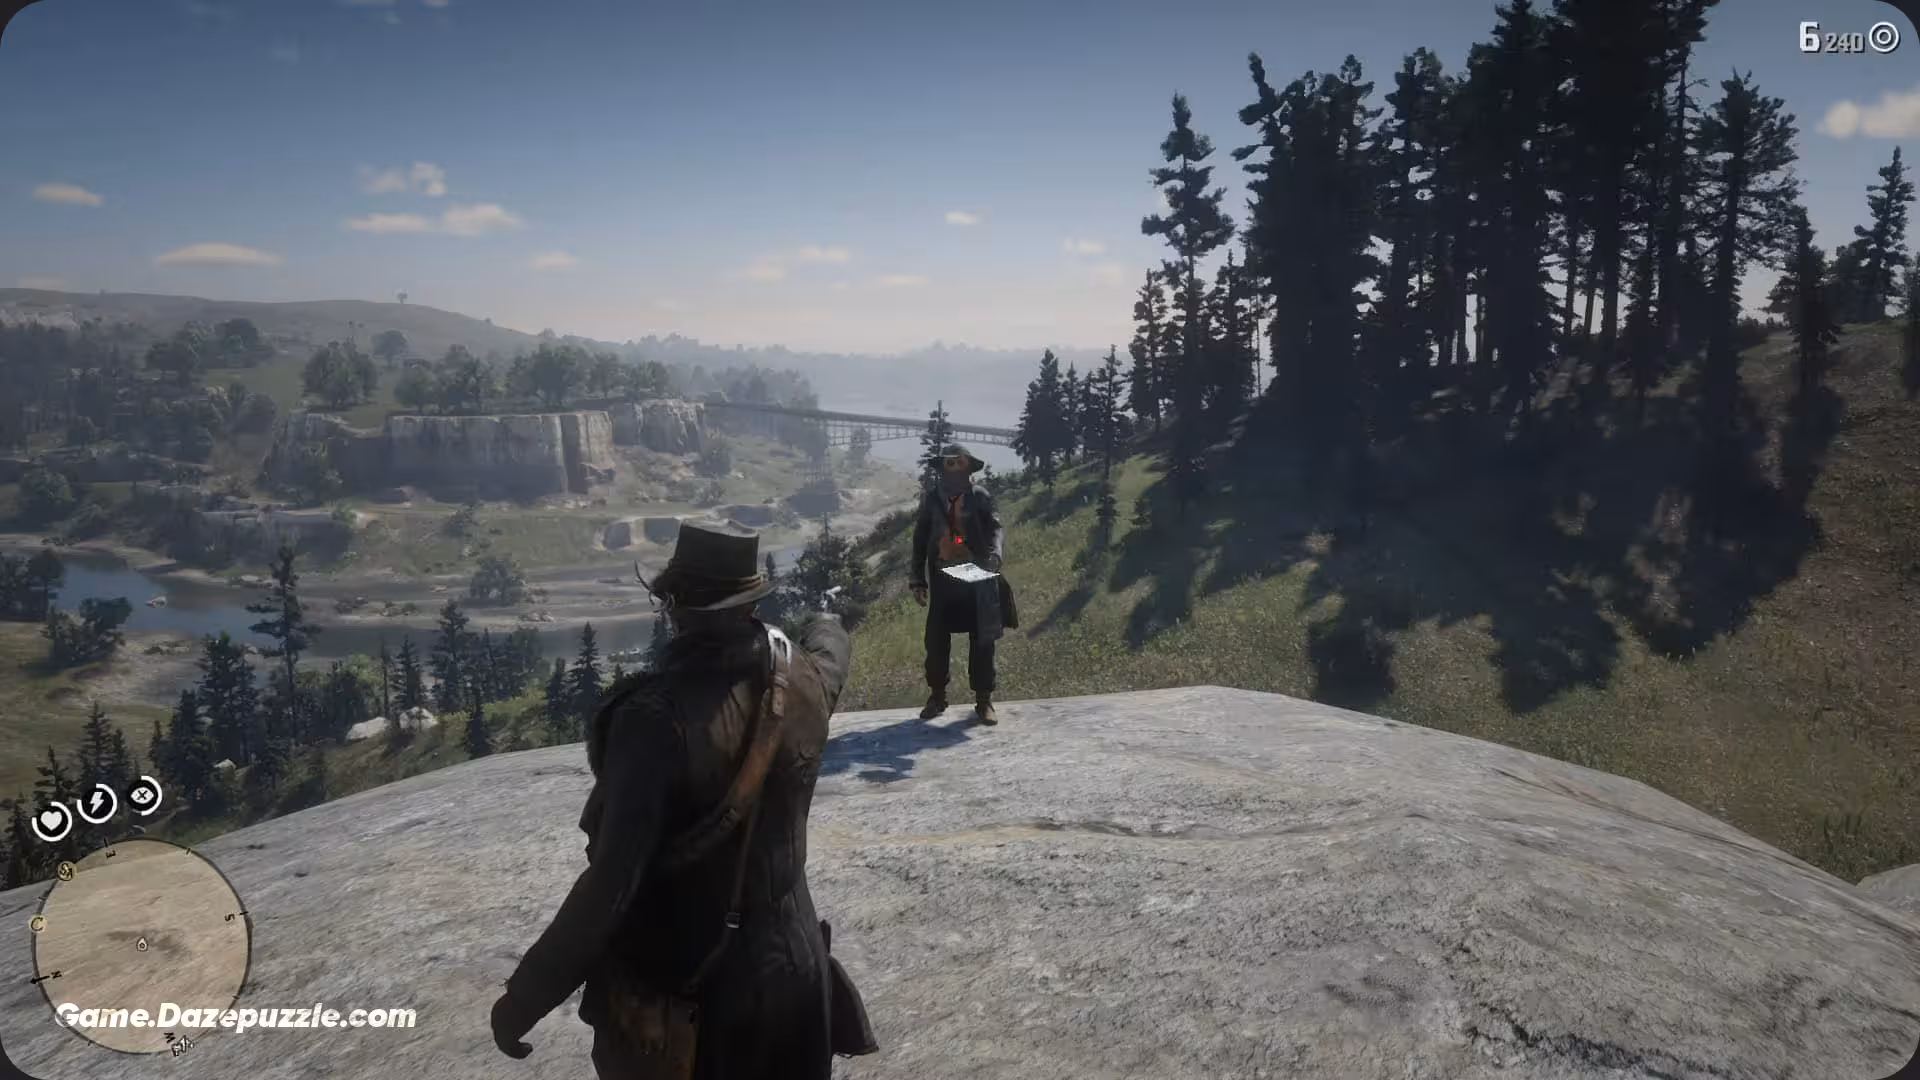
How to Start: You need to encounter a specific stranger who is looking at a map. He can spawn in several locations, but a common one is on a cliff edge near Diablo Ridge in West Elizabeth. He will get spooked and run, and you must chase him, tackle him, and take the map. If he gets away, you can later buy the map from a Fence.
Clue 1: The first map leads to Cumberland Falls, east of Wallace Station. You need to go behind the waterfall itself. A hidden ledge will allow you to walk through the rushing water into a small alcove where the next map is hidden.
Clue 2: The second map points to Barrow Lagoon, a frozen lake high in the western mountains of Ambarino. In the middle of the frozen lake, you’ll find a hollowed out log that serves as a bridge between two patches of ice. The final map is inside the log.
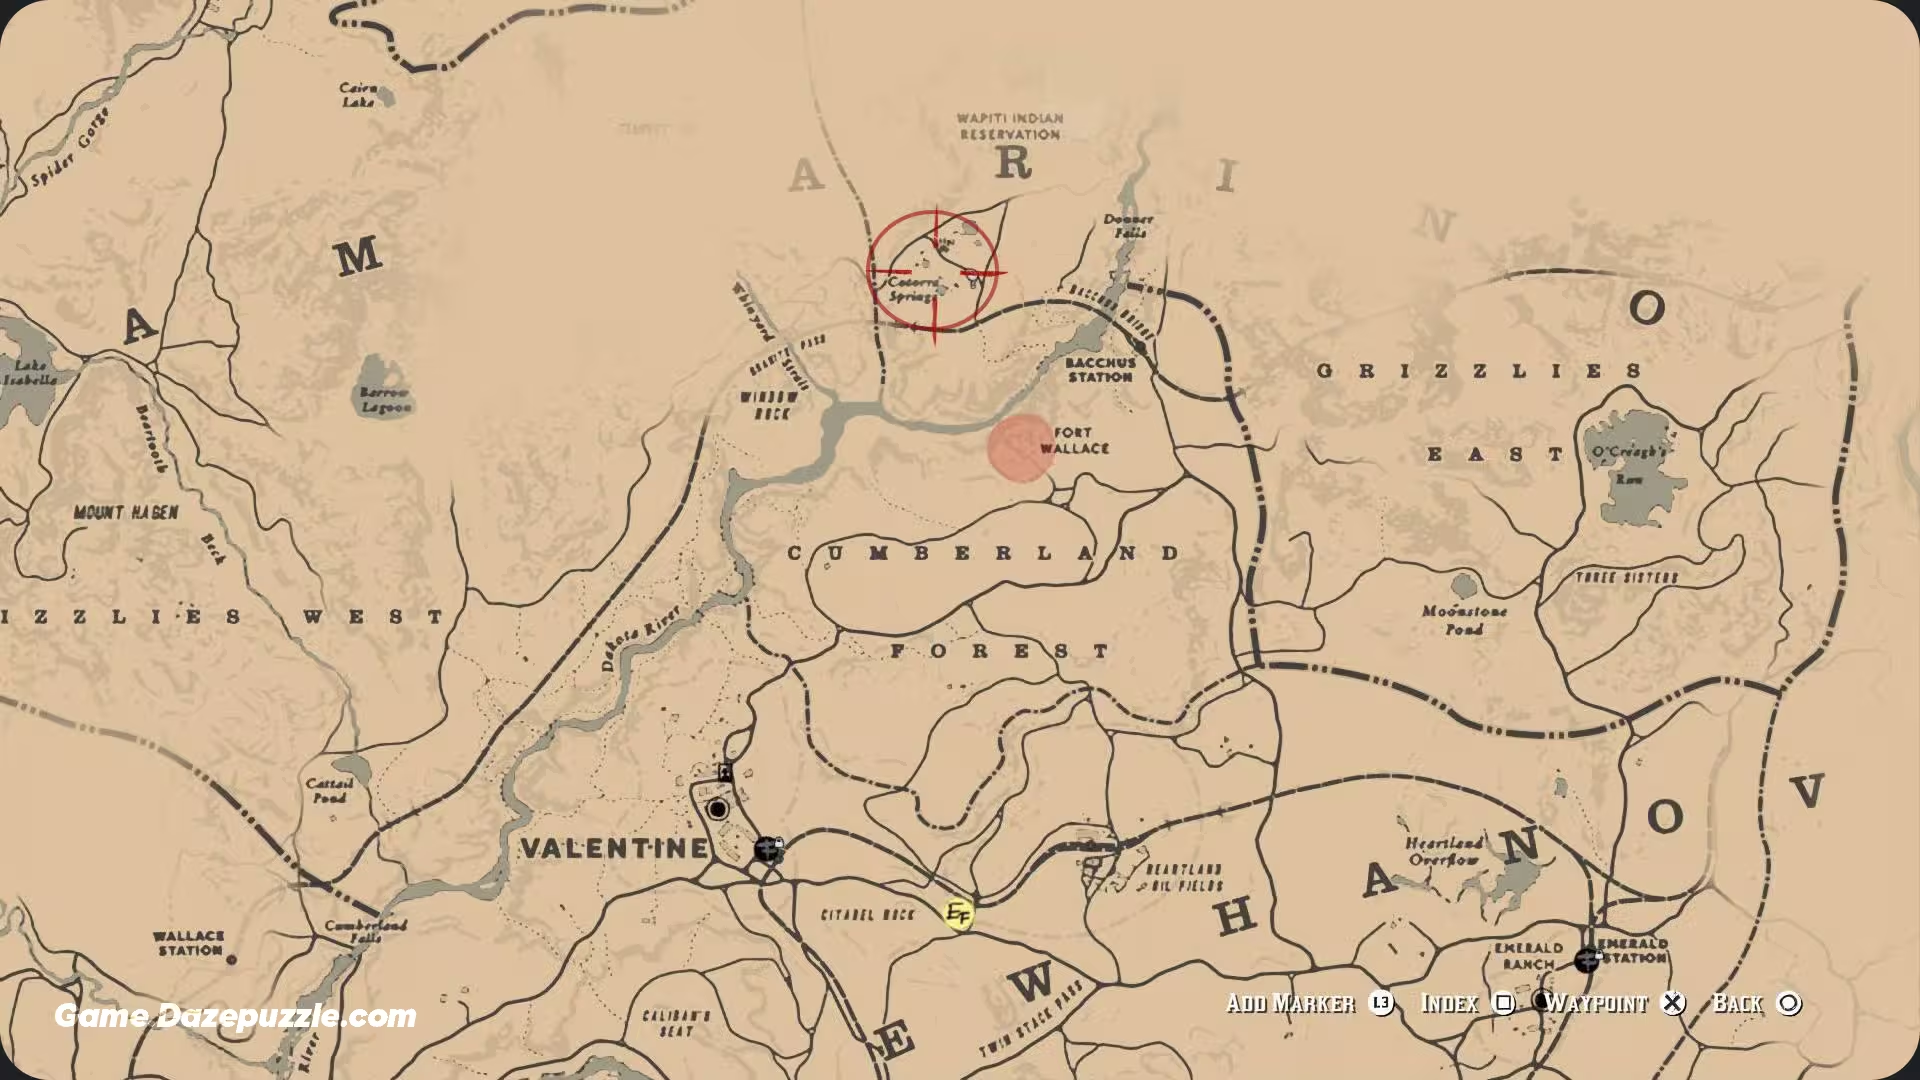
Final Treasure Location: The final leg of this journey is the most treacherous, but the reward is more than worth the risk. Make your way to the large rock formation located northeast of Fort Wallace, overlooking the river near Bacchus Station. You’ll want to ride your horse up the grassy hill on the backside of the rock face. At the top, you’ll discover a path that leads down between two peaks. Follow this path down to the cliffside below and this is where you’ll need to be careful. The treasure is hidden at the end of a series of narrow, dangerous ledges that wrap around the rock. You’ll have to crouch to get under an overhang and make a few small, precise jumps to continue. Take your time, and at the very end of this perilous path, you will find a small crevice in the rock. Tucked inside is your prize: three gold bars.
The Poisonous Trail Treasure (4 Gold Bars)
This is the most complex of the main treasure hunts, but it also has the biggest payout.
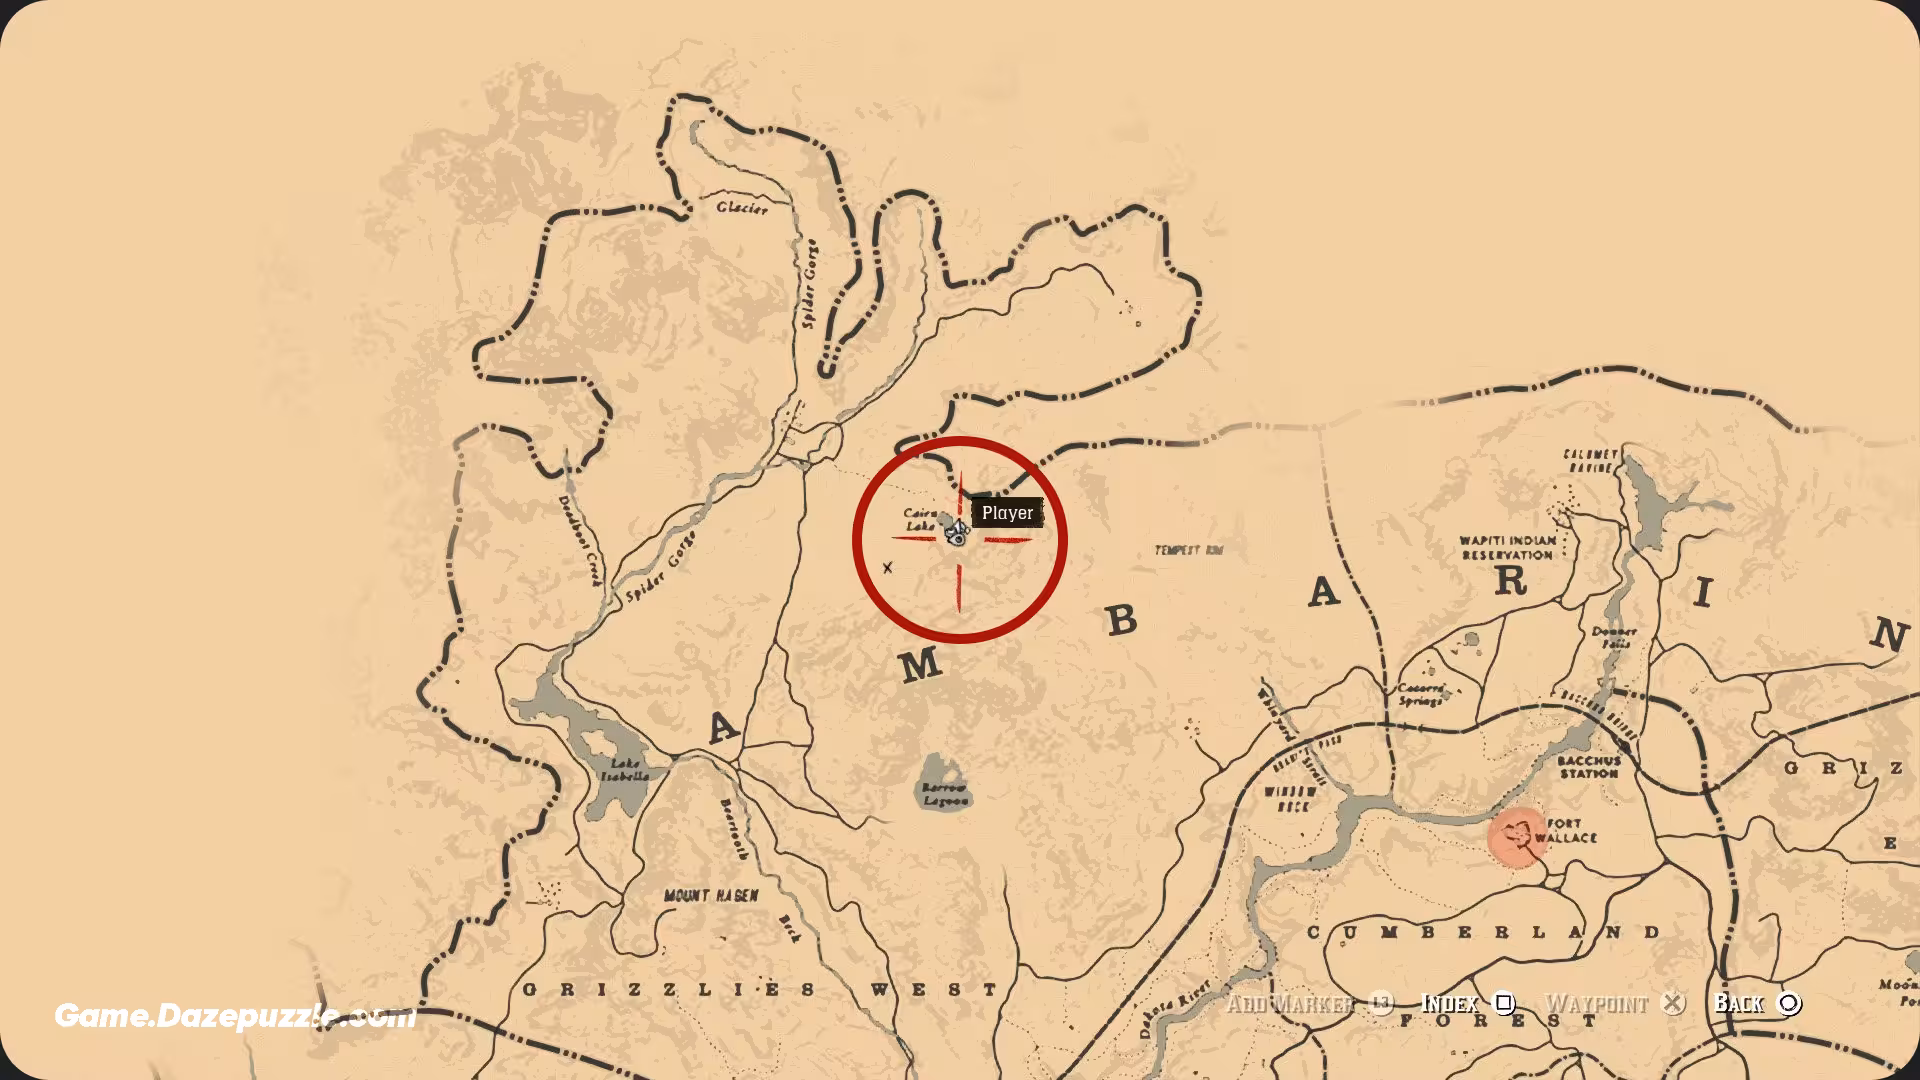
How to Start: You can’t buy this map. You have to find it. Go to Cairn Lake in the snowy mountains of Ambarino. Inside a small, lonely cabin, you’ll find the first map in a lockbox under the bed.
Clue 1: The first map points to a location in Scarlett Meadows, Lemoyne. You’re looking for a large, dead tree with a face carved into it. The next map is hidden in a hole in the tree’s trunk.
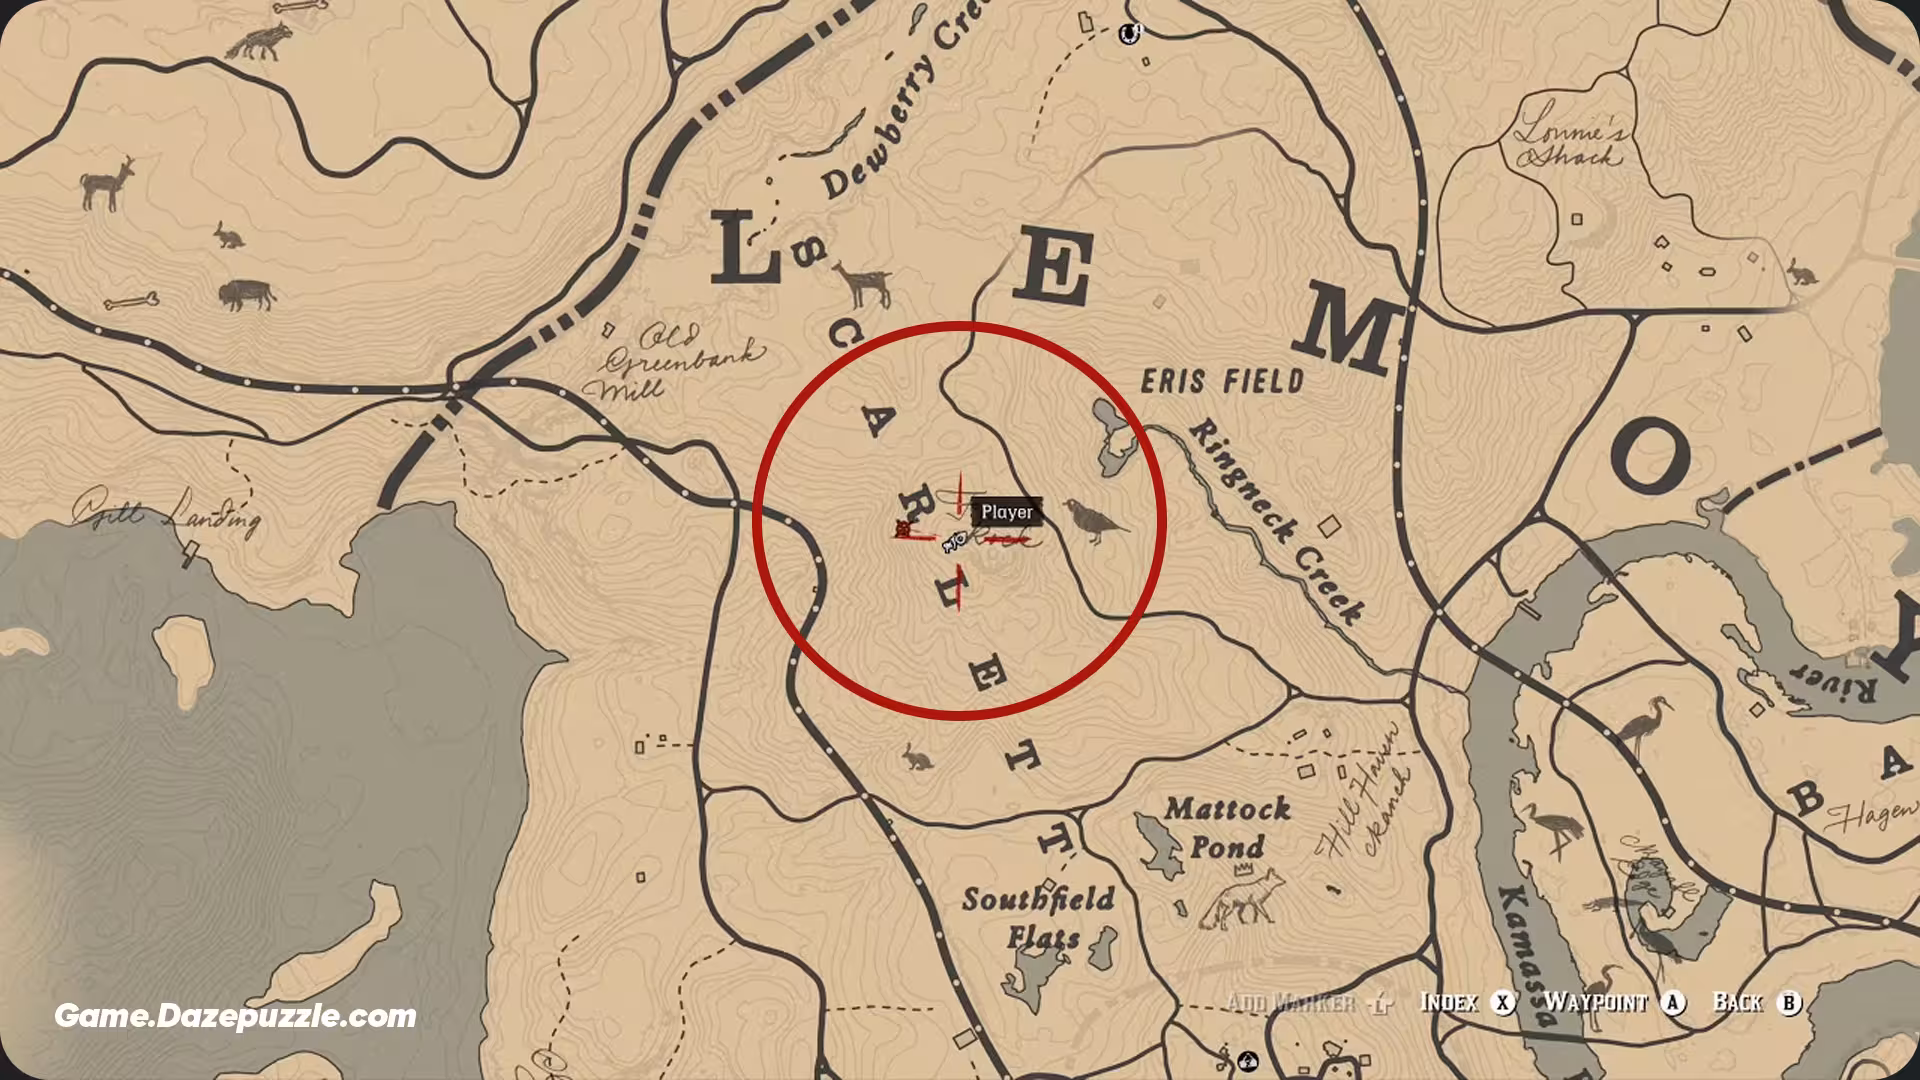
Clue 2: The second map is a bit more abstract, showing a snake made of stones. This snake can be found on a small hill just southwest of the “E” in “New Hanover.” At the head of the snake, search the pile of rocks to find the final map.
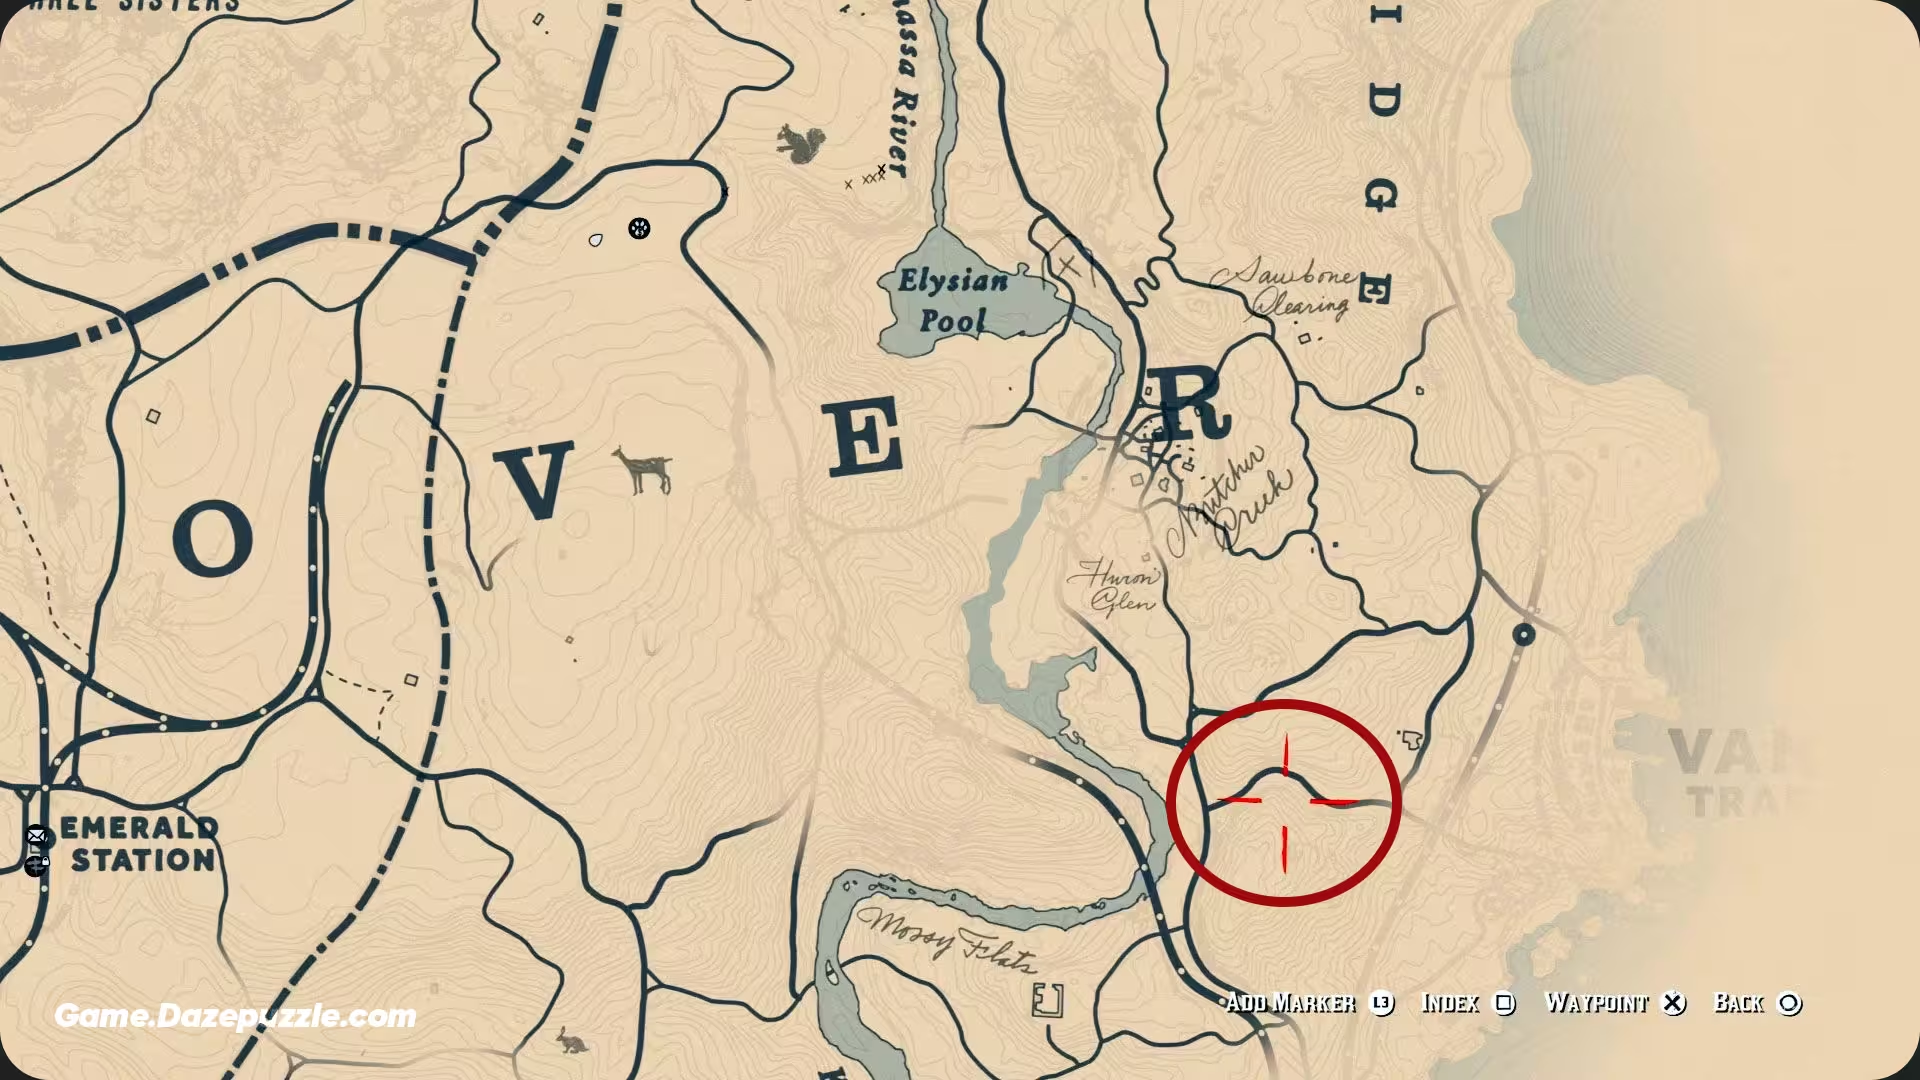
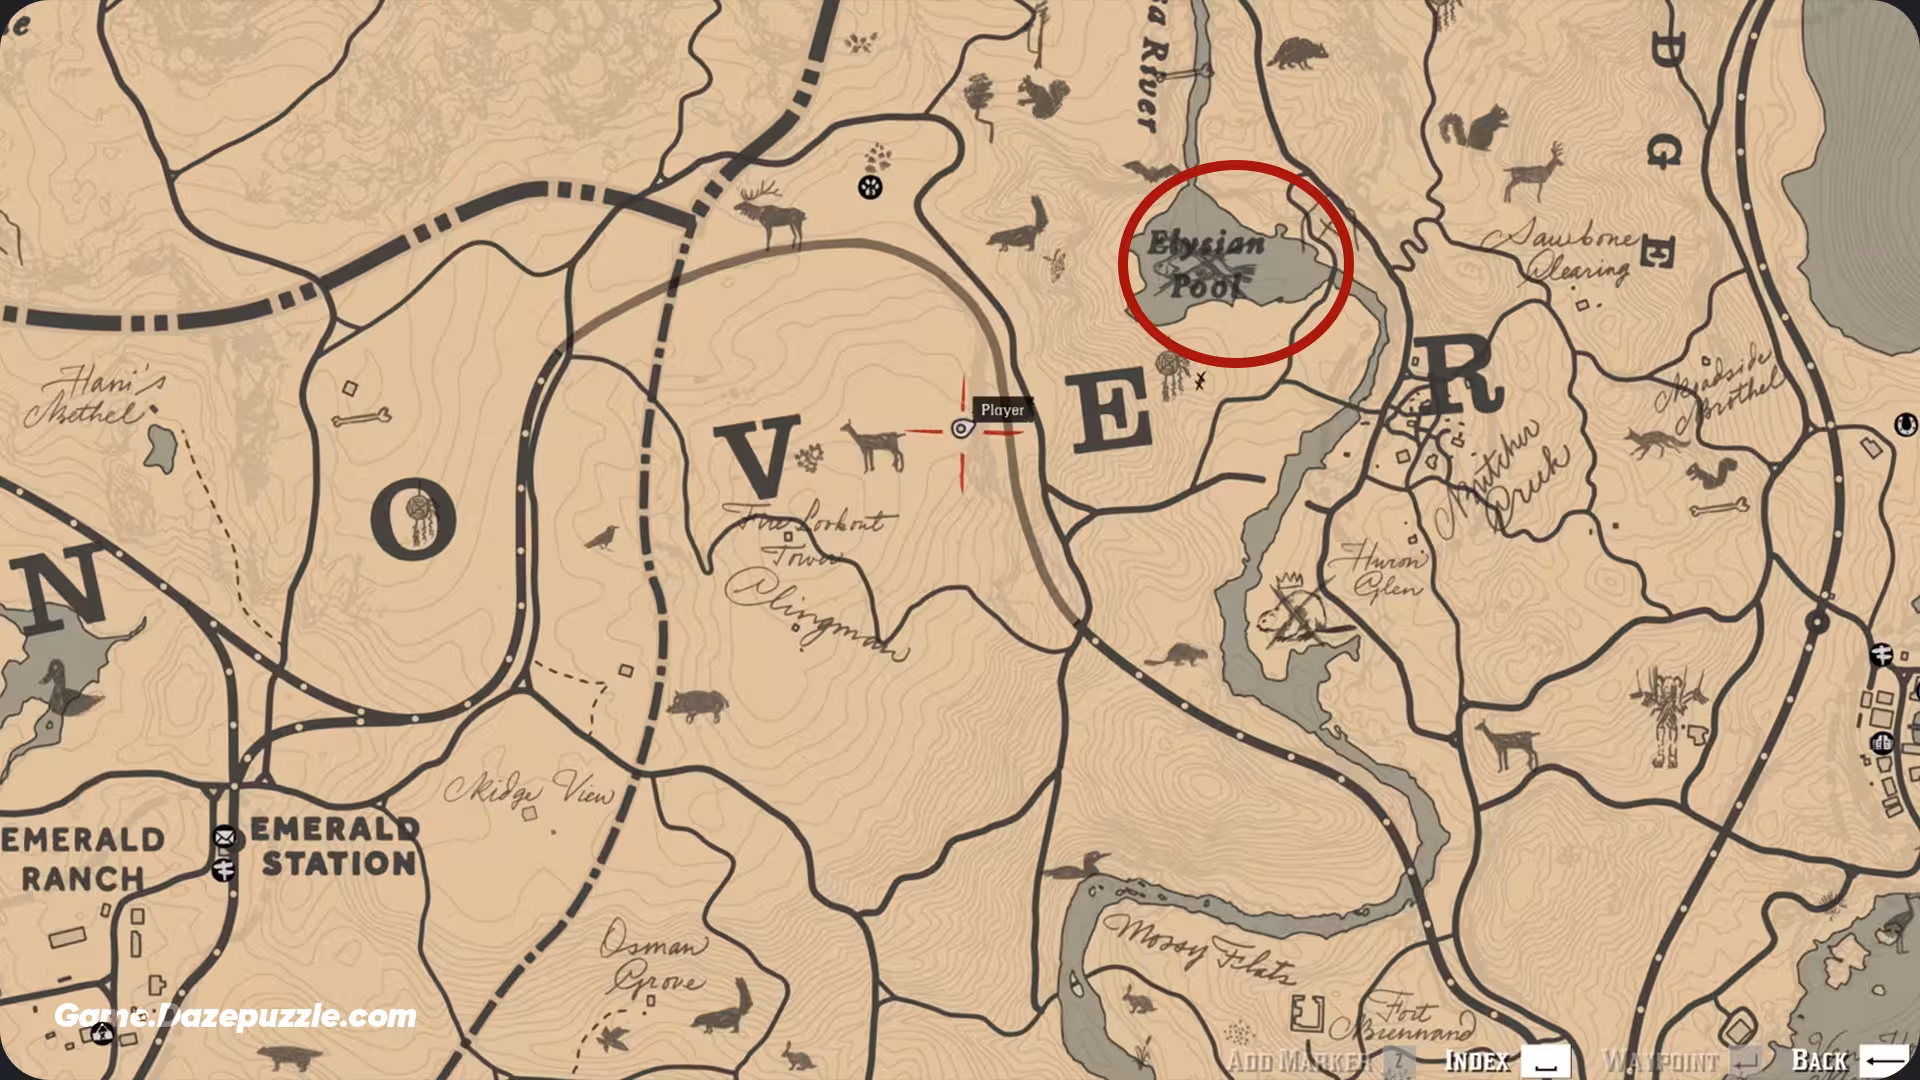
Final Treasure Location: The final map leads you to a hidden cave behind a waterfall at Elysian Pool (north of the “E” in “New Hanover”). Enter the cave, and be sure to bring a lantern. You’ll need to navigate a dark and winding series of tunnels. There’s a hidden path down a ledge on the right side of the main chamber. Follow this treacherous path down, and you will eventually find a small, hidden chamber with a pile of rocks. Search it to find the motherlode: four gold bars.
Congratulations, treasure hunter. You are now exceptionally wealthy. Your final step is to take your heavy satchel to any Fence and cash in your fortune. Now go on the world is yours.