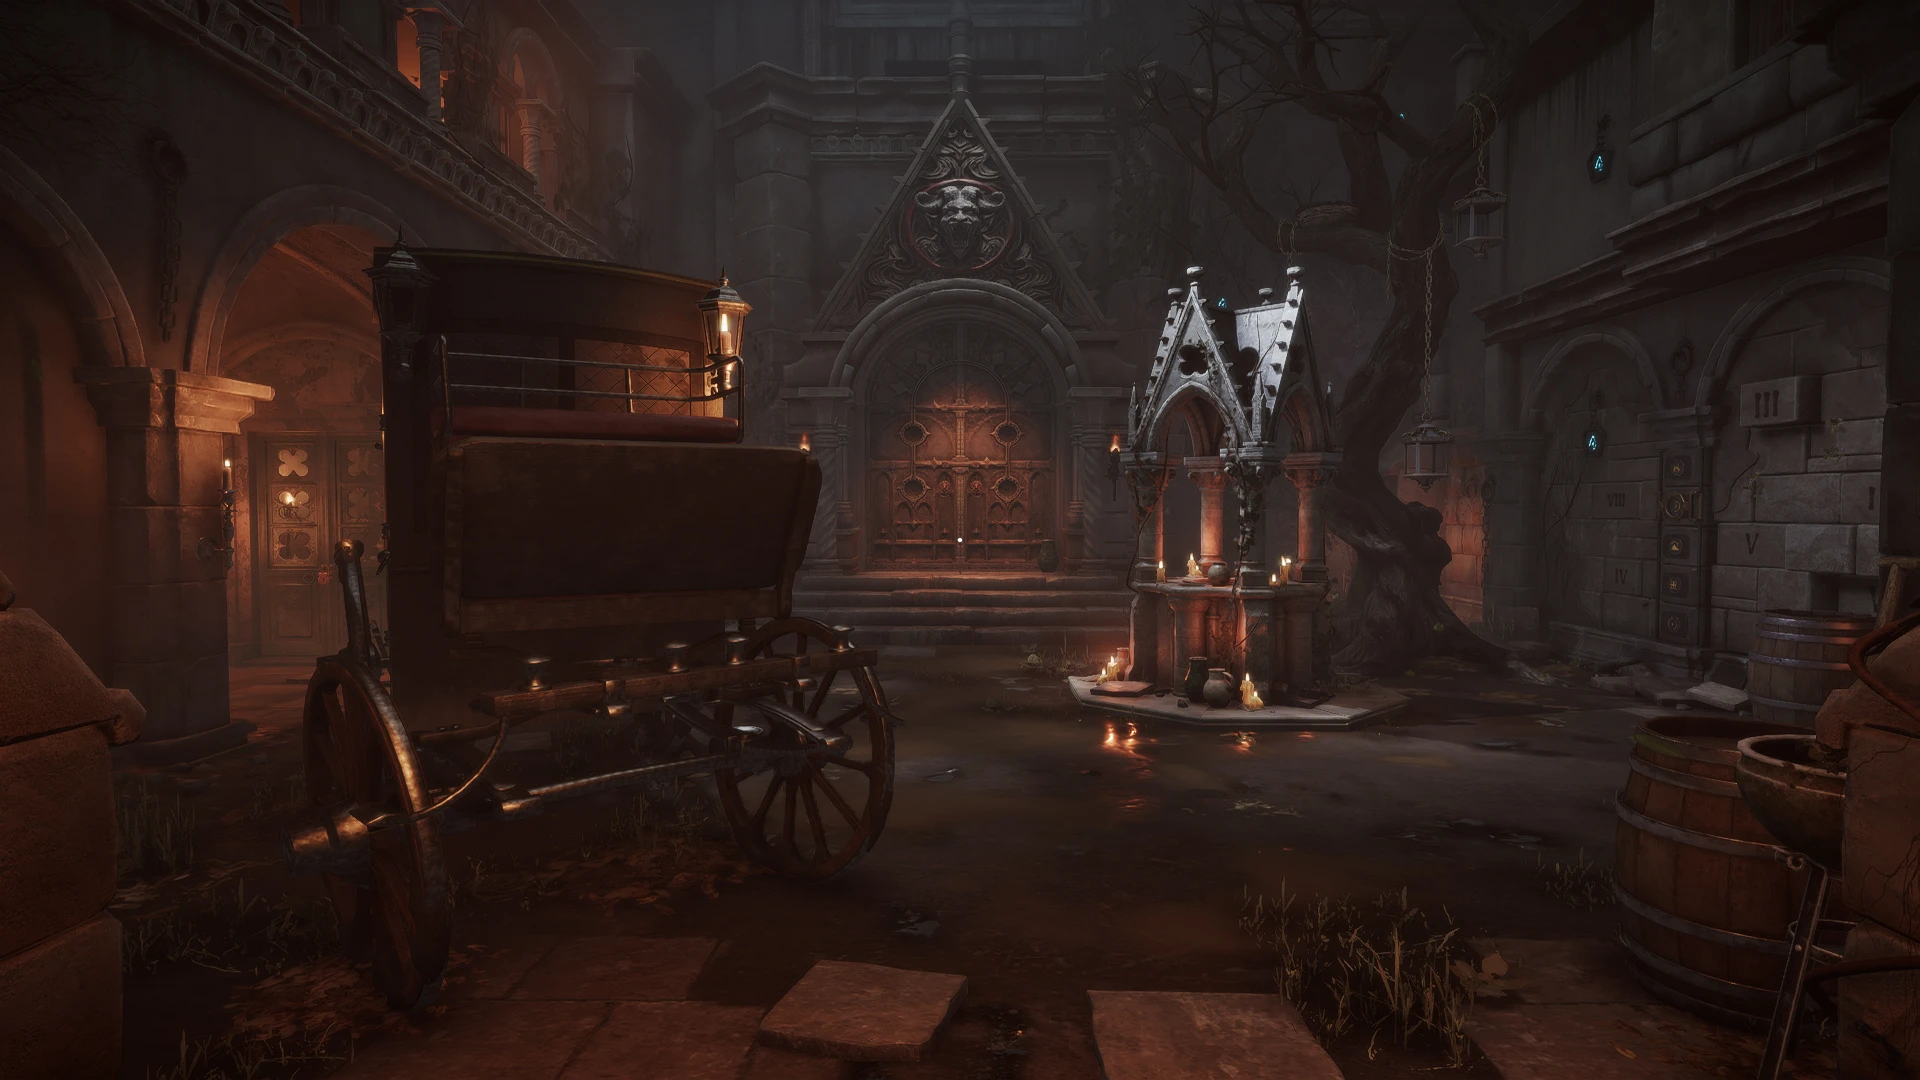
When I first started playing the Courtyard part of Dracula’s Castle in Escape Simulator 2, I felt like I walked onto a gothic horror movie set. I was surrounded by towering stone walls, spooky statues, a creepy old carriage and a giant locked door. It was awesome, but also pretty intimidating. This level is a massive, multi step puzzle box that had me searching for clues in every dark corner. If you’re feeling a bit stuck like I was, don’t worry. This complete Escape Simulator 2 Courtyard Walkthrough will guide you through all the Escape Simulator 2 Courtyard Puzzles, step by step, from your first clue to your final, sweet escape.
Before we dive into the nitty gritty, here’s the super quick Escape Simulator 2 Courtyard guide for pros who just need a nudge. The entire level boils down to finding four Moon Keys. Here’s where they come from:
| Quick Guide: The Four Moon Keys | |
|---|---|
| Moon Key 1 | Sin and Salvation Puzzle: Solve the angel/demon statuette grid puzzle in the small room. |
| Moon Key 2 | Gargoyles Gambit Puzzle: Solve the three demon logic puzzle and use the “Veritas/Mendacium” lock. |
| Moon Key 3 | Echoes of Truth Puzzle: Solve the well sigil puzzle, then answer the Wisp’s four Latin questions. |
| Moon Key 4 | The Key Beneath Puzzle: Find the two dig spots, get the mechanical key and chest, and combine them. |
If you need more than that, I tell you what, you’re in the right place. Let’s break down the whole thing.
What You Will Find in This Walkthrough
Escape Simulator 2 Courtyard Walkthrough
Your main goal is to open the massive door at the far end of the courtyard. To do that, you need four special “Moon Keys.” Getting them involves solving a web of interconnected puzzles. We’ll tackle them in a logical order to get you through the level smoothly.
The Turning Vault Puzzle
First, head to the right side of the courtyard where you’ll see a bulletin board. Grab the Paper and the Note from it, then look on the bench under the board to pick up the Hammer and a locked Chest. Don’t miss the Shovel leaning against the wall to the left.
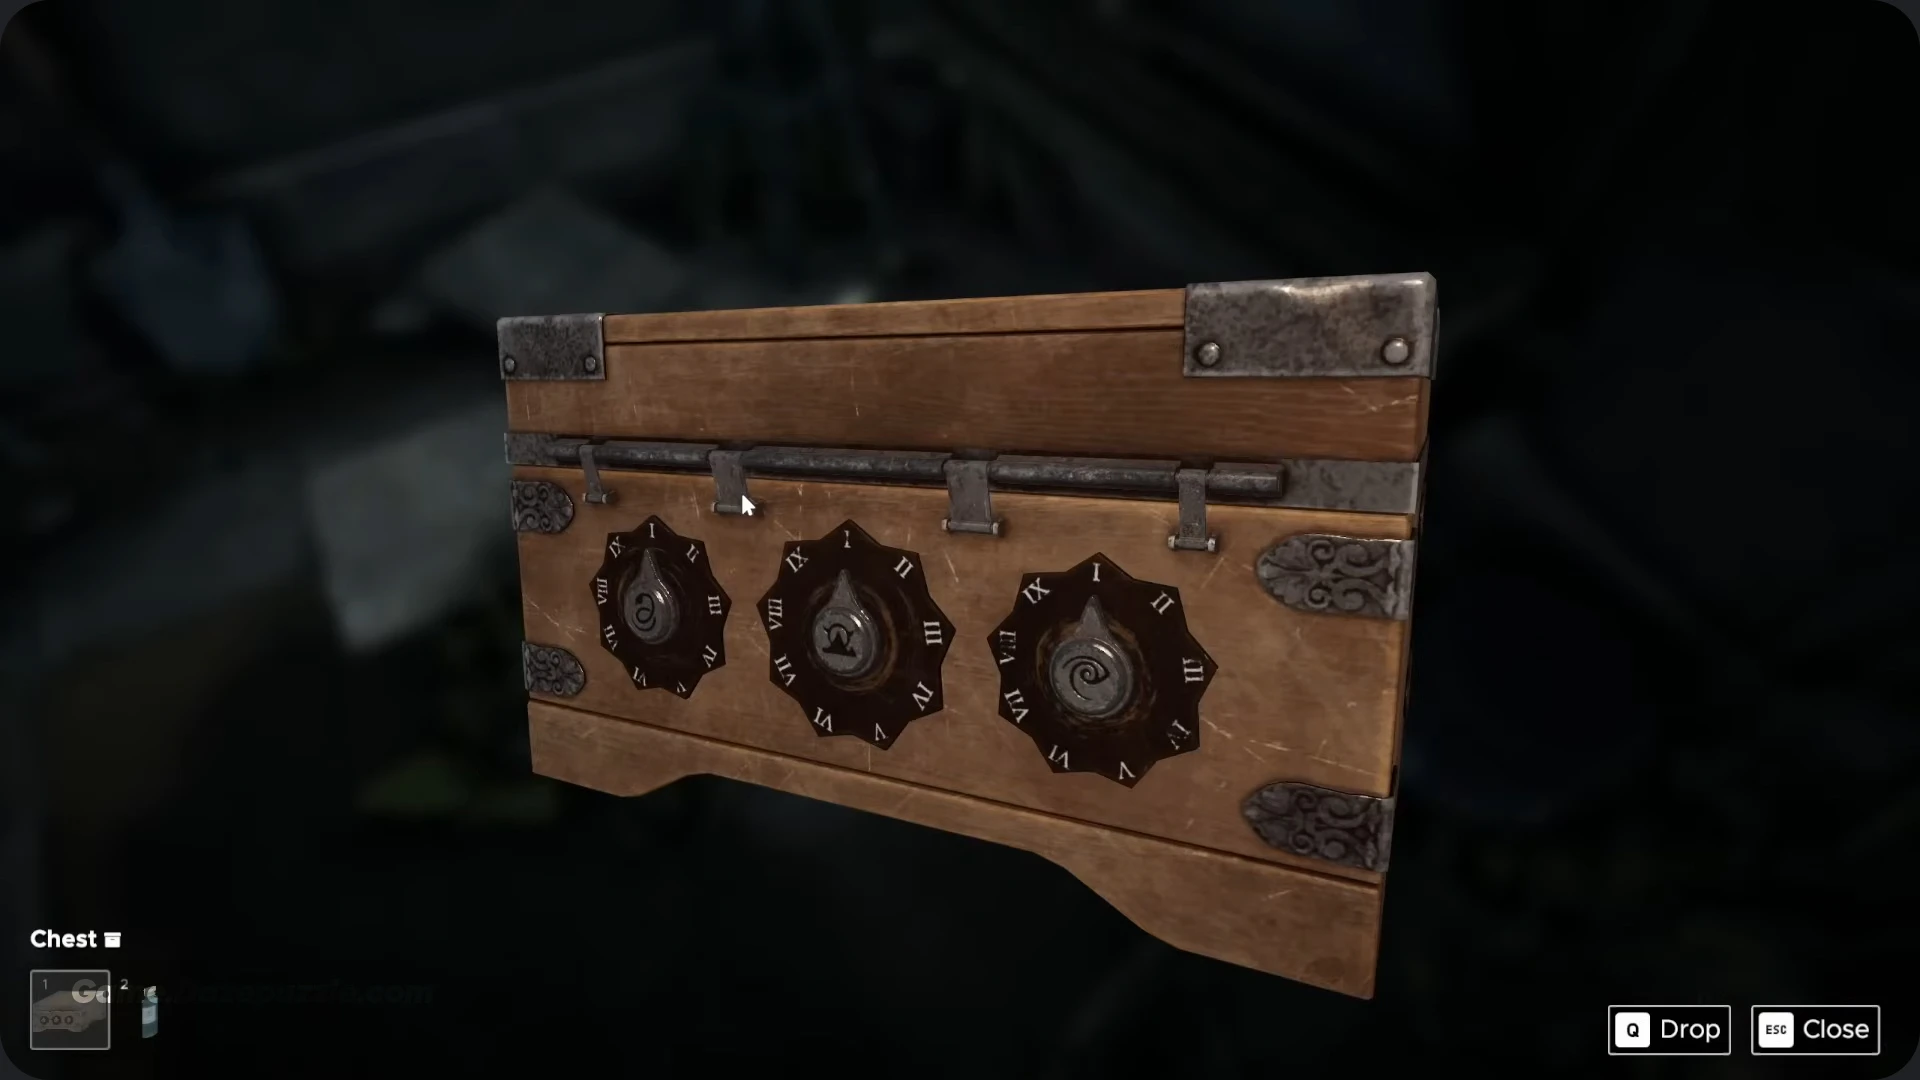
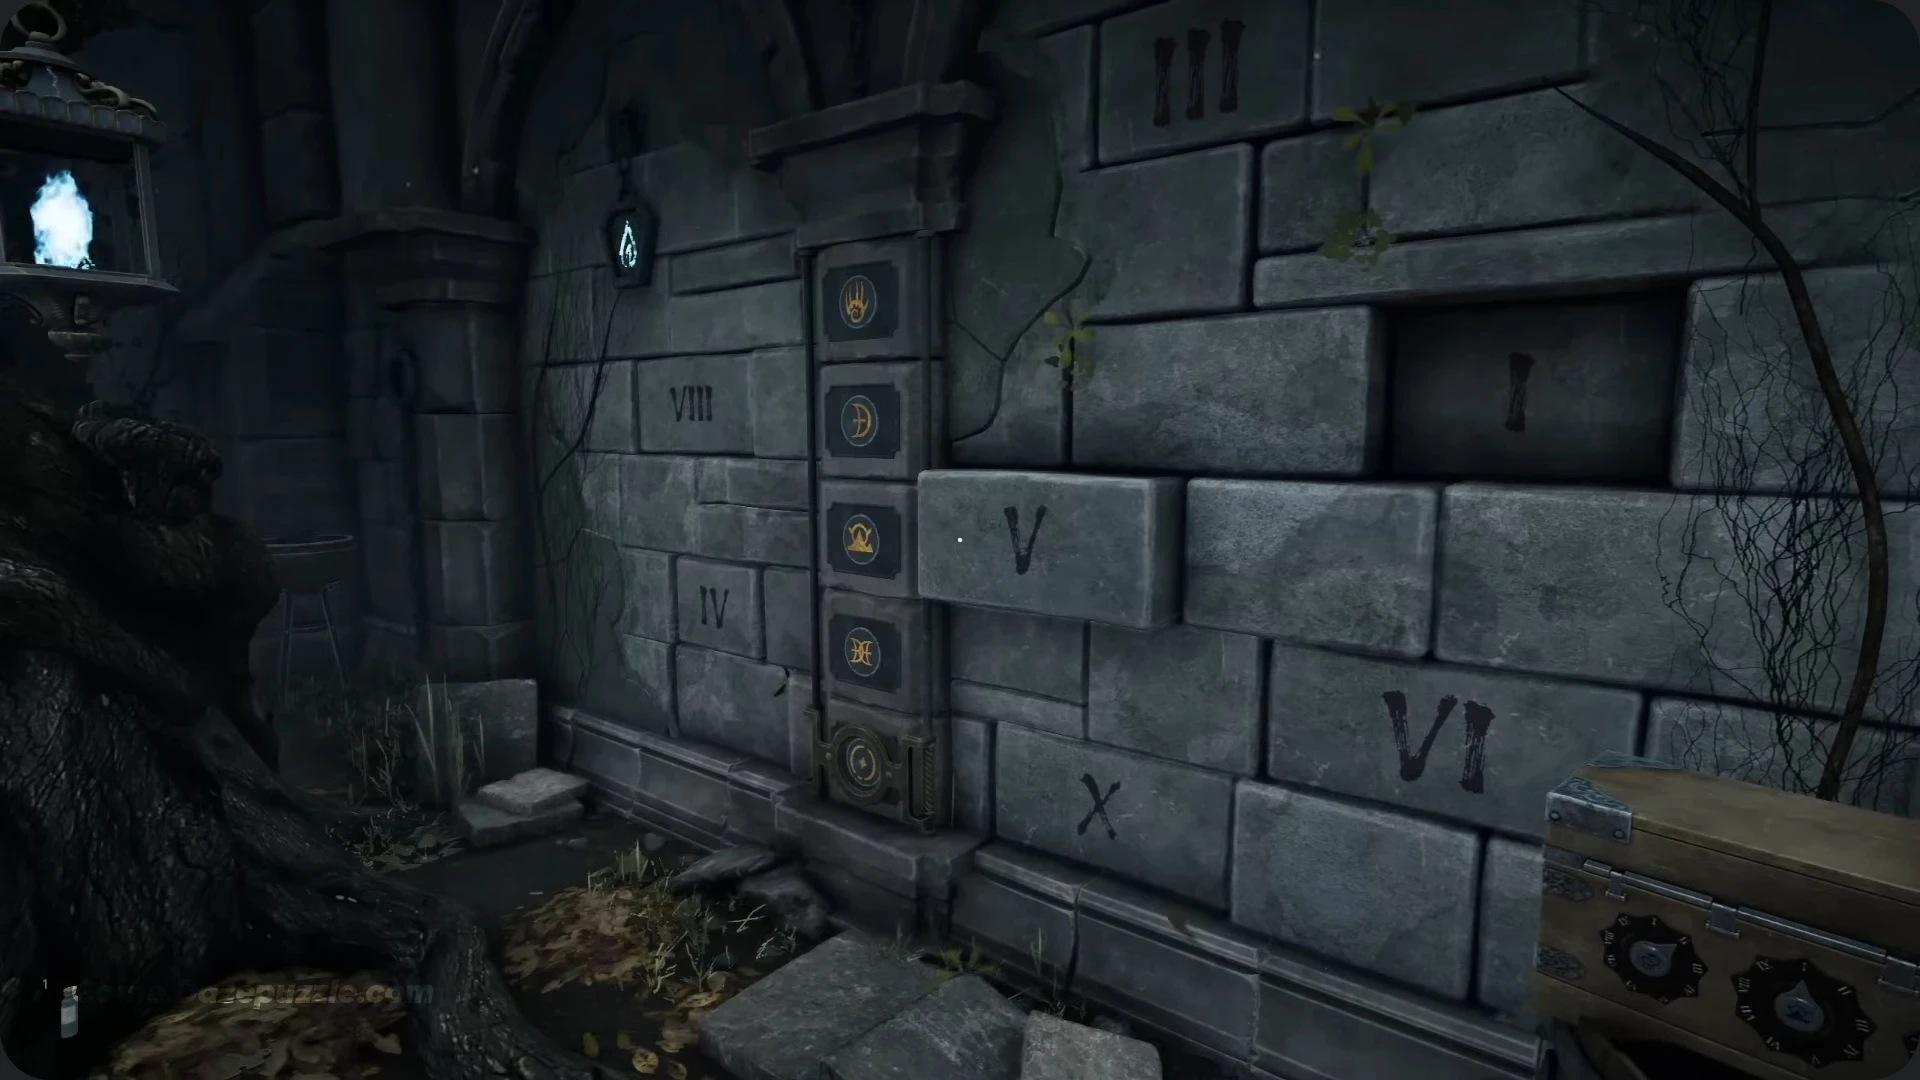
Now, look at that chest. It has three dials with symbols. You’ll see matching symbols on the stone wall to the left, set into three vertical slider tracks. Go to the wall and move the sliders to line up with each of the three symbols from the chest. As you center the slider on a correct symbol, a stone brick with a Roman numeral will pop out of the wall. You’ll find the symbols correspond to the numbers II, IV, and VI. Go back to the chest, set the dials to II, IV, VI, and it’ll open to give you two Mechanical Keys.
Runes of Rotation Puzzle
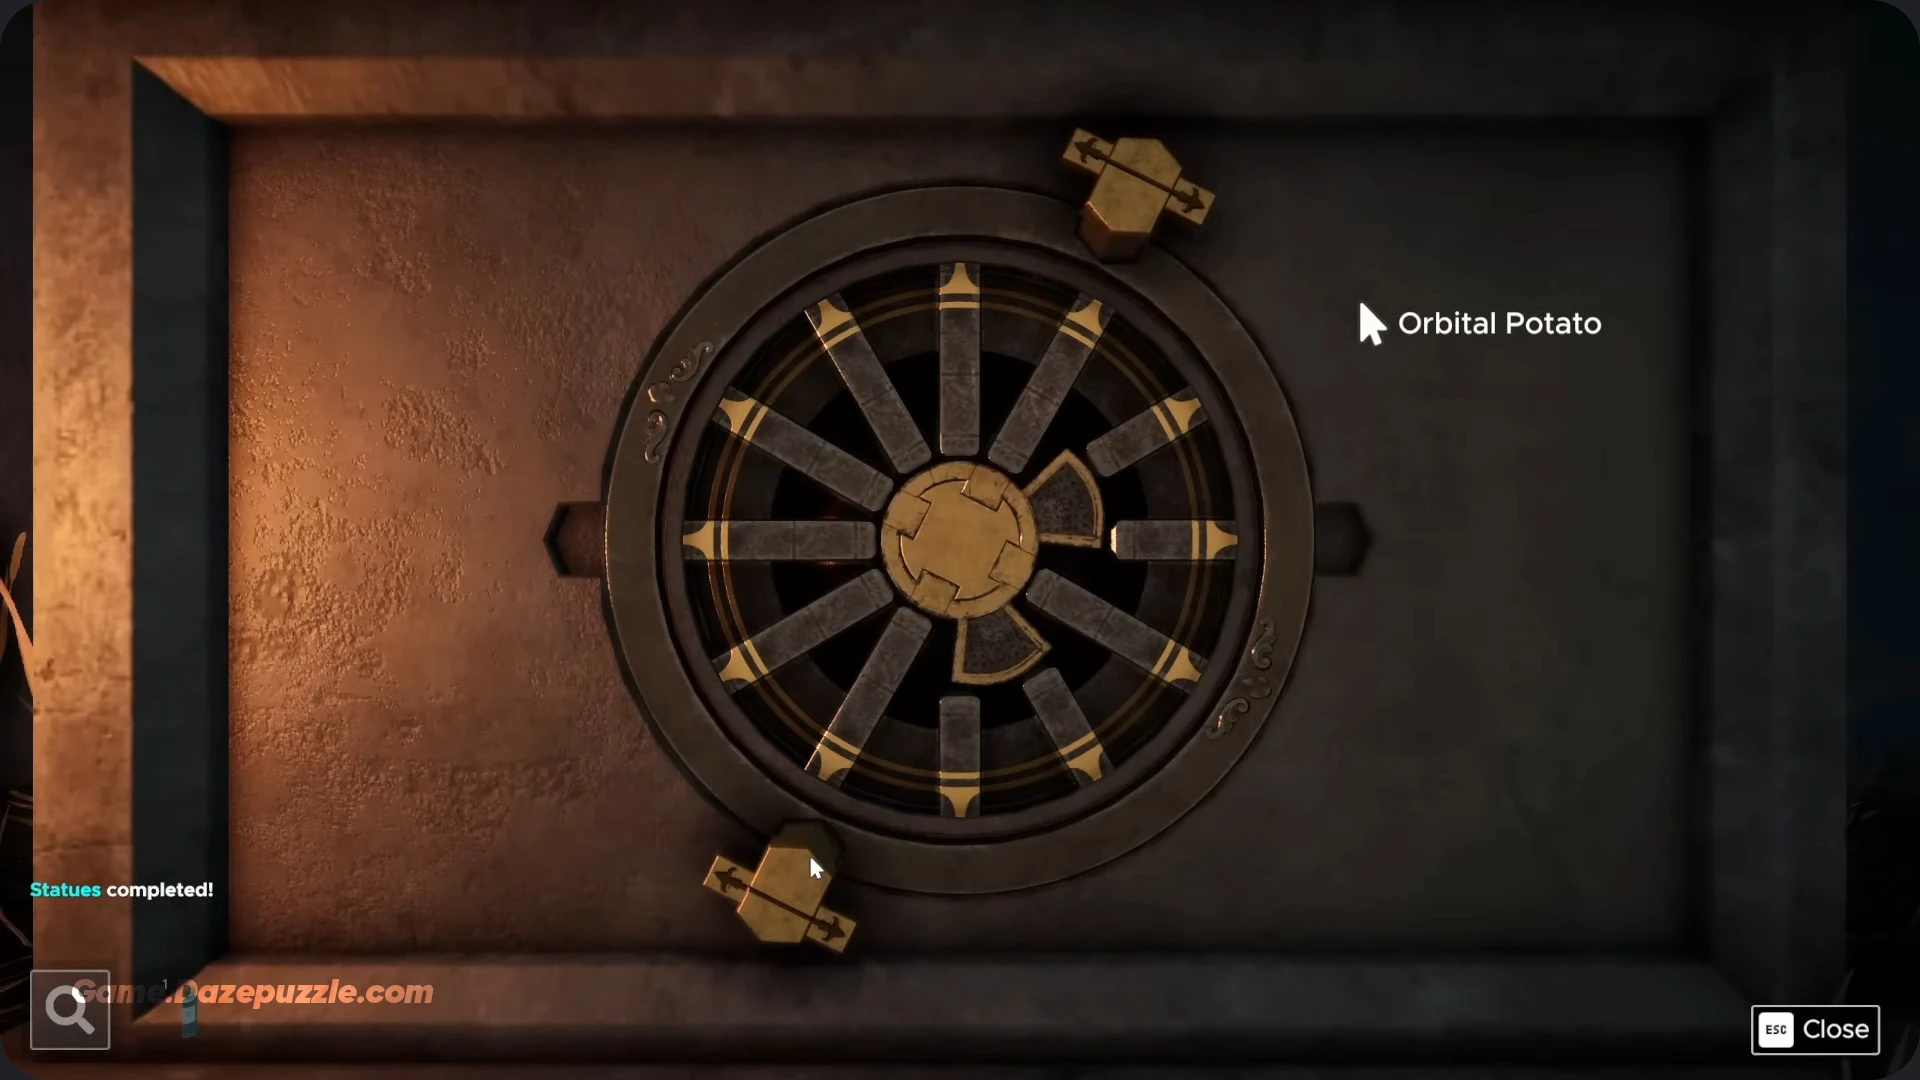
Turn around and head back toward the gate you first entered through, where you’ll see two statues flanking it: an angel on the left and a demon on the right. Look at the base of the angel statue and use the Mechanical Key with two prongs in the slot. You’ll need to rotate the key until the golden lines on its prongs line up with the circle on the base, completing the pattern. A compartment will open, letting you grab the Key.
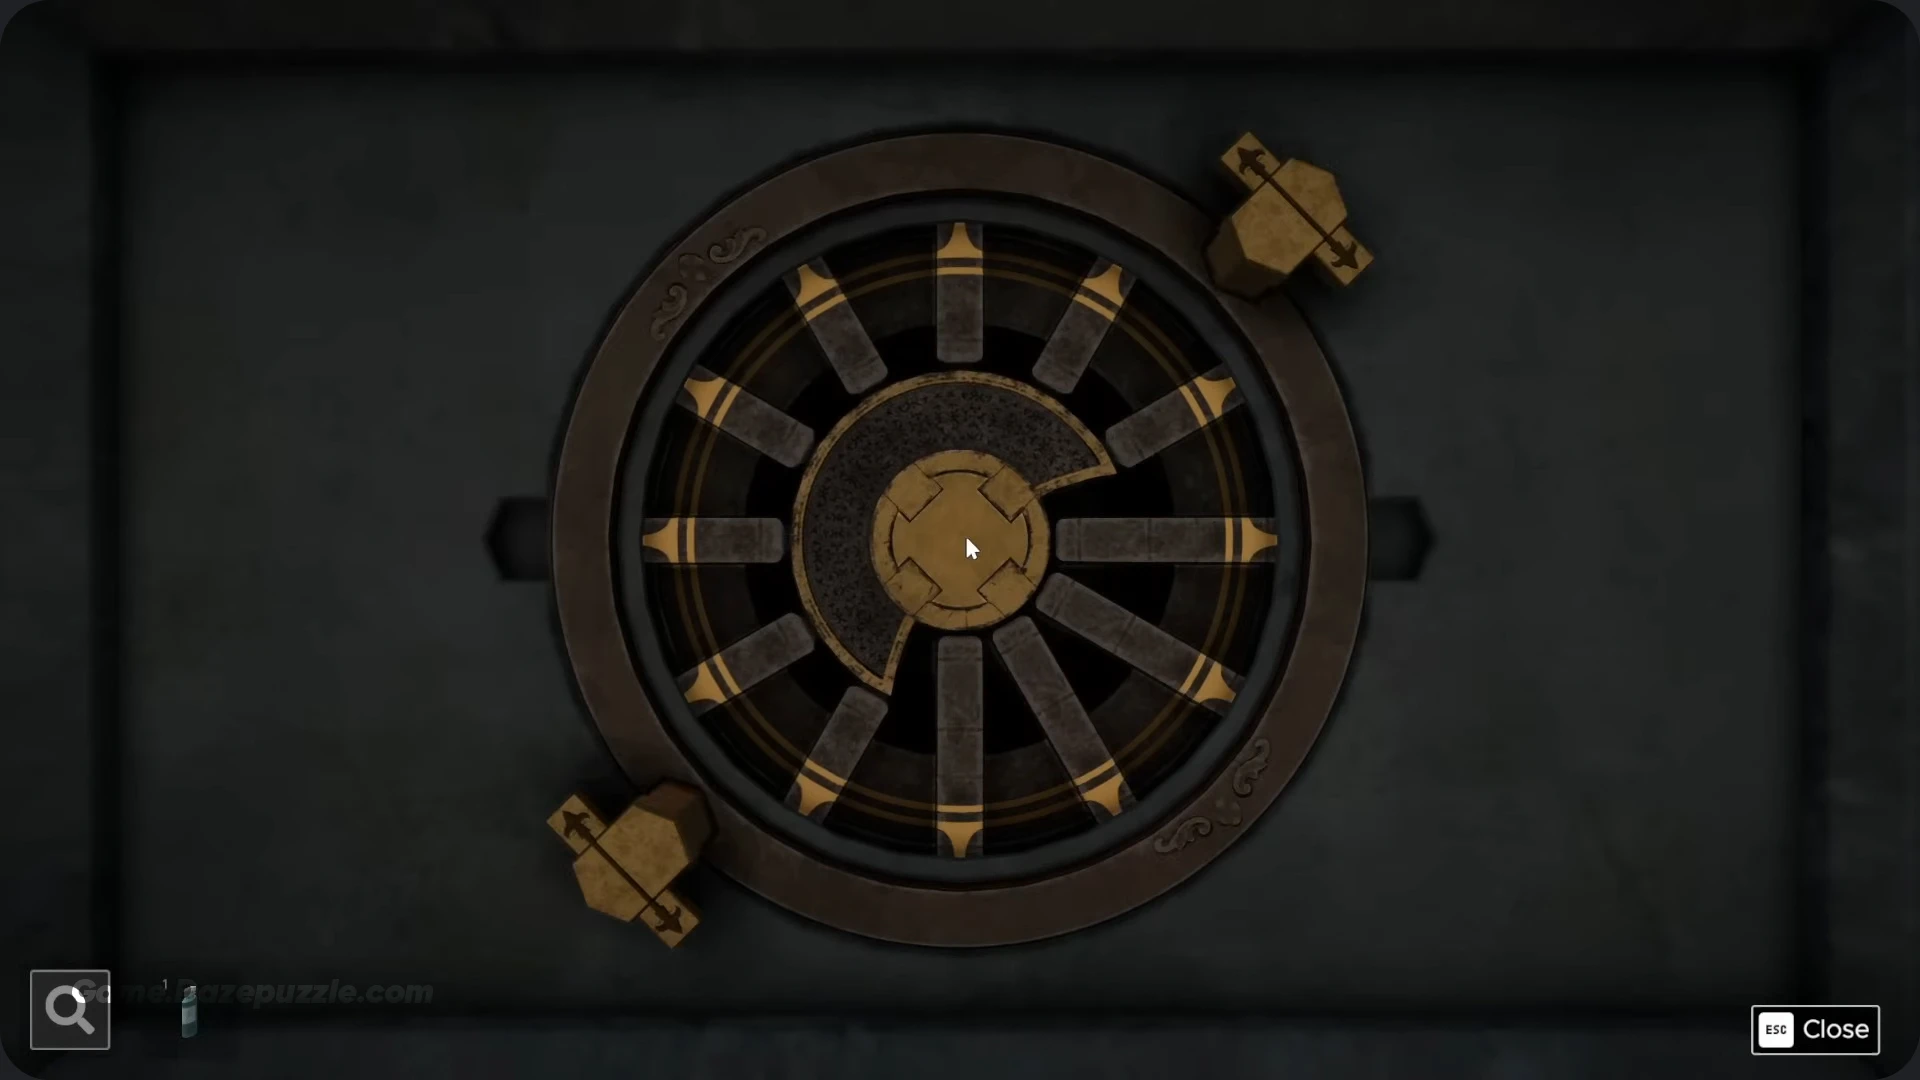
Now, go to the demon statue’s base and use the Mechanical Key with one wide prong. Do the same thing by rotating it to complete the circle, which opens another compartment revealing two Statuettes (one angel, one demon) for you to grab.
Sin and Salvation Puzzle
Now, head back to the main puzzle area. To the left of the demon carving wall, you’ll see a small green door. Use the Key you got from the angel statue to unlock and open it. Inside is a 3×3 grid on a table with a riddle carved at the bottom: “SISTER LOOKED AT THE GATES OF HELL, WHILE HER DARK BROTHER TO HER RIGHT REMAINED FOCUSED AT GATES OF HEAVEN.”
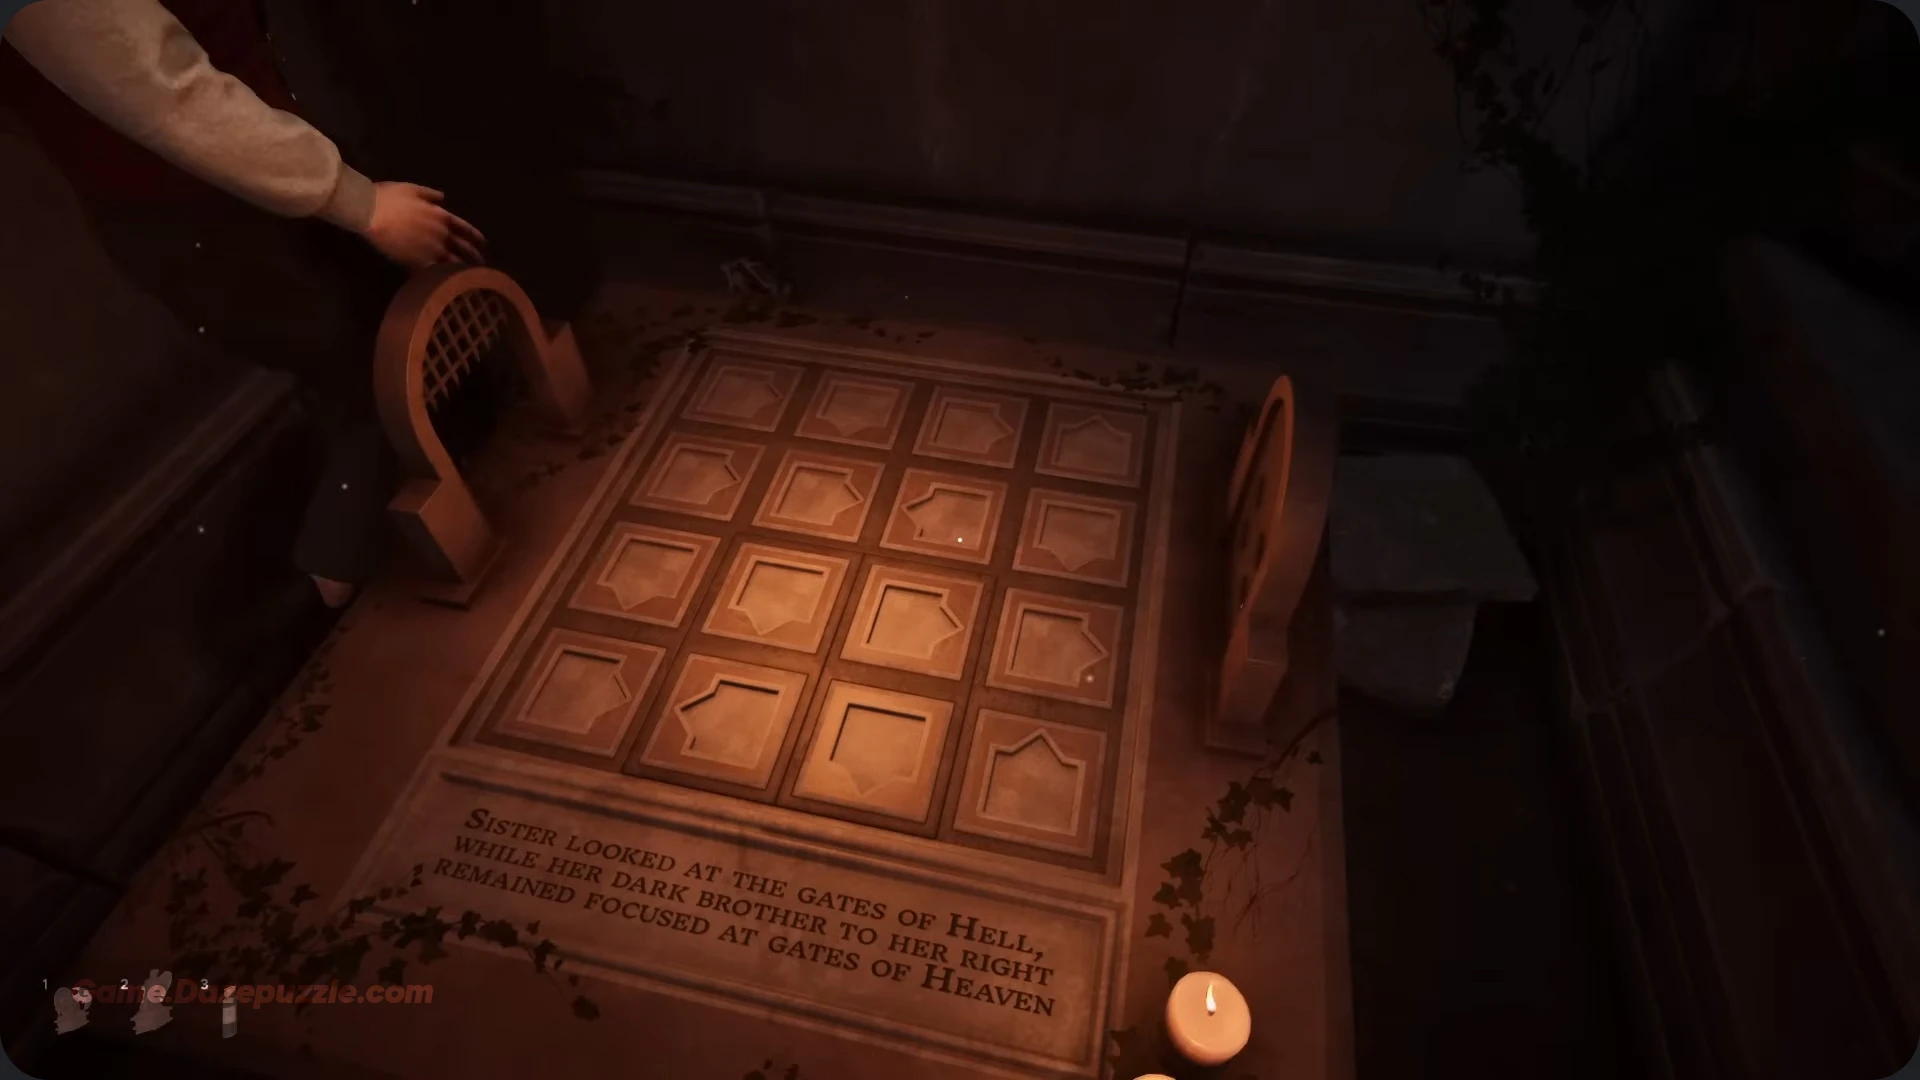
The “Sister” is your angel statuette and the “Dark Brother” is the demon. The “Gates of Hell” are the main exit door (with the demon carving above it), and the “Gates of Heaven” are the entrance gate (with the angel carving). The riddle is from the perspective of someone standing in the small room, so you need to place the Angel Statuette on the grid square that is “looking” at the main exit (Top row, center right column). Then, place the Demon Statuette to her right (from her perspective), “focused” on the entrance gate (Second from top row, center right column). When both are placed correctly, a secret compartment will open. Take your first Moon Key. This is a great first step in our Escape Simulator 2 Courtyard Walkthrough.
Gargoyles Gambit Puzzle
This one is a classic logic puzzle. Go to the wall carving with the three demons, located to the right of the small room you just opened. Each demon holds a plaque with a statement. Demon 1 (Left) says “EVERYONE IS TELLING THE TRUTH.” Demon 2 (Middle) says “THERE ARE TWO OR MORE LIARS.” Demon 3 (Right) says “I AM TELLING THE TRUTH.”
Let’s break this down: Demon 1 can’t be telling the truth, because if he were, Demon 2’s statement would be false, which contradicts Demon 1. So, Demon 1 is a Liar. Since he’s a liar, we know there is at least one. If Demon 3 is True, then Demon 2 must be False (meaning 0 or 1 liar). This gives us two liars (Demon 1 and Demon 2), which makes Demon 2’s statement… True. That’s a contradiction. Therefore, Demon 3 is also a Liar. With Demons 1 and 3 both being liars, that makes two liars, which means Demon 2’s statement is True.
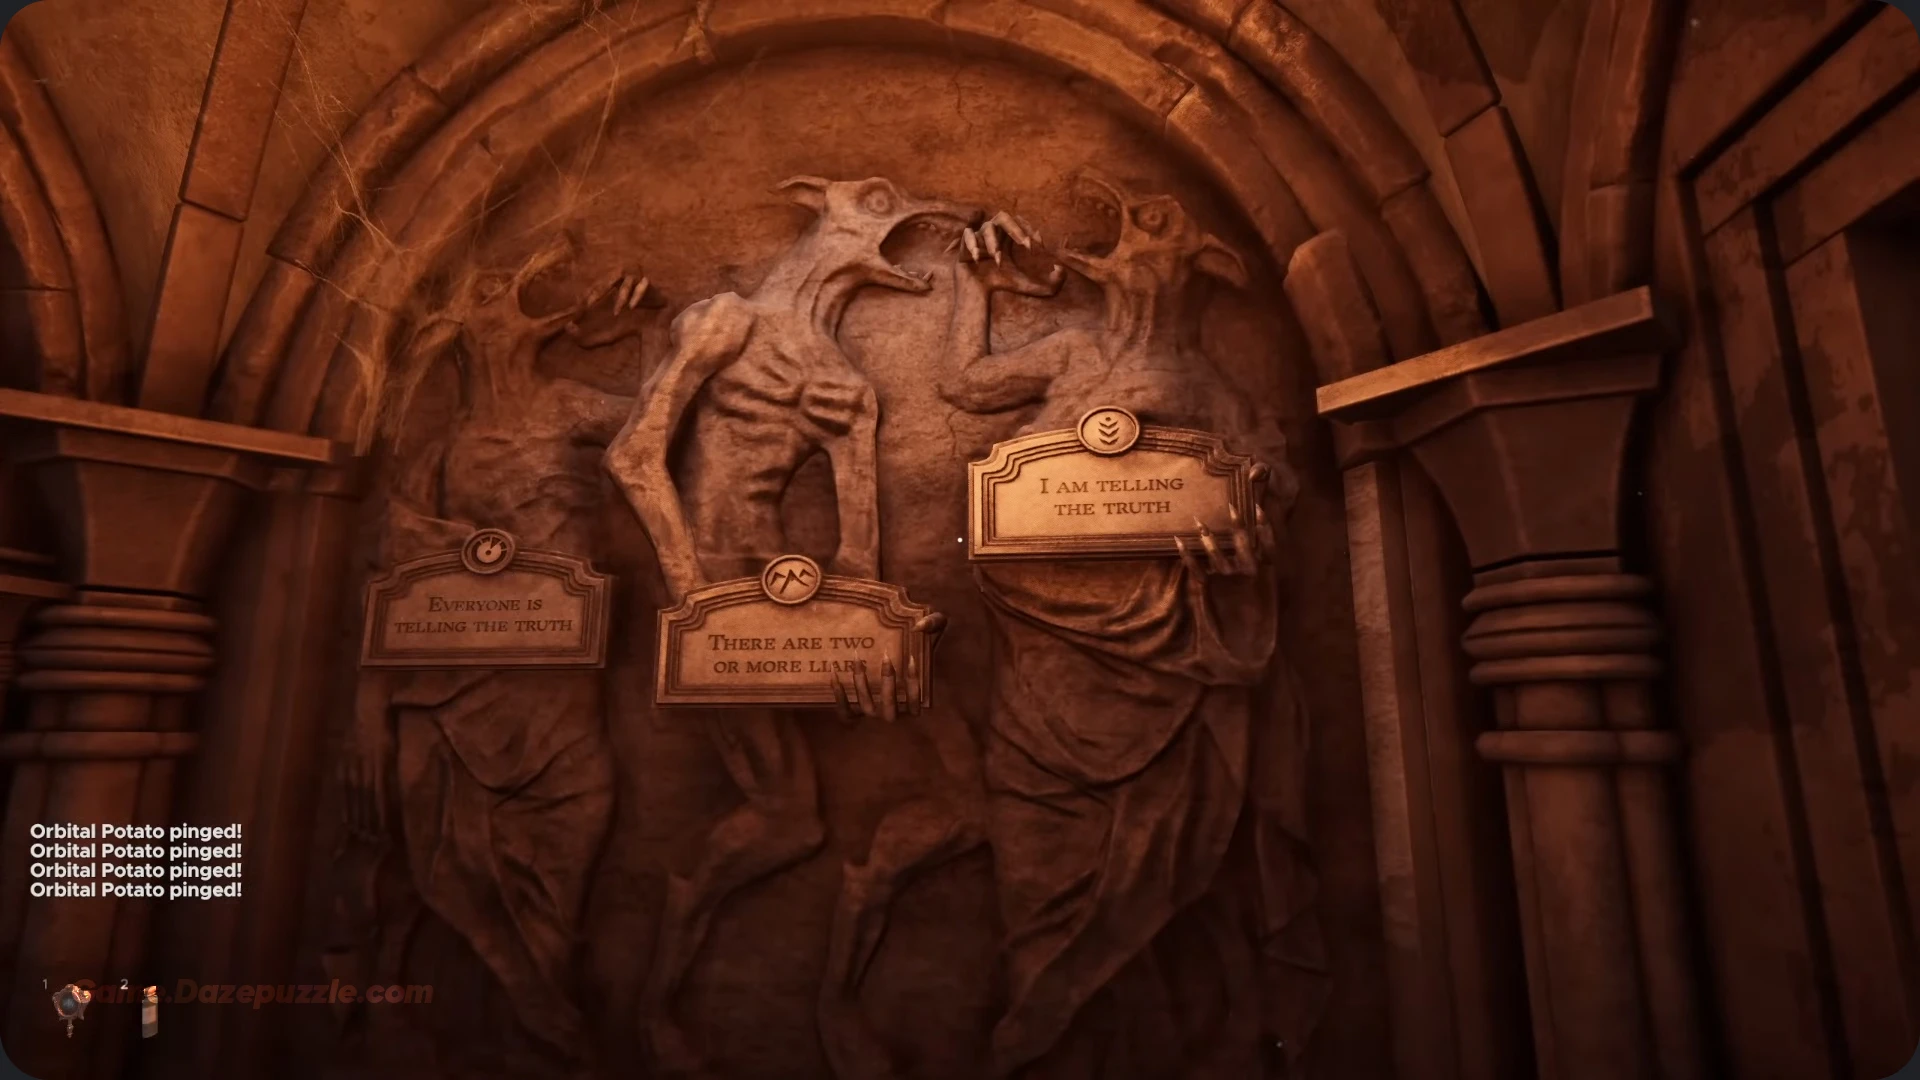
So, the solution is: Lie, Truth, Lie. Note the symbols on each plaque (Left: Swirl, Middle: Mountain, Right: Leaf). Now, go to the locked alcove to the left of the carving. The lock has the words “MENDACIUM” and “VERITAS”. Remember that Note you grabbed from the bulletin board? It tells you: Veritas = Truth, Mendacium = Lies. You need to input the sequence on the lock by matching the symbols from the wall: Swirl (Mendacium), Swirl (Mendacium), Mountain (Veritas), Leaf (Mendacium), Leaf (Mendacium), and Mountain (Veritas). The lock will open. Take your second Moon Key.
The Burning Message Puzzle
Find the other locked chest, the one sitting on the bench to the left of the alcove you just opened. There’s a Paper on top of it with a letter grid cypher and a clue: “Two fires dance in the grand tower. Listen to their message!” Look up at the “grand tower” (the big building with the main exit door) and you’ll see two lit windows at the top. Watch them flash, as their pattern corresponds to the rows and columns on your cypher. You’ll see the pattern flashes out four letters: H-E-L-P. Use this code HELP on the 4 letter padlock on the chest. It will open, letting you grab the Stake from inside.

The Wagon Escape Puzzle
Head over to the large carriage in the middle of the courtyard. Go to the window on the right side (the non door side) and click on it to wipe away the condensation. Inside, you’ll see a pattern on the curtain covering the opposite window. Memorize the positions of the five animal crests. Now, go around to the carriage door on the left side where you’ll see a lock with the same five crests.
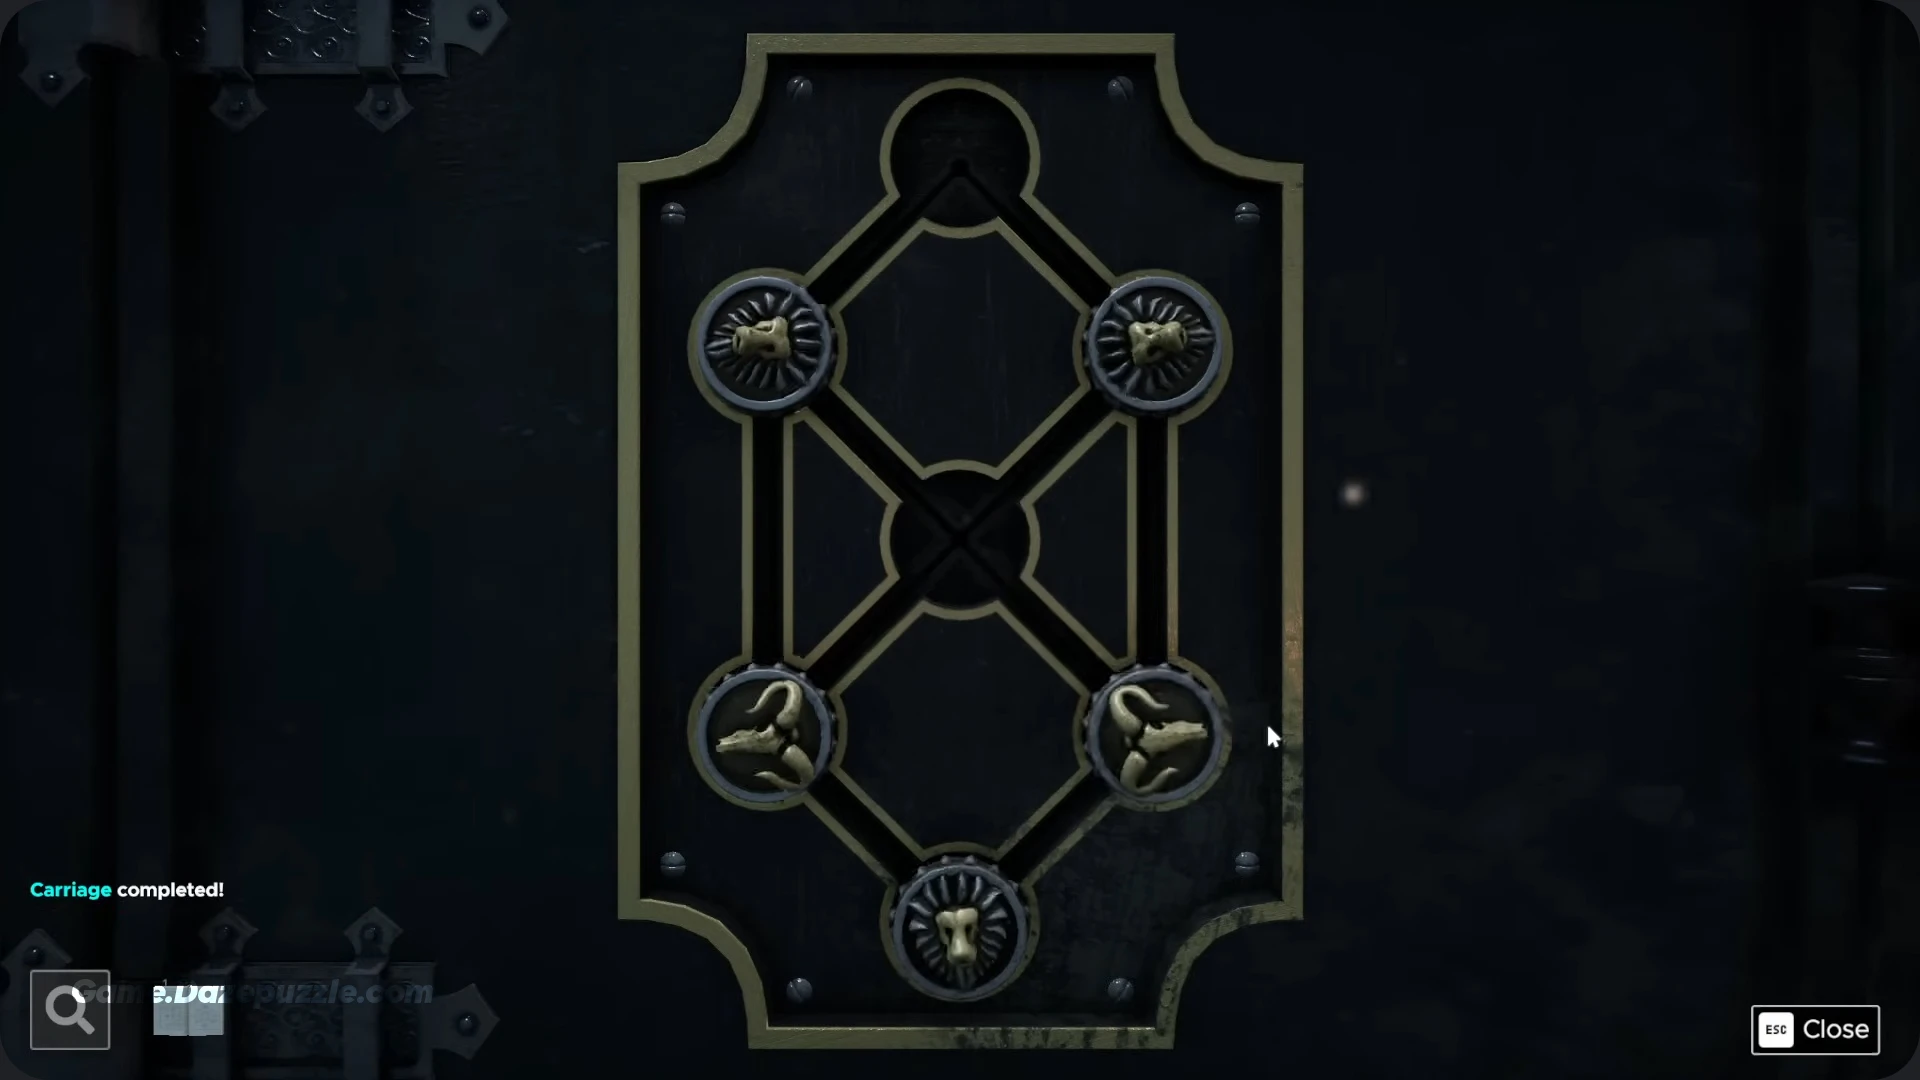
Slide them to match the pattern you saw: the Top Row has two Lions facing away from each other, the Middle Row has two Rams facing away from each other, and the Bottom has one Lion facing forward. The door will unlock. Open it and grab the Key and the Bottle from inside. While you’re here, look under the driver’s bench and grab the Leather Bag. Inspect the bag to find a Book (an English Latin Dictionary). This Escape Simulator 2 Courtyard Walkthrough is heating up now. We have a lot of items, and the next step is to use them.
The Workmans Secret Puzzle
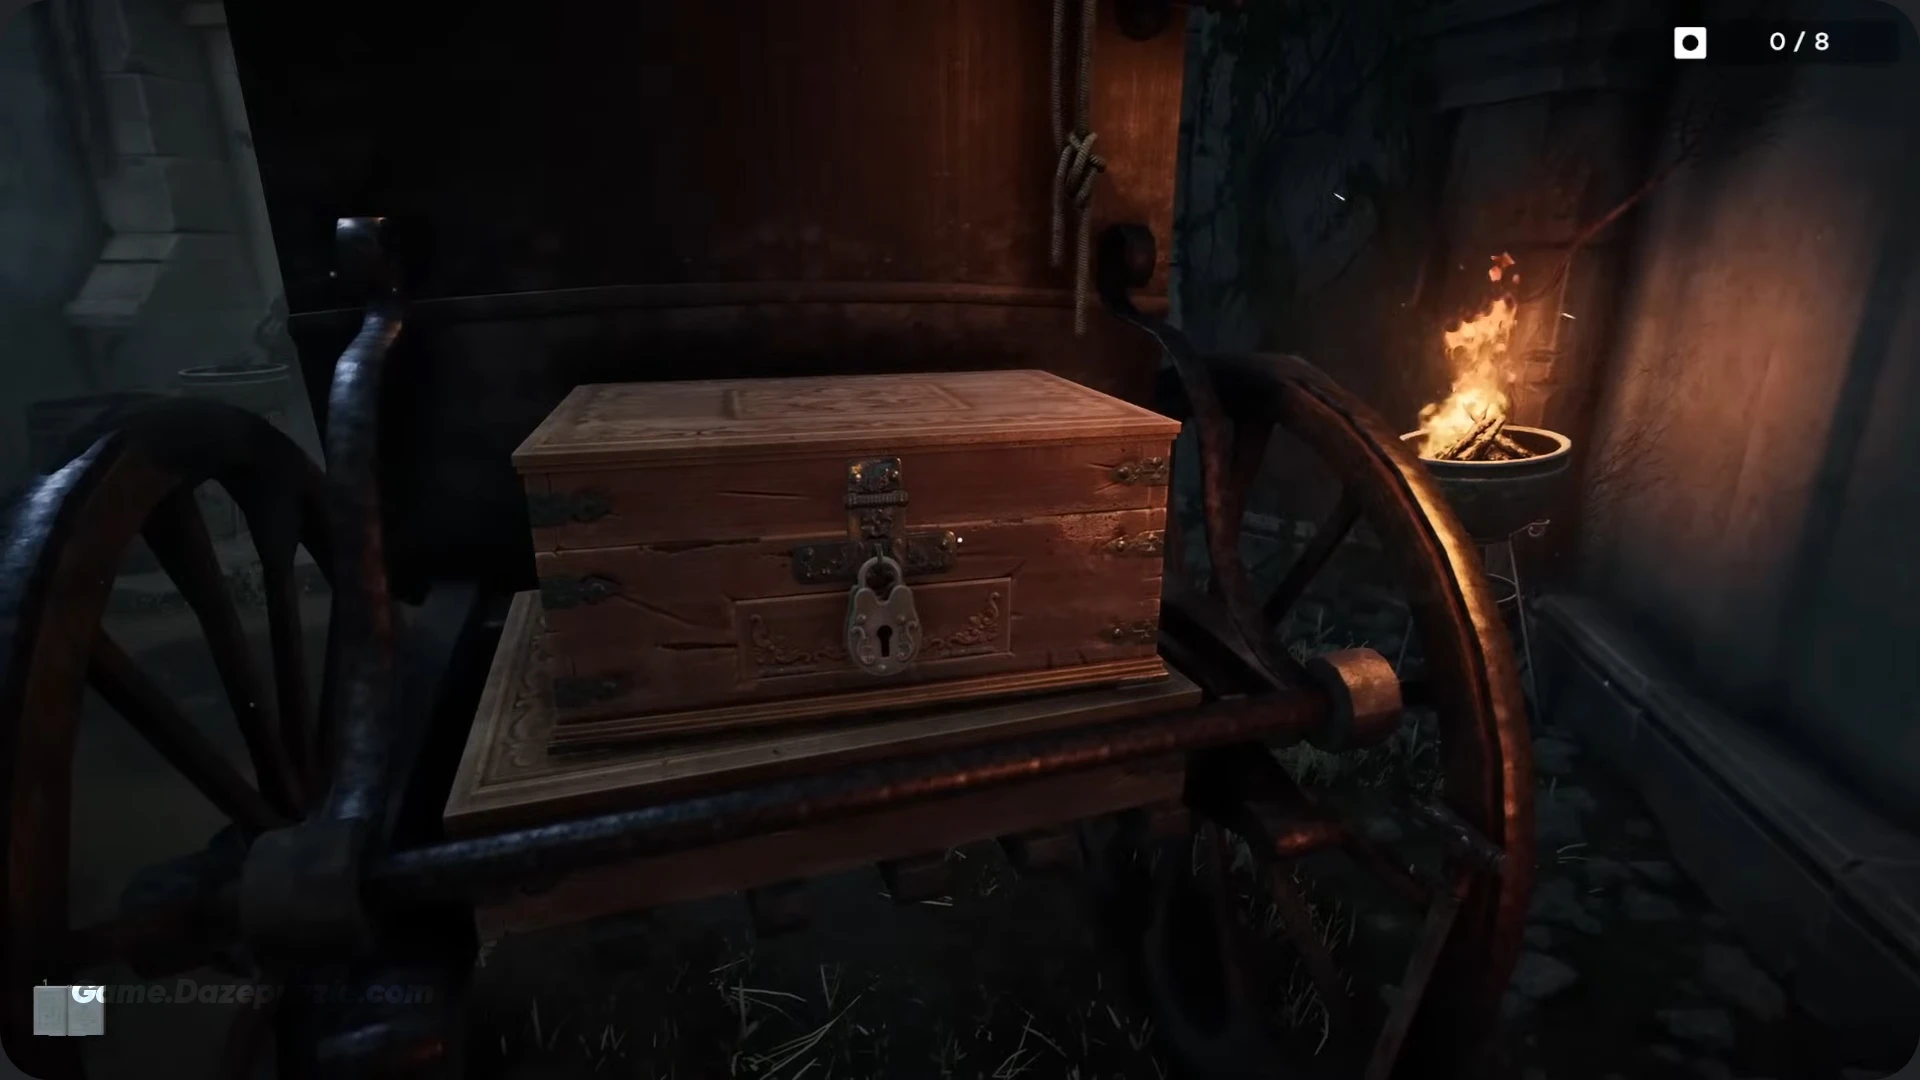
Go to the back of the carriage. You’ll find a large chest locked with a padlock. Use the Key you just got from inside the carriage to open this chest. Inside, you’ll see a red velvet inlay with three form fitting slots. Place the Hammer (from under the bulletin board), the Stake (from the HELP chest), and the Bottle (from the carriage) into their matching slots. A secret compartment will pop open at the bottom. Take the Mirror.
The Guiding Reflection Puzzle
This puzzle is clever. Inspect the Mirror from your inventory and click on it. Your view will change to a top down, bird’s eye perspective of the courtyard. Walk around while looking through the mirror to find four large, glowing sigils on the ground and objects that are invisible from your normal view. There’s one on top of the wagon, one in the corner by the bulletin board, one in the branches of the big tree, and one on the ground near the entrance to the small room.
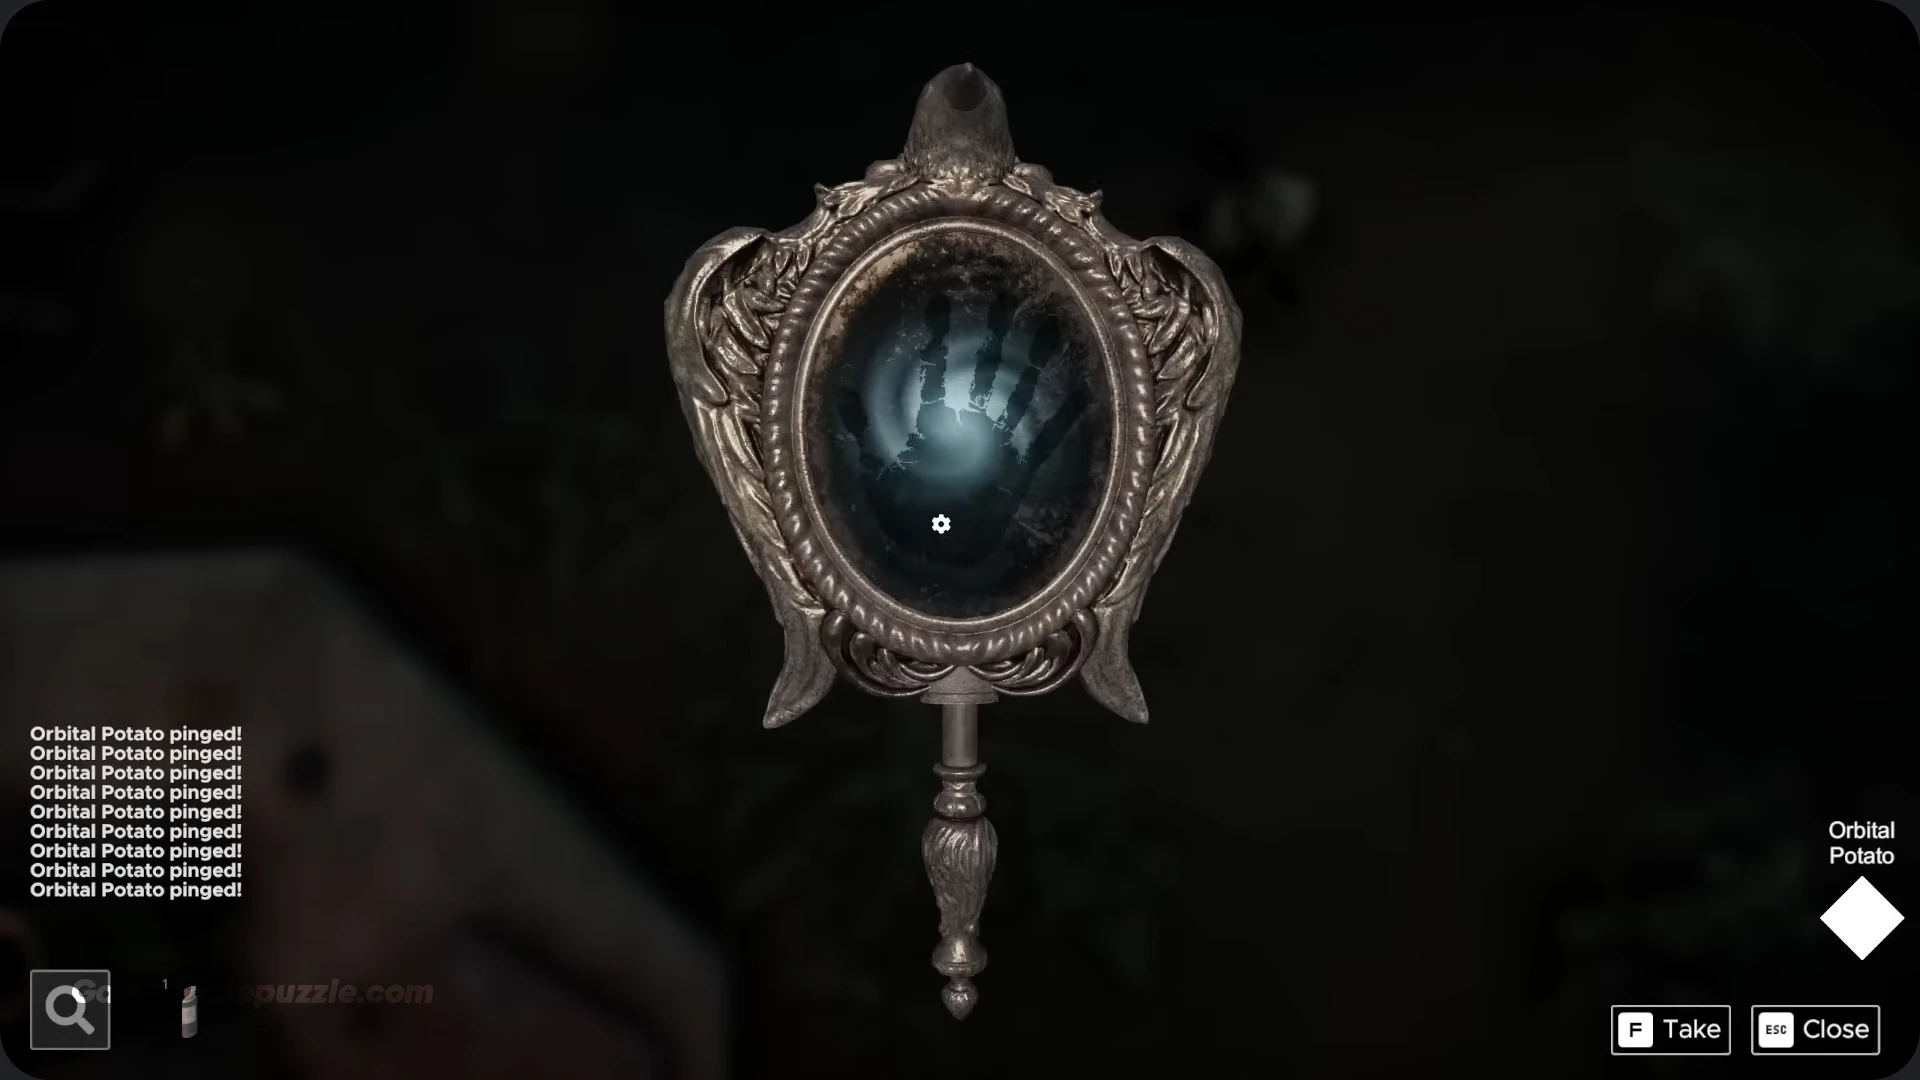
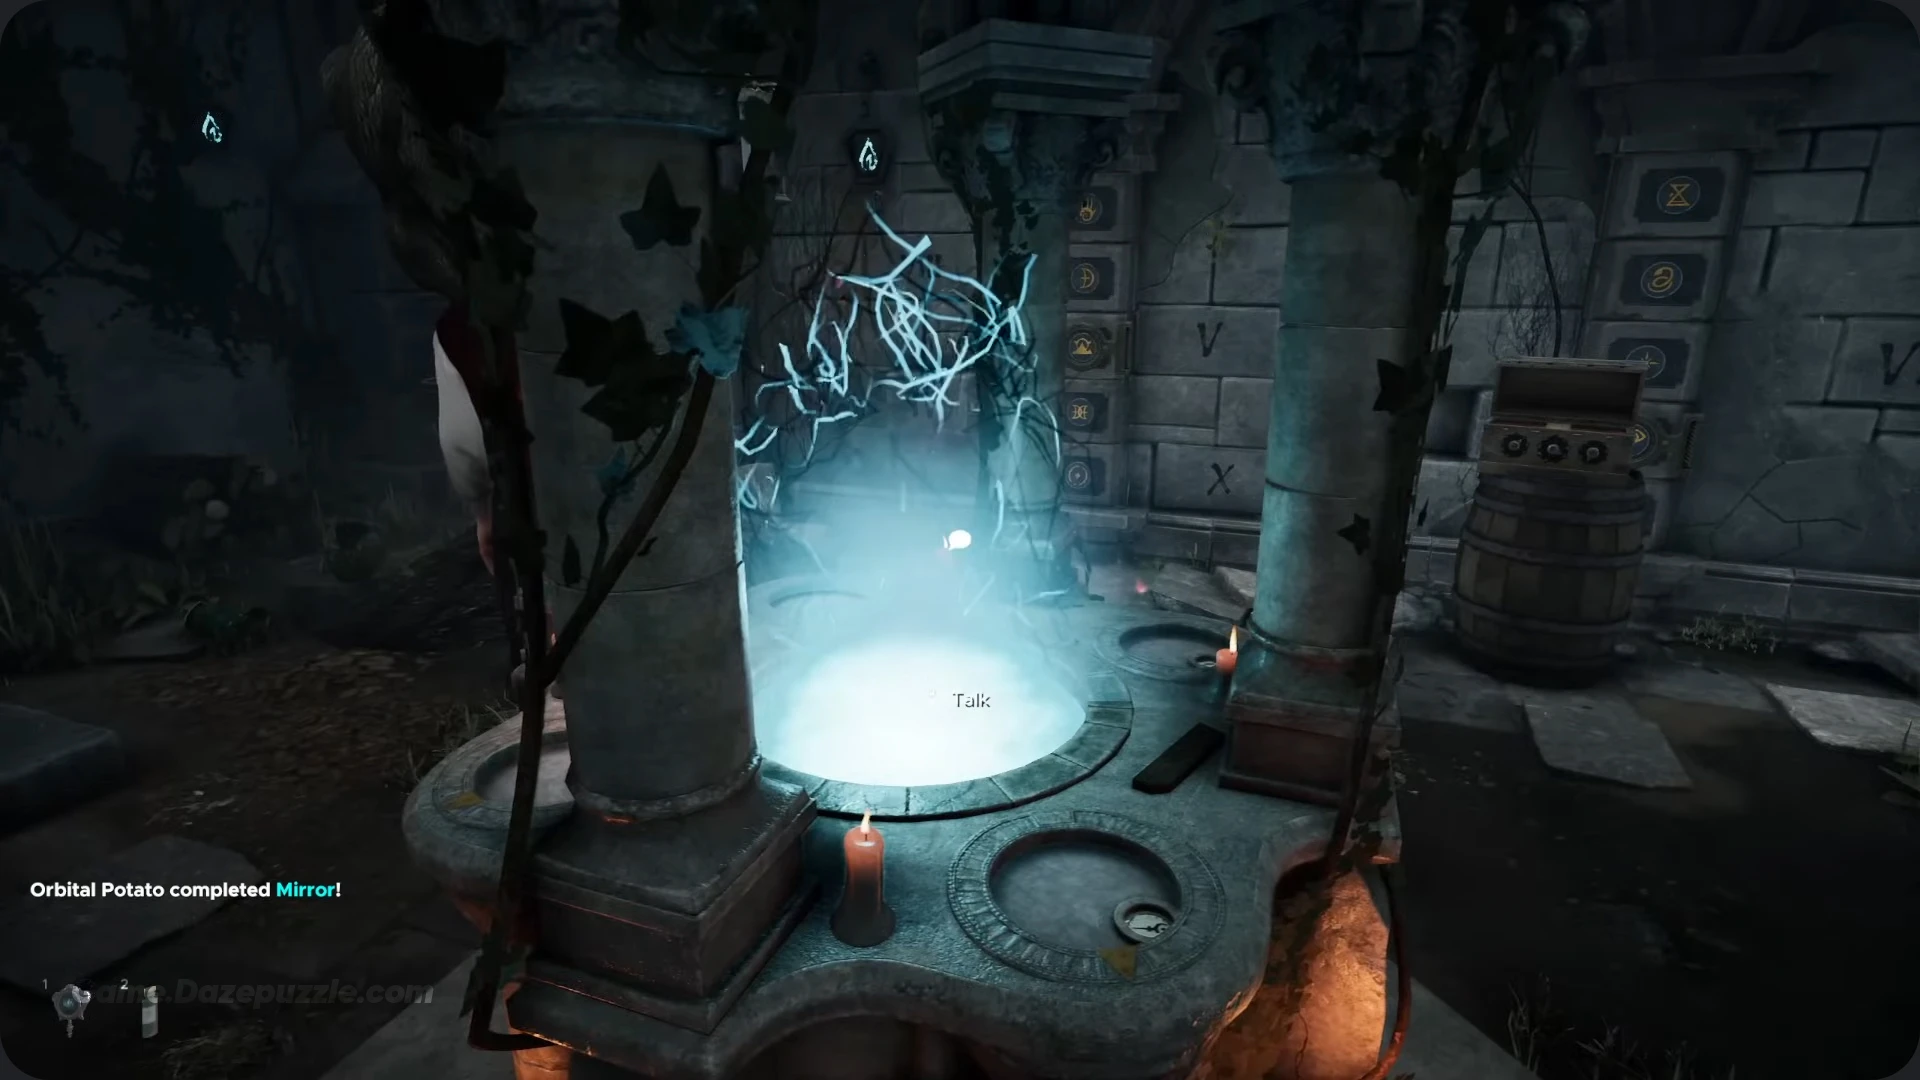
Now, go to the well in the center of the courtyard. You’ll see four circular mechanisms around its edge, each with a yellow arrow pointing in a general direction. You need to set each mechanism to the sigil you found in that direction. The arrow pointing to the wagon needs the “stick with half moon” sigil. The one pointing to the bulletin board gets the “spikey half circle” sigil. The one pointing to the tree needs the “two V’s” sigil. Finally, the one pointing to the small room gets the “swirls” sigil. When all four are correct, the well will activate with a bright blue light.
Echoes of Truth Puzzle
With the well active, interact with the blue light. A “Wisp” will appear and ask you four questions in Latin. Remember that Book we got from the leather bag? Open it. It’s your translation guide! The Wisp will ask the questions in a random order, but you’ll be able to find all the answers. Quid est post vitam? (What is after life?) is Mors (Death). Quid est maximum? (What is maximum/greatest?) is Sol (Sun). Quid est inimicus ignis? (What is the enemy of fire?) is Aqua (Water). And Ubi sunt falco? (Where are falcons?) is Caelum (Sky). Answer all four questions correctly, and the Wisp will reward you with your third Moon Key.
Infernal Alignment Puzzle
We’re on the home stretch. Remember that Paper you got from the bulletin board at the very beginning? The one with the picture of three lanterns? The clue reads: “In the shadowed depths of ancient graves rest the two robbers. They behold three ethereal blue lights…” Look at the big tree to see three lanterns with blue flames hanging from it, then look at the stone walls to see three carved blue flame icons.

The puzzle is to find the two “graves” (dig spots) where the robbers stood to “behold” the lights. You need to find the exact spots on the ground where the three hanging lanterns line up perfectly with the three carved icons on the wall. For Spot 1, stand near the bulletin board and face the tree, moving around until the lanterns align with the icons. Get your Shovel out and dig at that spot to unearth a Mechanical Key. For Spot 2, stand near the left side of the main exit door and face the tree, moving again until they align. Dig at this spot to unearth a locked Chest.
The Key Beneath Puzzle
You’ve got the final two pieces. Inspect the Mechanical Key you just dug up and you’ll see a small lever on it. Click the lever to extend the key’s prongs. Now, use this activated Mechanical Key on the Chest you just dug up. Twist the key, and the chest will open. Inside is your fourth and final Moon Key. You now have all the major Escape Simulator 2 Courtyard puzzle pieces for this Escape Simulator 2 Courtyard Walkthrough puzzles.
Escape Simulator 2 Courtyard Tokens Locations
Running through the level again for that 100% completion? Here’s a quick hitter list for all 8 hidden Escape Simulator 2 Courtyard tokens.
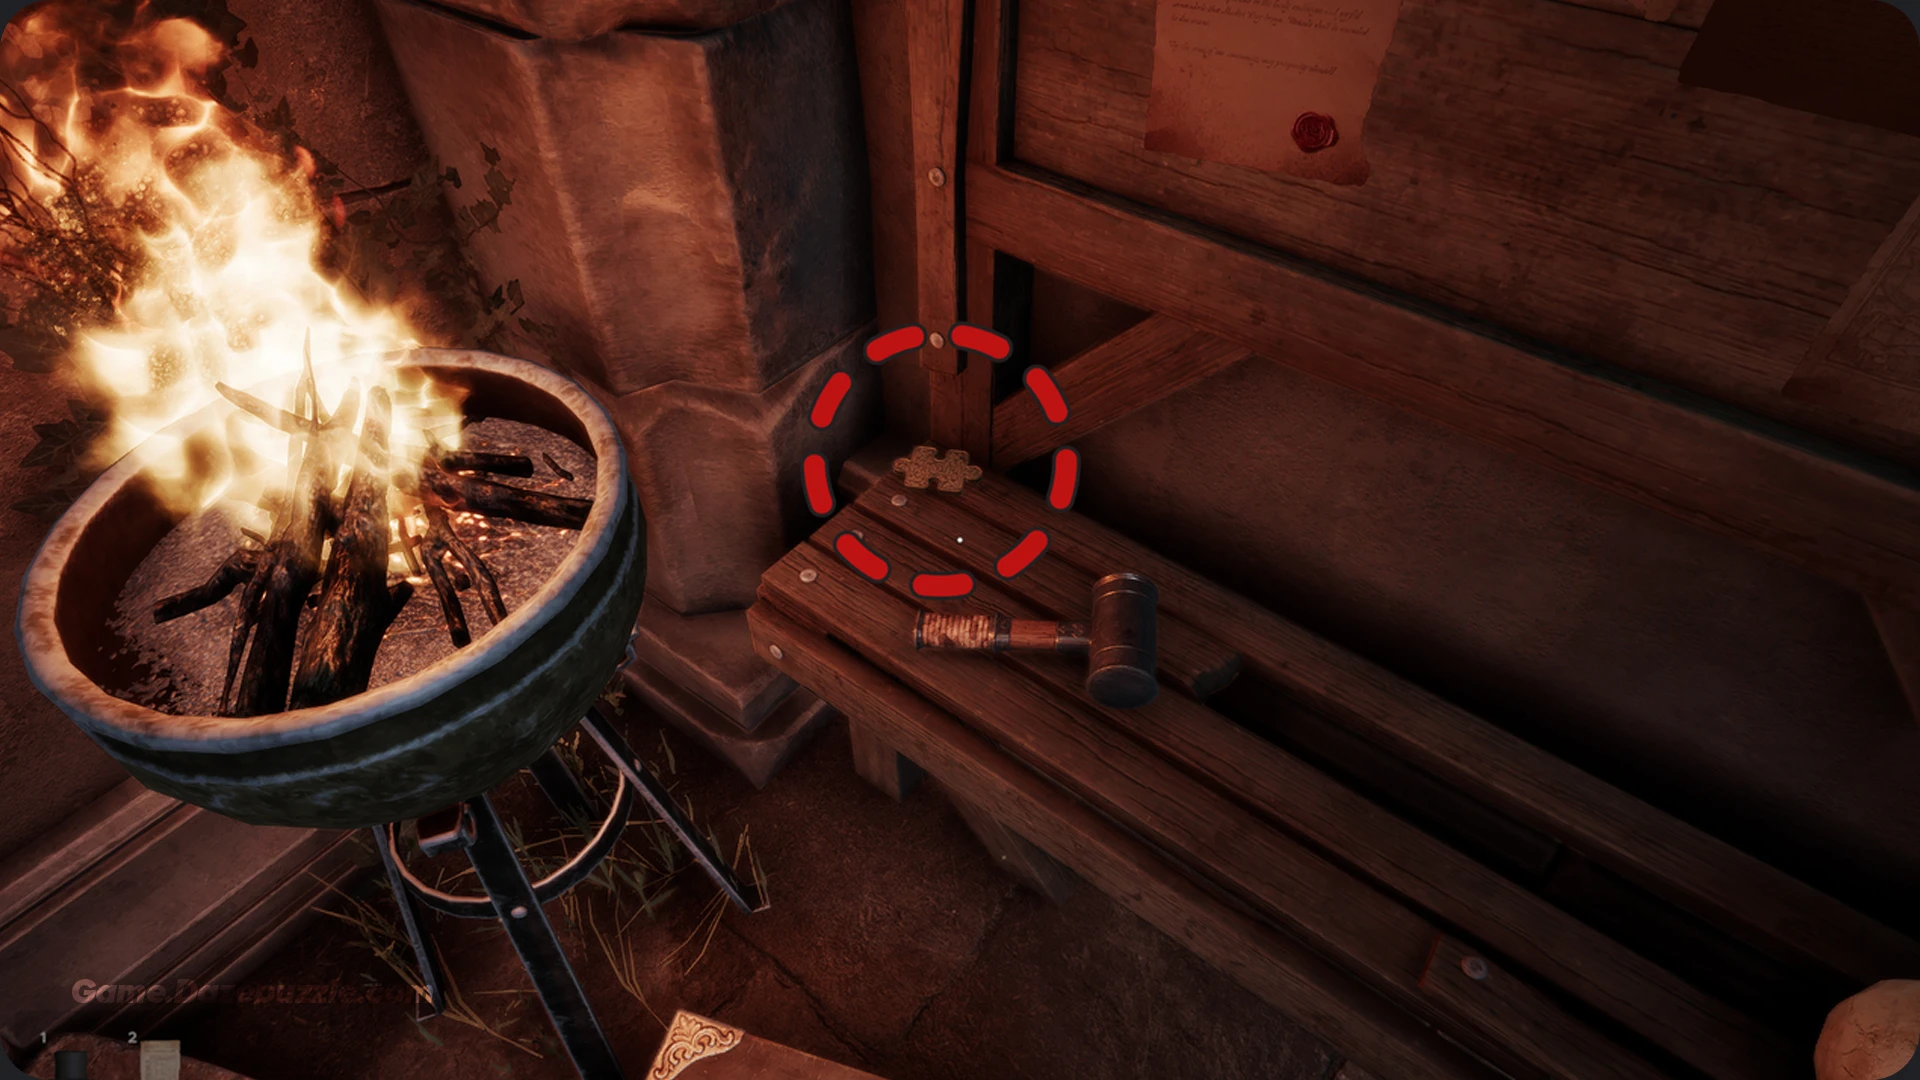
Courtyard Token 1
On the bench, right underneath the bulletin board where you start.
Courtyard Token 2
Hidden in the pile of leaves at the base of the large, spooky tree.

Courtyard Token 3
Look at the angel statue near the entrance gate. The token is in her outstretched hand.

Courtyard Token 4
Go to the wall with the three demon carvings (the logic puzzle). Look at the loose tiles on the floor right below it and you’ll find the token.

Courtyard Token 5
By the wagon, there is a small fire in a brazier. The token is sitting right in the flames.

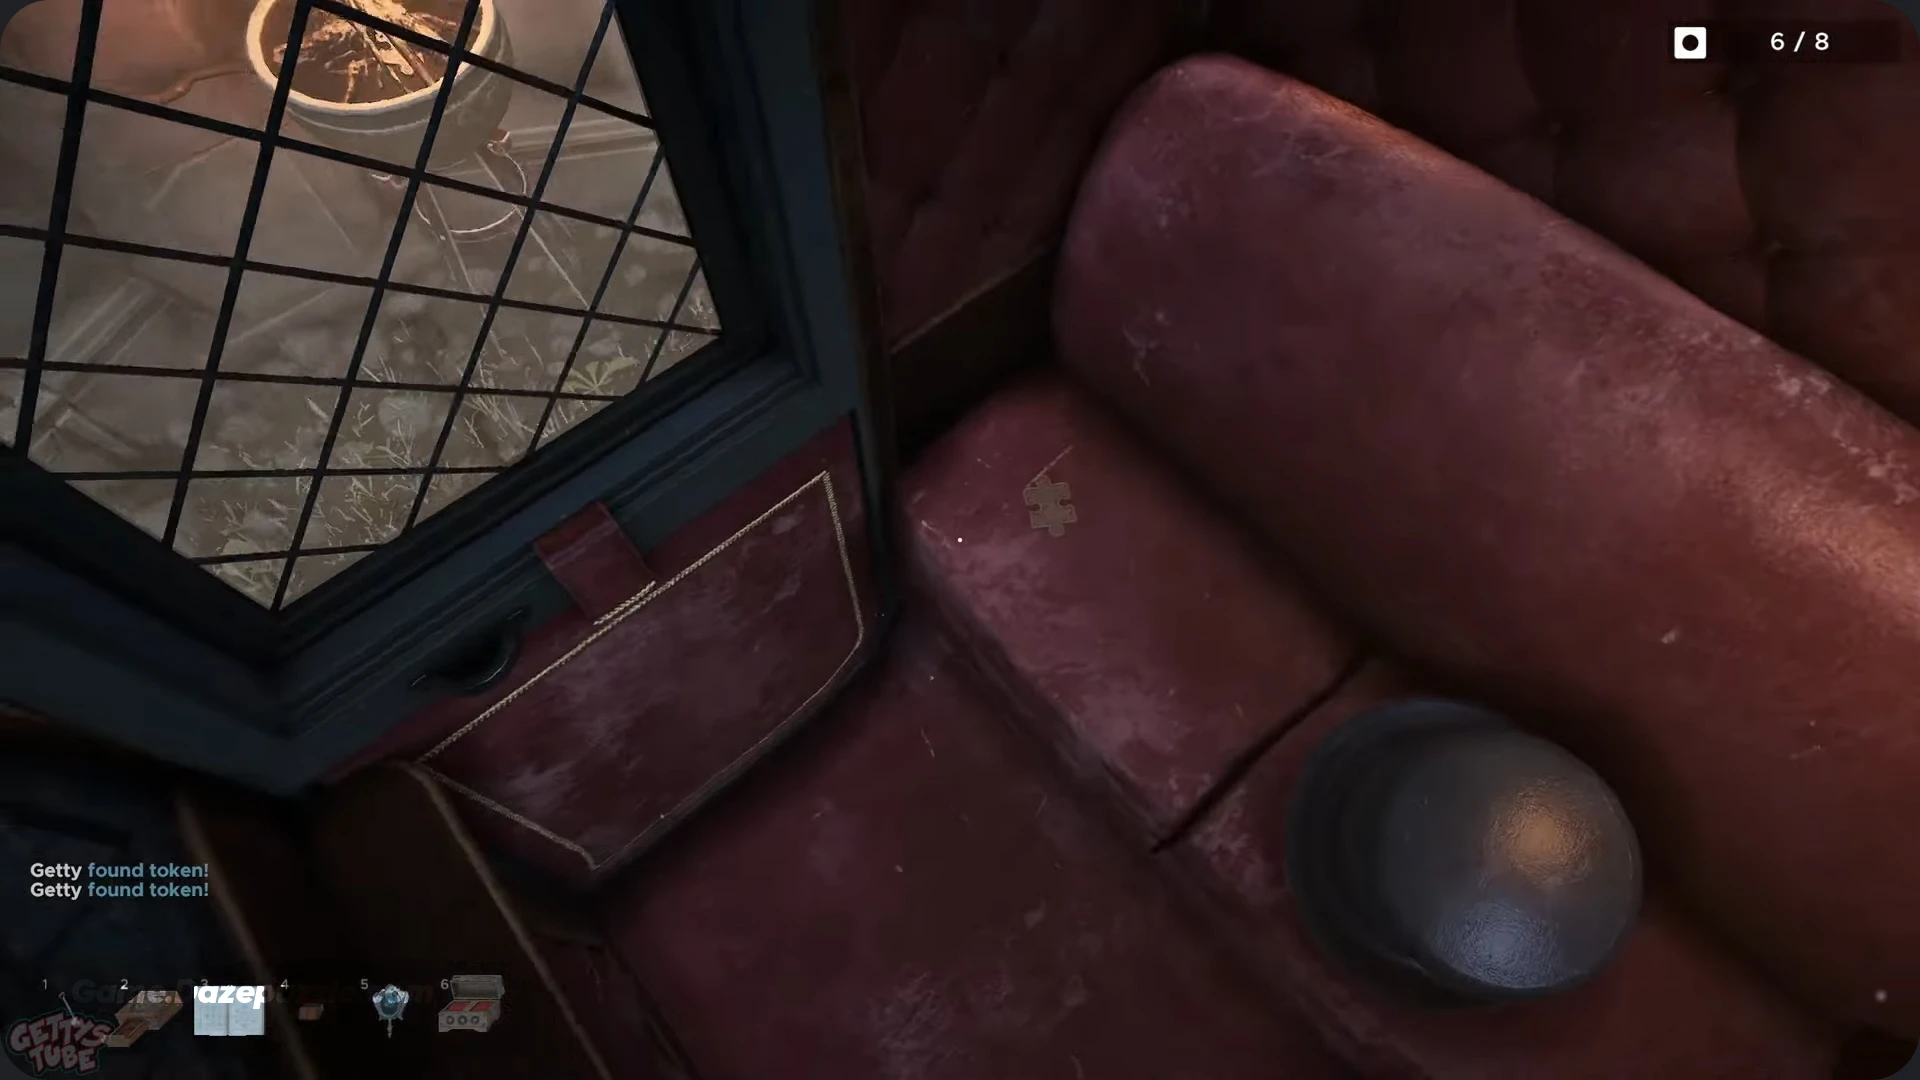
Courtyard Token 6
In the small, square grate on the window of the room you opened for the Sin and Salvation puzzle.

Courtyard Token 7
On the wall to the right of the main exit door. It’s a bit high up but easy to spot once you look.

Courtyard Token 8
This one is inside the Skull you can find inside the main carriage, after solving the Wagon Escape puzzle.
Escape Simulator 2 Courtyard Darkest Puzzle
Some of these puzzles are definitely trickier than others. If you’re scratching your head even with the solution, here’s a little more detail on the ones that trip players up the most.
Untangling the Gargoyles Gambit
The logic of the three demons can be a headache. The key is to use contradictions. Demon 1 (“Everyone is telling the truth”) must be a liar, because if he was telling the truth, Demon 2 (“Two or more liars”) would also be true, but his statement would be false (zero liars). This is a paradox. Once you know Demon 1 is a liar, you can test the other two. The only configuration that works without a paradox is Lie, Truth, Lie.
Nailing the Infernal Alignment
This puzzle is all about player perspective. You aren’t moving the lanterns. You are moving yourself until the hanging lanterns visually line up with the static icons on the wall. It’s like lining up a shot in a video game. Walk back and forth slowly in the two zones (near the bulletin board and near the exit door) until all three lights “slot” into place visually. Then, dig right where you are standing.
Decoding the Echoes of Truth
This puzzle is only hard if you miss the Latin to English dictionary. The book is inside the Leather Bag found under the driver’s seat of the carriage. Without it, you’re just guessing. With it, it’s a simple matching game: ignis (fire) maps to Aqua (water), falco (falcon) maps to Caelum (sky), maximum (greatest) maps to Sol (sun), and vitam (life) maps to Mors (death).
Escape Simulator 2 Courtyard Solution
You’ve done it. You’ve solved every puzzle, braved the spooky atmosphere, and collected all the key items. All that’s left is to get out.
Gathering the Four Moon Keys
You should now have all four Moon Keys in your inventory. As a final check, you got them from the Sin and Salvation grid puzzle, the Gargoyles Gambit logic puzzle lock, the Echoes of Truth well quiz, and The Key Beneath dug up chest.
The Crimson Halves Puzzle
This is it. The grand finale. Walk up to the massive main exit door where you will see four circular keyholes. Place your four Moon Keys into the holes. Here’s the cool part: if you put a key in the wrong slot, it’ll go all the way in and its “moon” emblem will be pointing in the direction of the correct slot. Just swap the keys around until all four are slotted in correctly and facing outward. The locks will disengage, the giant door will grind open, and you can step out of the courtyard, having completed this epic Escape Simulator 2 Courtyard Walkthrough.
Thanks for Staying with Game.Dazepuzzle